Quantcast
Channel: Jalie Patterns' Blog
Viewing all 110 articles
Browse latest View live

Swimsuit with Removable Swim Cups // FREE Extra for the Diane pattern

$
0
0
In today's post, we have a little freebie for you!

As you may know, the original DIANE one-piece swimsuit was designed with sewn-in swim cups. It makes the swimsuit very comfortable, with no "moving parts". That being said, the process can be a little intimidating for some and it requires buying a new pair of foam cups for each suit.

In order to provide an option for those who prefer removable cups, we decided to create a new front pocket piece that allows you to insert foam cups between the lining and outer fabric.

CLICK HERE to download the new, free, pocket piece. The PDF file includes the pieces and the instructions to attach it to the original one-piece front of the DIANE and is drafted for sizes P to FF (teens, adults and plus size).


If it is your first time working with a PDF pattern piece, take a look at our HOW TO PRINT A PDF guide.

You can "borrow" swim cups from another suit or buy new ones in fabrics stores and online. There are plenty on Amazon and Etsy, in different shapes, thicknesses, colors and materials.

Looking for swimsuit inspiration for you or your little ones? Go take a look at the beautiful customers' creations photos on the pattern page.


NEW ADD-ON RELEASE!

Did you know that we also recently launched a variation pack that includes 3 new designs for the Diane? Same back, three new fronts!


Tie-fronts (with or without opening) and a surplice neckline. The new designs work with the back of the Diane, a keyhole back that stays put when you are in the water!

The Diane and its front variations come in 27 sizes. This means you have all sizes, from toddlers to plus sizes, included in one envelope. No need to pick a size at checkout - you get them all!


Happy sewing!


Different Fabrics, Different Tops & Dresses

$
0
0
It's not always easy picking a fabric for a sewing project. Sometimes we love the print but have doubts on the weight and drape. The fabric you choose can make a big difference in the final result, especially where there is ease, ruffles, or gathers involved.

To help you better visualize how various fabrics look, we made a few versions of the Michelle dress and Adele tops. This way, you can see how the choice affects the fit and style on both garments.

ADÈLE TOP

For the ADÈLE Top / Tunic, the type of fabric you choose will decide on how your shoulder ruffle looks. Some people like a subtle, "waterfall" look, others prefer a statement ruffle that emphasize the shoulders. The top can be made in a knit too, but the garment becomes a bit more challenging to sew.


From left to right:
See how the ruffle falls flat in the knit, stays horizontal in the cotton and "in-between" in the crepe? The pattern works with all three fabrics. In prototyping and on the pattern cover, we used crepe for the adult, cotton for the child. The ruffle being two layers of fabric, fold your fabric when you buy it to have an idea of how thick the ruffle will be.

MICHELLE DRESS

The Michelle dress is roomy, with a gathered skirt. If you want the fabric to stay closer to your body, you will need to go with something soft and flow like rayon challis.


From left to right:

See how the bottom of the armhole looks different and how the shape of the skirt changes. If you like the structure of a heavier fabric but don't want the skirt to look too big, you can make it a bit narrower, which will remove volume around the body and reduce the gathers at the seam, making it a bit less bulky.

Have fun, experiment with fabrics, and share your creations on our website and on Instagram #jalielife #jalieadele #jaliemichelle !


PIKA Dress Hack // Step-by-Step Tutorial

$
0
0
The Pika top has been around for two years and people have made it as a sports bra, flowy tank, blouson tank, all versions included in the pattern. One of the most popular hacks we have seen was a dress hack. It is very easy to do and it makes a great dress for girls and women. Here is how you lengthen the pika tank into a dress:

A Pika top prototype, in kids size, as a blouson tank (the hip band is folded under on the photo)

DETERMINE LENGTH

For our Size L (8) dress, we decided to go with a 10'' (25 cm) extension. It is not easy locating exactly where the pattern will sit on the body so we left some room under the arm and measured from the bottom edge of the piece to where we wanted to hit (just above the knee).


MODIFY THE PATTERN

Add length to the tank back piece (E), measuring at center front and keeping it straight. Then, prolong the side seam line in the same angle as the original pattern and the bottom aligned with the center back. 


For the front tank piece (D), you will need to add at the side seam and at the bottom. Tape your paper so you have room to trace:


Using your back piece as a guide, trace the new side and bottom edges on piece D, making sure the center back edge is parallel to the center front edge:


Cut your paper along the lines. You are ready to cut your fabric and sew it, following the sewing instructions for view A (without hem band):

TANK CONSTRUCTION

Folding the curves of the front and back tank armholes to the wrong side and topstitch:


On the front, sew two rows of gathering stitches along the top (one inside the seam allowance, one outside):


Pin front to back at side seams and stitch:


BRA CONSTRUCTION

Pin bra front to bra back at side seams and stitch. Repeat for the lining (inner fabric)


Turn right side out and mark the center front on the tank and bra with a pin:


Pull threads to gather the top edge of the tank and pin its wrong side to the right side of the bra, matching notches and centers:


Baste and then pin the right side of the straps (outer fabric) to the right side of the curved edge (bra+tank front), from one bra corner to the other. Make sure to match notches and centers, and stitch:


Pin strap lining (inner fabric) to right side of bra front lining / inner fabric and stitch:


Bring the seam allowances towards the bottom (press if your fabric can handle some heat):


Pin strap inner fabric and outer fabric right sides together at the neckline, matching notches, and stitch:


Apply elastic to the seam allowance, with a zigzag stitch. Make sure your zigzag stays within the seam allowance (6 mm (1/4'') from edge):


Pin wrong side of the tank back upper edge to the right side back of the bra (OUTER LAYER ONLY), matching the double notches, and baste:


Pin bra straps over the tank back, matching the double notches again and baste with a zigzag. DON'T CATCH THE INNER LAYER OF THE BACK YET!


Turn inside out so that the straps are sandwiched between the bra layers and stitch across the back:


Now that all layers are held together in the back, it's time to join the front layers together at the seam. The illustration can be a bit confusing so we did a little video:


After you pin at the notches and stitch, the layers won't move or slip:


All that is left to do now is to apply elastic at the bottom of the bra (turned and topstitched) and hem the bottom edge of the tank:


We would like to thank Club Tissu for the fabric used in this tutorial. You can find their double brushed poly collection on their website. For the bra, we used an athletic knit that was not brushed so it would not cling to the outer layer.

Happy sewing!

If you have made the Pika, don't forget to share photos on our website or Instagram #jaliepika #jalielife 

ELIANE Scrub Top // Tips, Tricks and Coupon Code

$
0
0
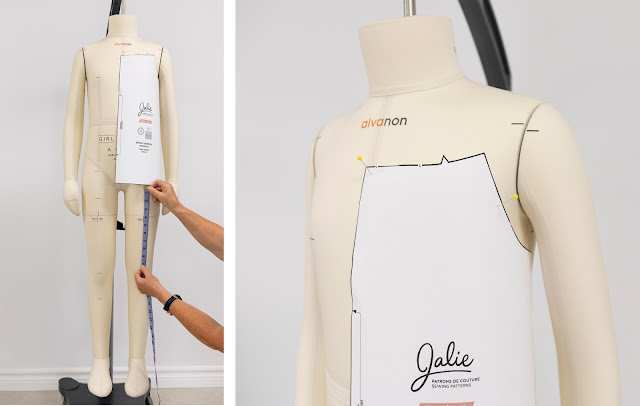
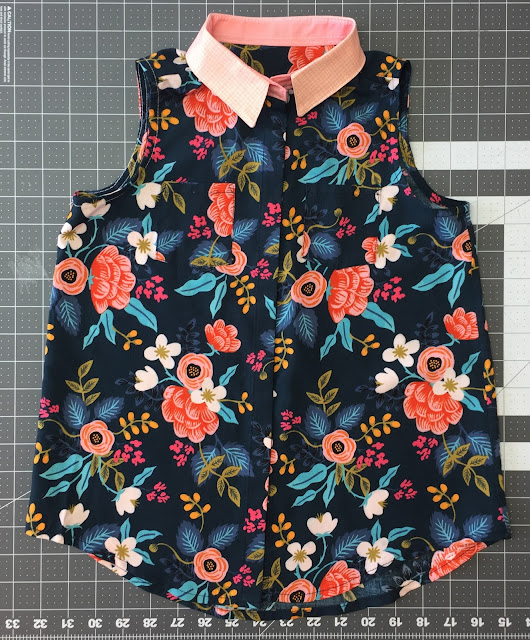
During this crisis where healthcare workers are holding the fort and working hard to keep everyone safe, we thought of highlighting a pattern designed especially for them: the Eliane scrub top pattern.

** For the francophiles out there: How to pronounce Éliane (the nurse who inspired the pattern)**


If you know someone who needs to wear scrubs for work, now is the perfect moment to spend time making a scrub top for them!

This weekend only (March 28-29, 2020)
NO COUPON NEEDED // How way to help and say thanks :)


We also put together this tutorial to walk you through all the steps. This way, even people with little sewing experience will be able to make a scrub top!

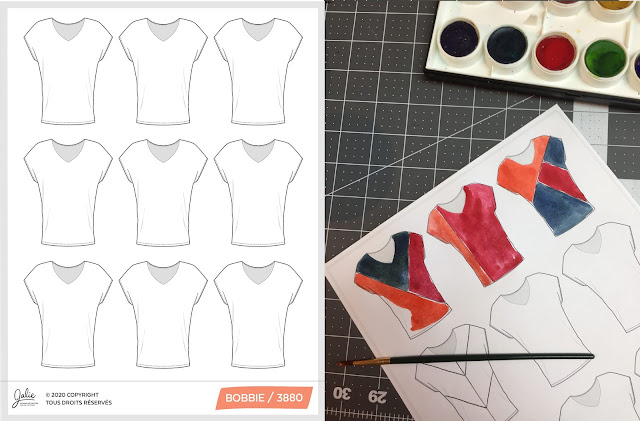
Our scrub top pattern was designed in collaboration with nurses to ensure that it would be practical but also flattering. The princess seaming, facings, and pockets allow you to have fun with color blocking but also use fabric you have left in your stash.

This post will not cover detailed information about sizing or fabric. We will focus on more "critical" ones or areas where you could hesitate or scratch your head. It is not a difficult pattern, but because of the number of pieces, you do need to you take your time and pay attention.
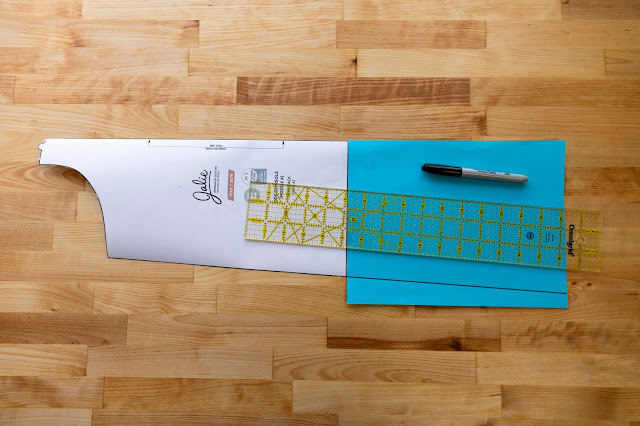
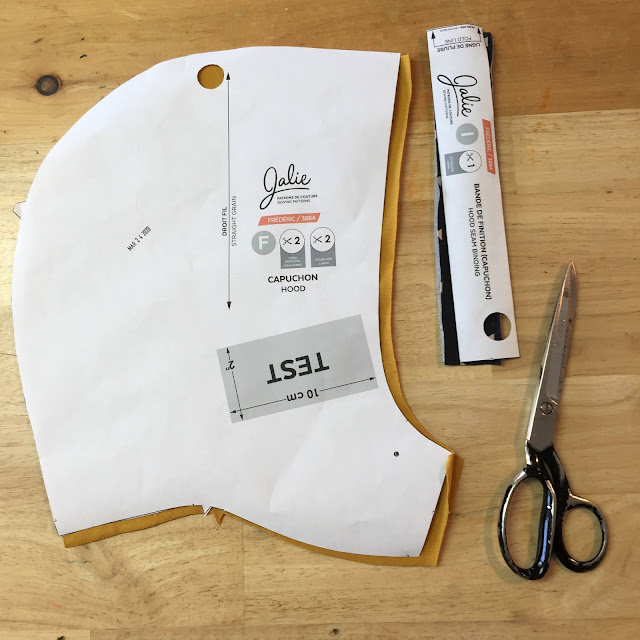
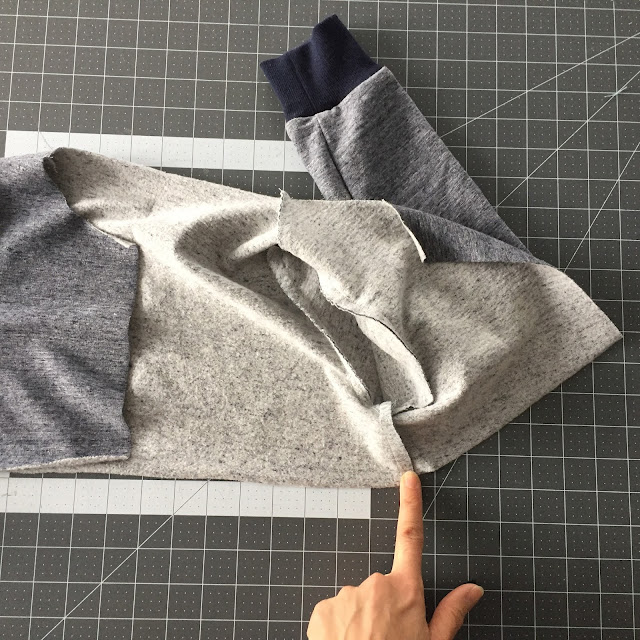
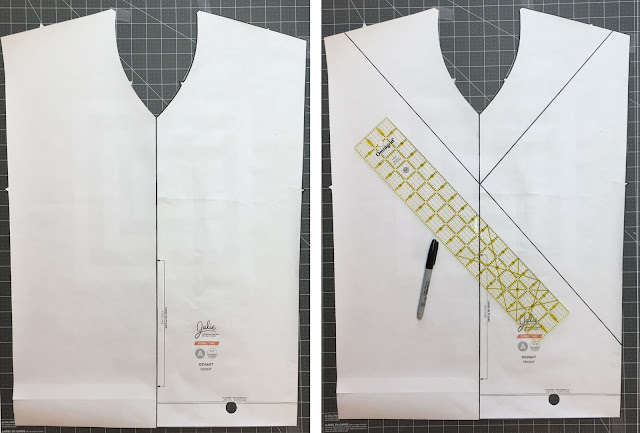
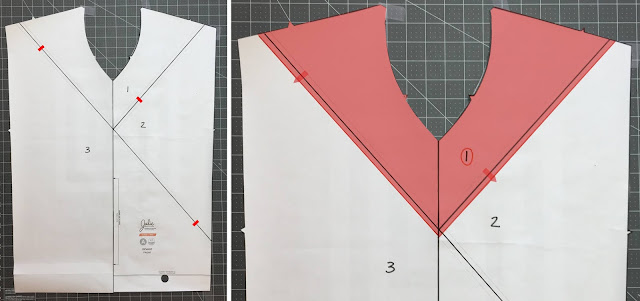
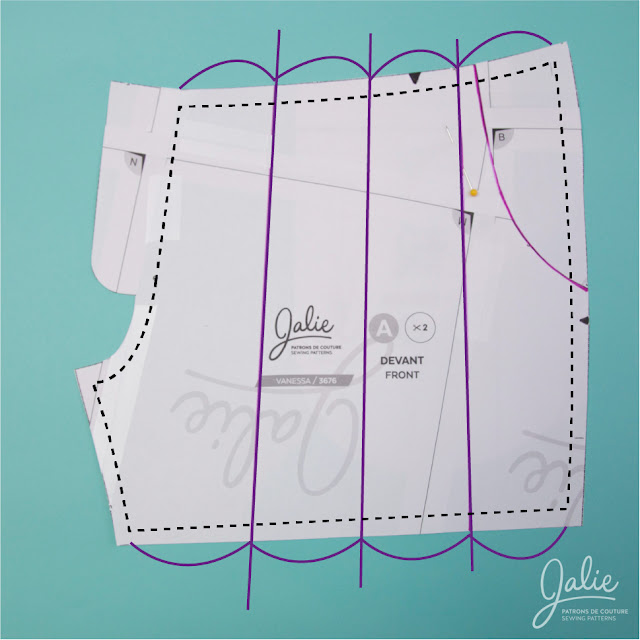
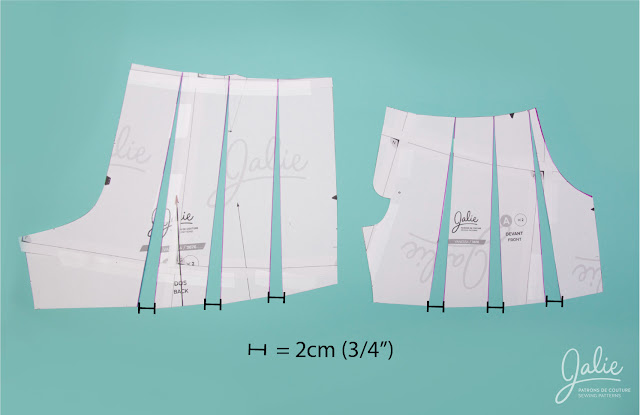
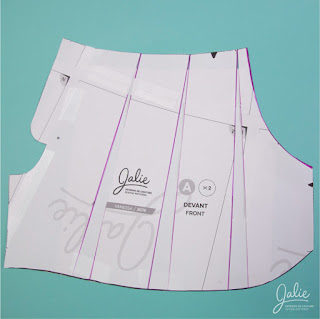
PUZZLE PIECES

If you have been sewing with Jalie patterns for a while, you might have noticed "puzzle pieces" in some of our patterns. These are designed to not only save space on our pattern sheets but also to save tracing/printing paper for you too!

In the Eliane pattern, piece C and K (side front and side back) share the same bottom section (part 2). You simply have to tape the top parts (C1 and K1) to the C2/K2 piece. You only have to flip the top part when you cut your fabric, like this:
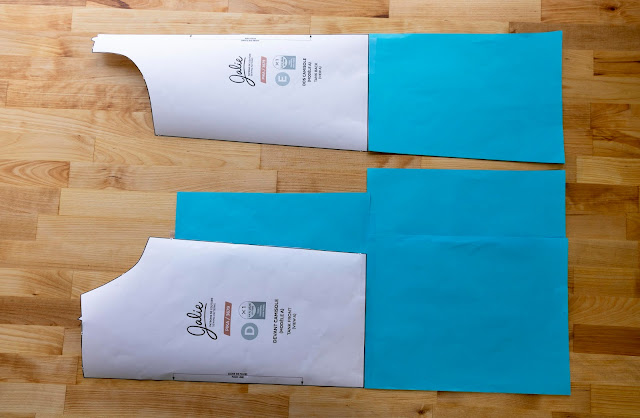
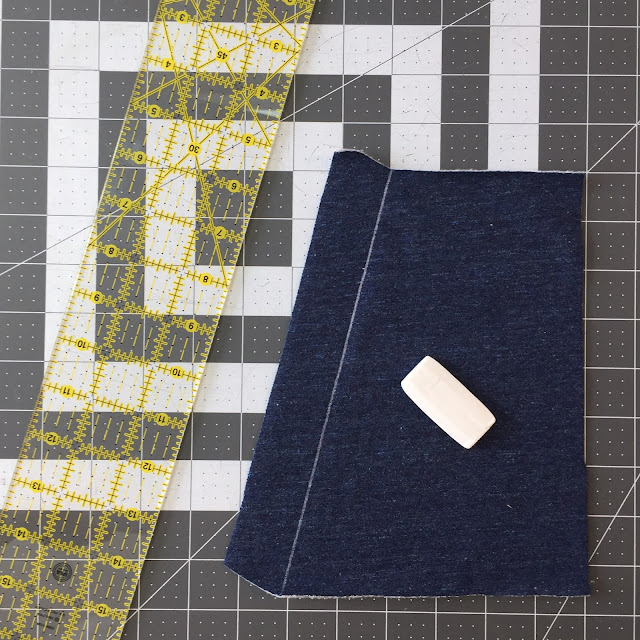
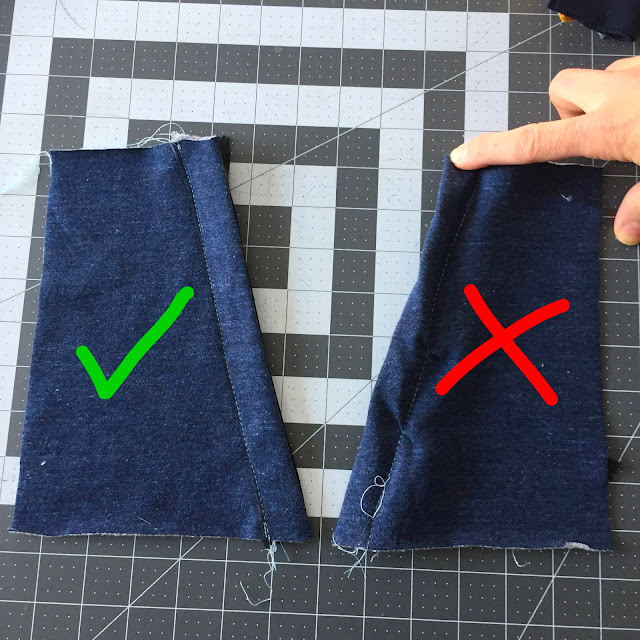
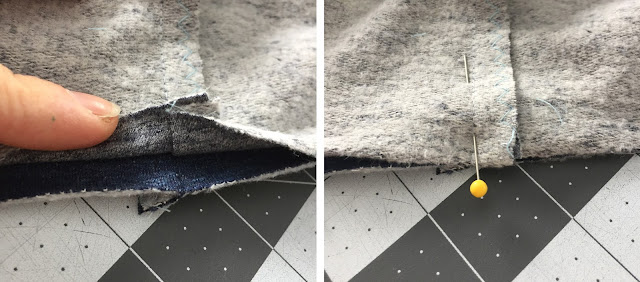
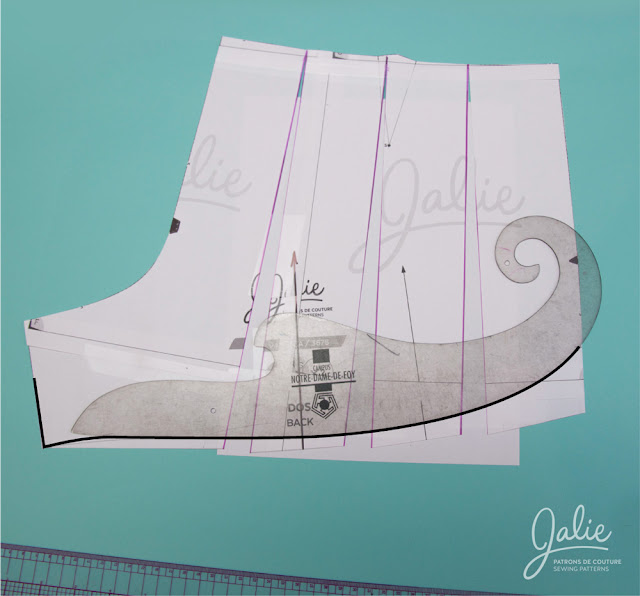

SIDE SEAM MARK

Before you start sewing, you must transfer the mark (black dot) you see on the pattern, near the side slit section on pieces C and K (2x each). The mark indicates where the side seam ends / where the side slit starts:


VISUALIZE THE FINISHED GARMENT

Throughout your project, it's always good to lay the pieces as they will be in the end. It helps you get a clearer picture of the steps to come and identify the marks that will help you assemble, which we mention in the instructions.


For example, when looking at the back pieces, you can see the yoke, side, and center. Each has notches and you will have the center back mark to help you align the yoke and center panel together.
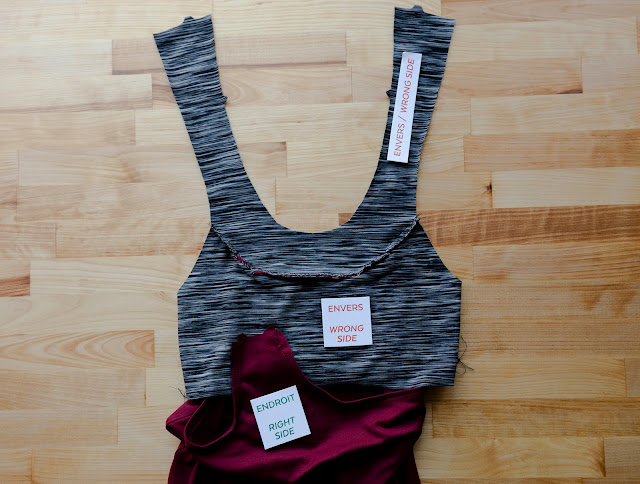
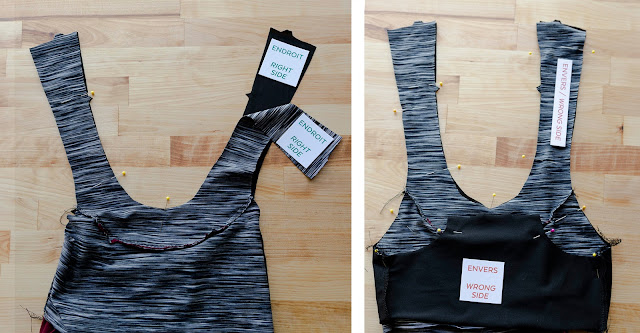
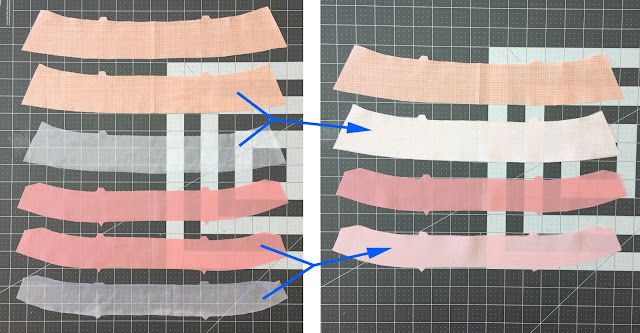
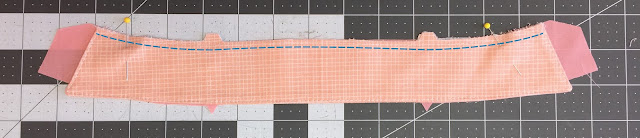
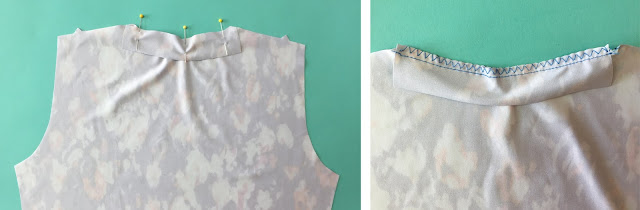
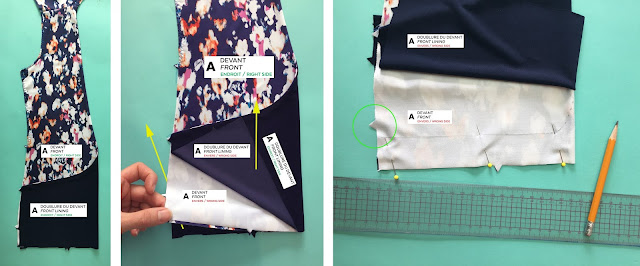
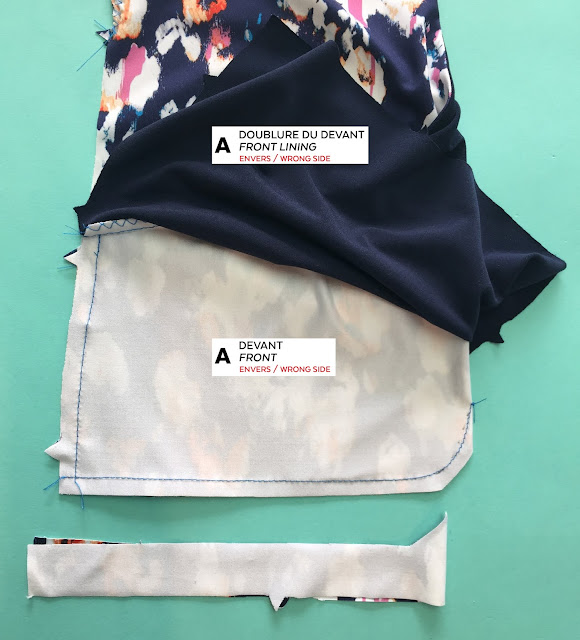
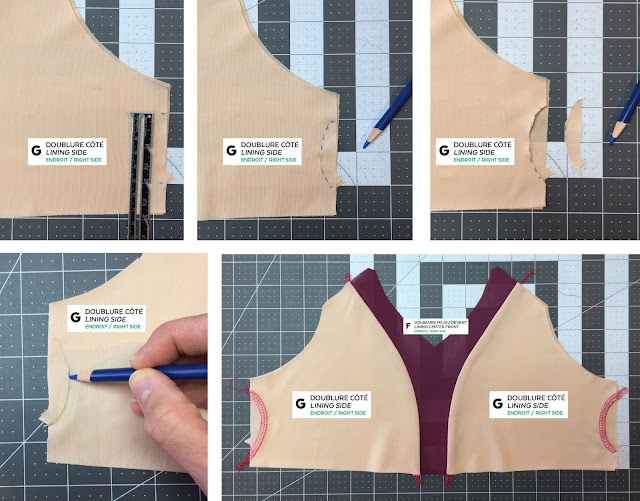
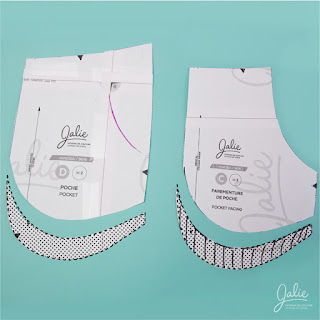
FACINGS

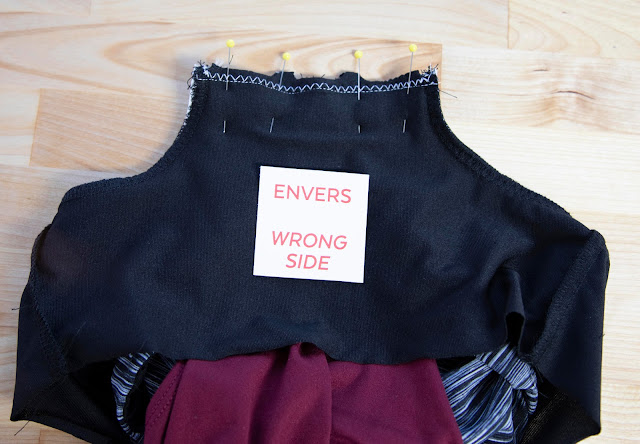
Applying interfacing to the wrong side of your facing pieces will give more body to the neckline. We are using different colors to make this tutorial easy to understand:


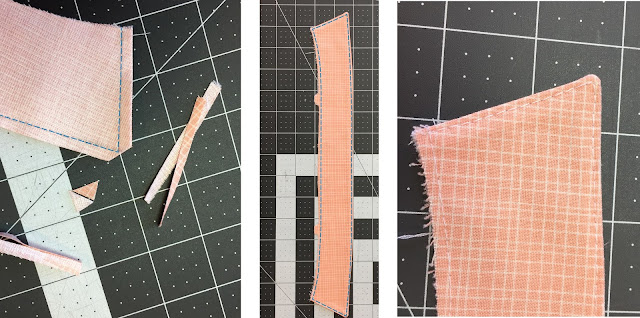
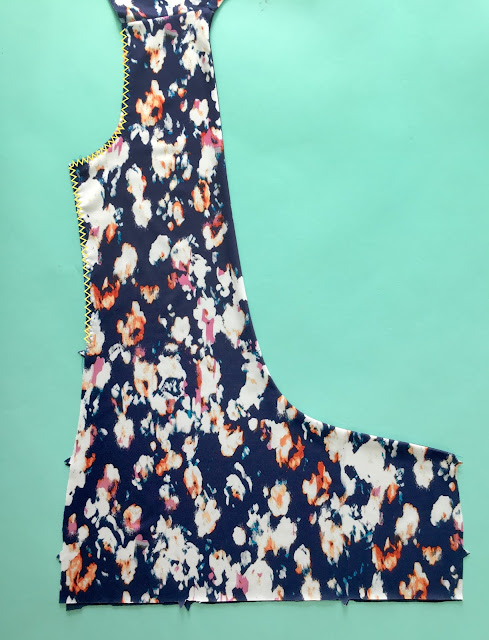
Notice how the notches are carefully cut. They are very important in the Eliane pattern. Cut them correctly (triangles and trapeze shapes). Sew along the curved edges without notches with a serger or use a zigzag for a cleaner finish:
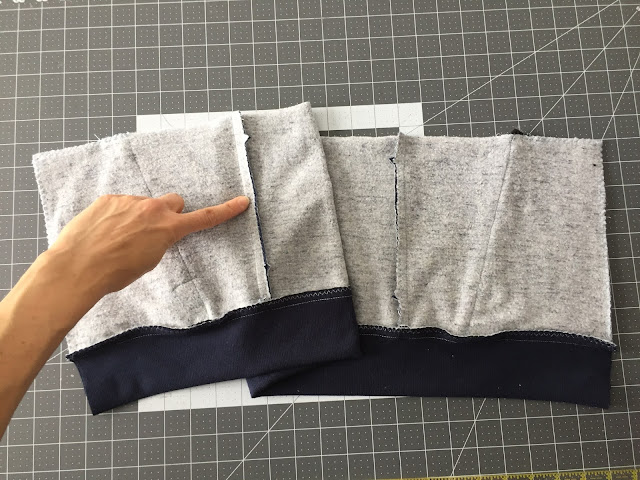
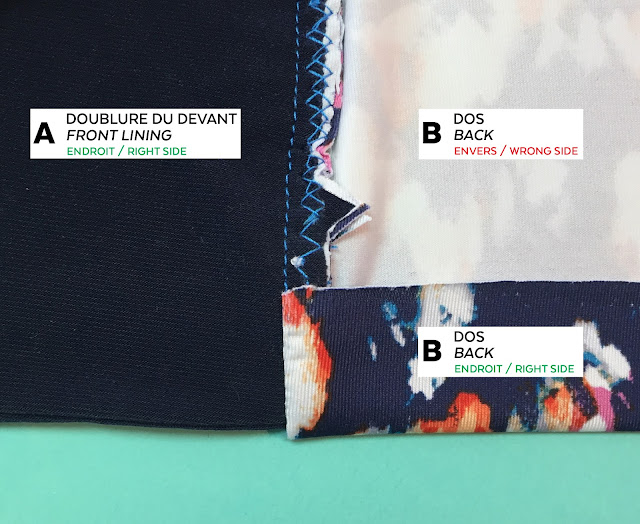

ASSEMBLING THE BACK

Transfer the back waist elastic line to the WRONG SIDE of the center back piece. It will be your guide when pinning and sewing the elastic.


Pin the elastic (the length you should cut is listed in a chart on the pattern) at the line (below it). Start by pinning the ends of the elastic and stitch across the ends, close to the edges to hold them in place. Then, stretch out the elastic and add pins to keep it straight along the line. By doing this, the next step will be much easier!


Stich along the edges of the elastic, using a long straight stitch. You are now ready to sew the side pieces to the center panel.

Pin the side back pieces to the center back piece, matching the notches. Sew with a straight stitch, 1 cm (3/8'') from edge. For a clean finish, you can serge along the edge or use a zigzag to mimic an overclock seam without the fancy machine ;) The lower back is assembled, ready to the yoke.


Press the seam allowances towards the sides. Pin the yoke to the lower back, matching notches and center back marks (fold lines). Stitch from one armhole to the other and press the seam allowance towards the yoke.


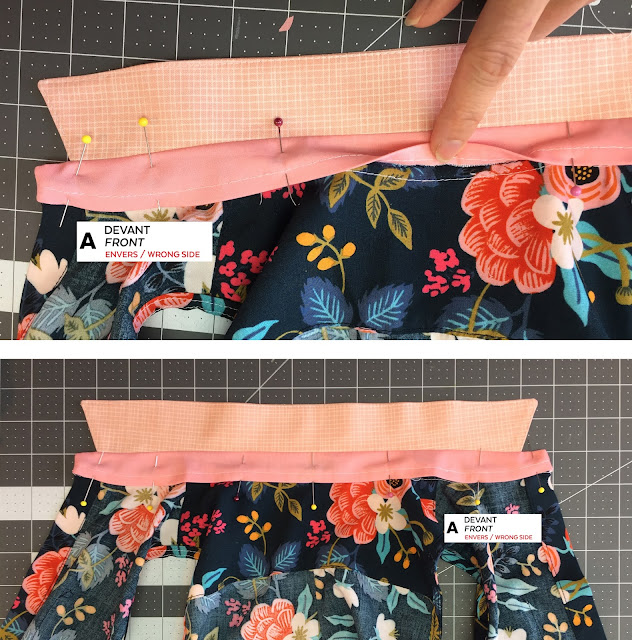
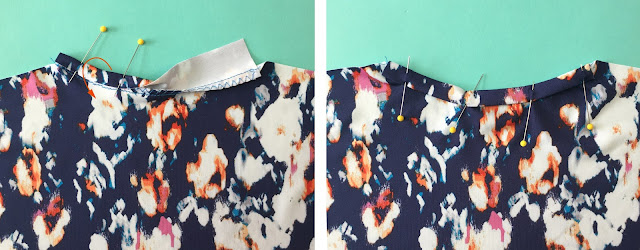
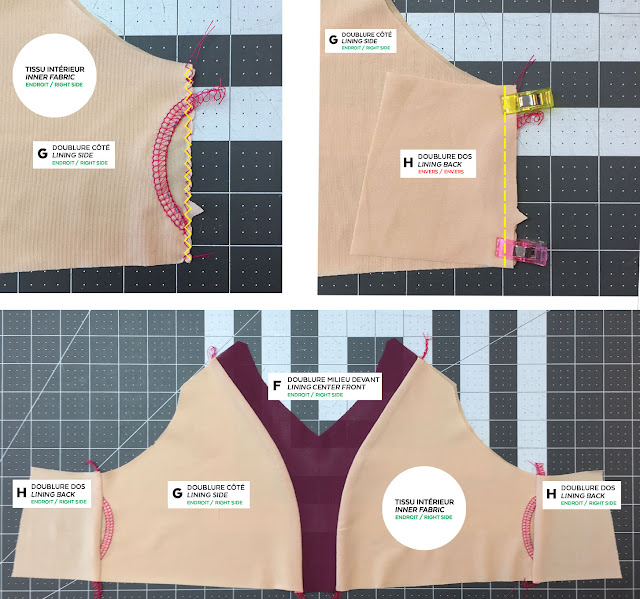
Pin the back facing to the back neckline, matching notches and centers and stitch.


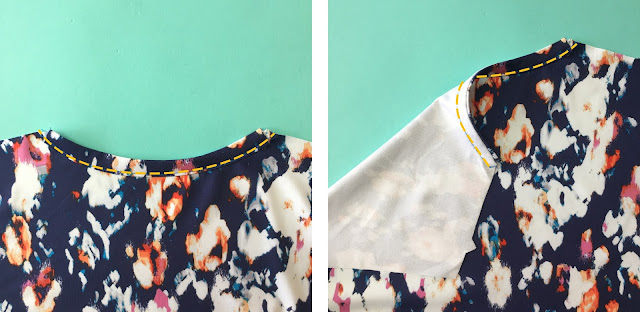
Trim the seam allowance (optional) and clip the curves. Press the facing away from the garment and understitch.


Understitching is stitching close to the edge of a facing to keep it from rolling out. You stitch through the facing and the seam allowance. Pulling fabric away from the seam to keep it nice and flat will help have a perfect understitching. Follow the seam line, stitching 2-3 mm (1/16"-1/8") from it.


After the facing is understitched, you bring it back in place, interfaced side against the wrong side of the main fabric.
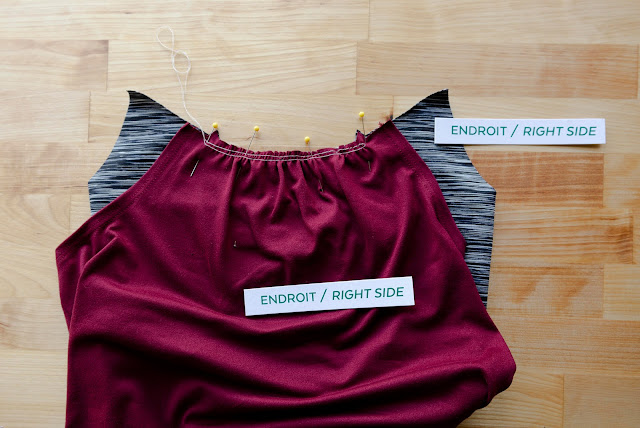
NECKLINE

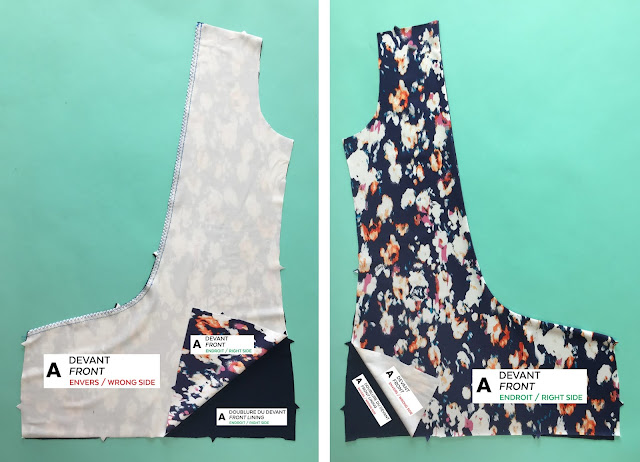
Sew facings to the front inset pieces using the same technique:


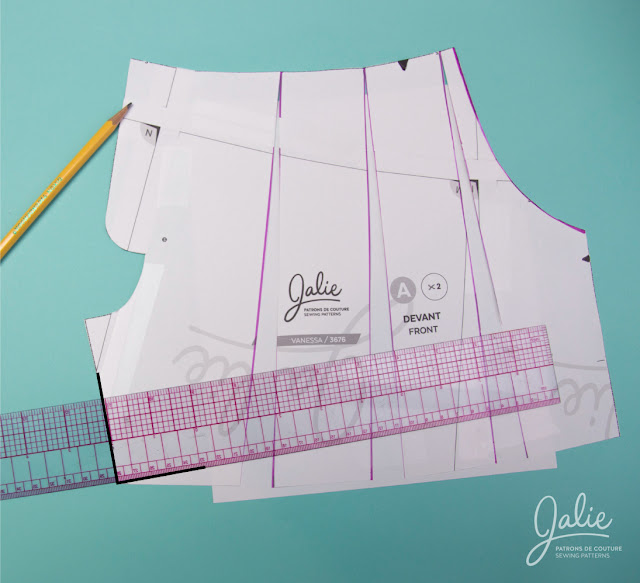
There is an extra step for the front inset before you attach it to the front. You need to topstitch it 2 cm (3/4'') from edge. Then, pin it to the center front piece, matching the notches. Pin and 
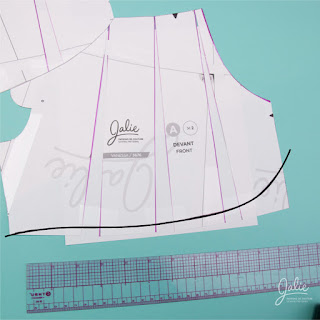
stitch 6 mm (1/4'') from edge for this piece only.


Now, pin the center front facing over the neckline edge (sandwiching the inset), matching the notches, and stitch 1 cm (3/8''), the usual seam allowance for this pattern, trim, understitch and topstitch:


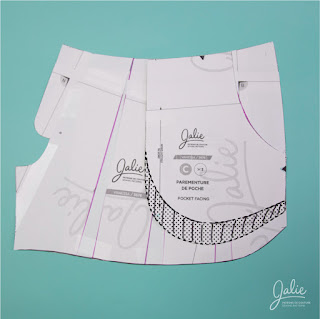
POCKETS AND FRONT ASSEMBLY

This scrub has layered pockets sewn to the side panels. Therefore, you should have two "main pocket" pieces and two "extra pocket" pieces. Make sure all marks are transferred onto the fabric before you continue. Finish the top edge of the pockets with a serger or zigzag before the next steps.


Fold the top at the mark (2 cm (3/4'')), press and topstitch. Fold the raw edges without notches by 1 cm (3/8'') to wrong side and press. Repeat for the other extra pocket.


Pin wrong side of extra pocket to right side of side of side front and topstitch along the folded edges as shown in the photo. Add topstitching 4 cm (1 1/2'') from edge to create a section for a pencil.


Fold and topstitch the top of the main pocket, press the bottom seam allowance to the wrong side of the pocket. Then pin the main pocket on top of the extra pocket and topstitch as shown:


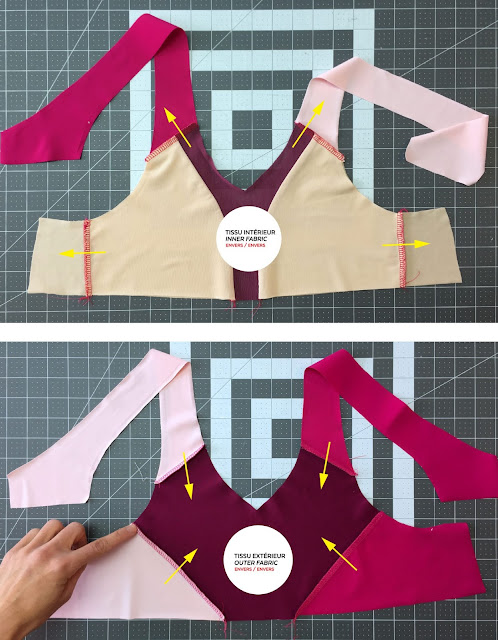
The side panels are now ready to be attached to the center front. Pin, matching notches and stitch. Press seam allowances towards center front:


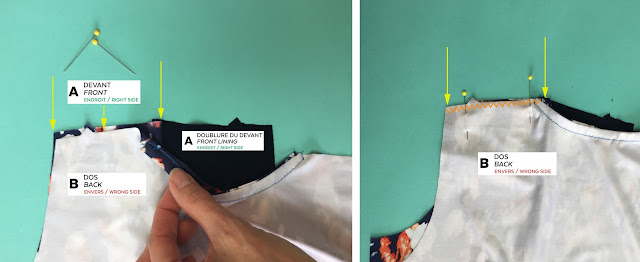
Sew facings to shoulder yokes using the same technique as earlier but DO NOT TOPSTITCH.


Leave the facings as shown on the photo on the right. Pin the front of the scrub to the yokes, the neckline seams aligned. Stitch as shown and make sure you do NOT catch the shoulder yoke facing in the seam.


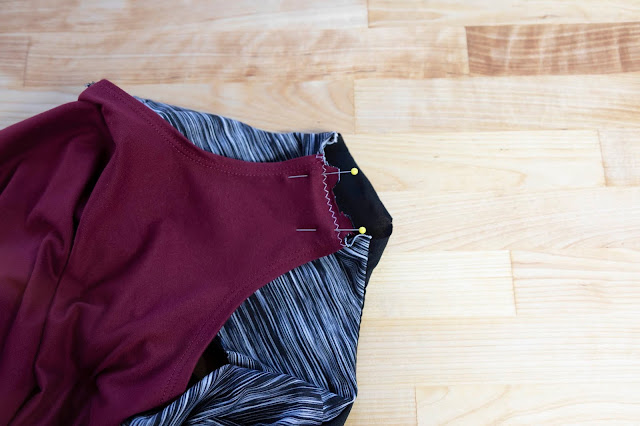
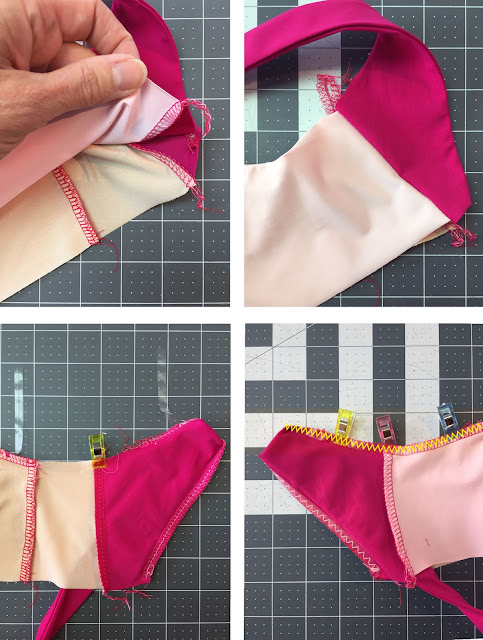
Bring shoulder yoke upwards and then bring the shoulder yoke facing (red) against the center front facing (yellow), right sides together, and stitch. At the same time, finish the raw edge of the seam with a zigzag (or serger). Clip the corner and turn right side out.


SHOULDERS AND SIDE SEAMS

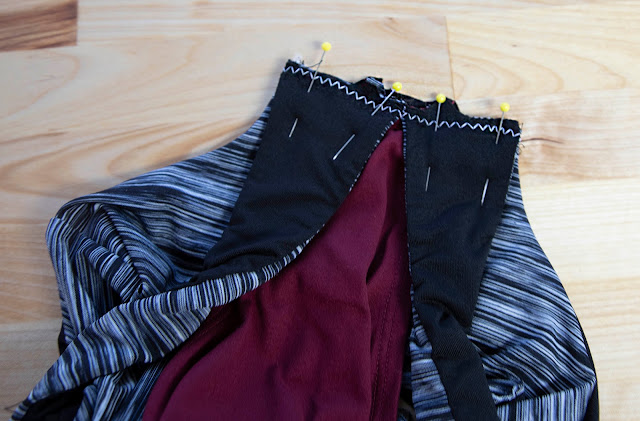
Bring shoulders yokes to back yokes and facings (front+back) right sides together (you will have to "open" the facings to do it) and stitch.


Bring facing and garment wrong sides together, pin the facings and topstitch shoulder yokes and back facing in one, continuous seam:


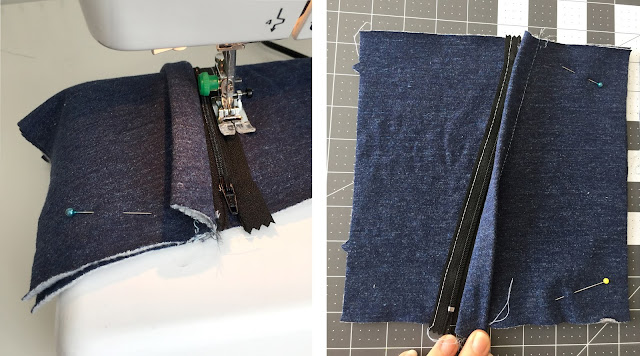
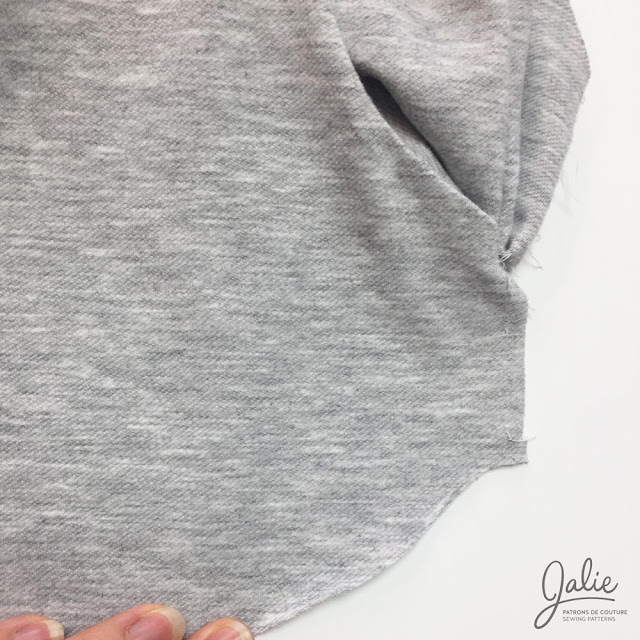
Now, sew the sleeves in (easy, no special technique here - just make sure the center of the sleeve is aligned with the shoulder seam) and prepare your side seams edges (one piece at a time) before the next step by finishing the edges with a zigzag. If you are using a serger, stop just above the side slit edge.


After the side seam edges are finished, pin the side seam edges right sides together and stitch, from sleeve hem corner to the mark at the top of the slit section (that you marked at the beginning).


Press the seam allowance open and topstitch each side, turn the wider section under (or leave it flat if you prefer a wider topstitching), press and topstitch as shown.


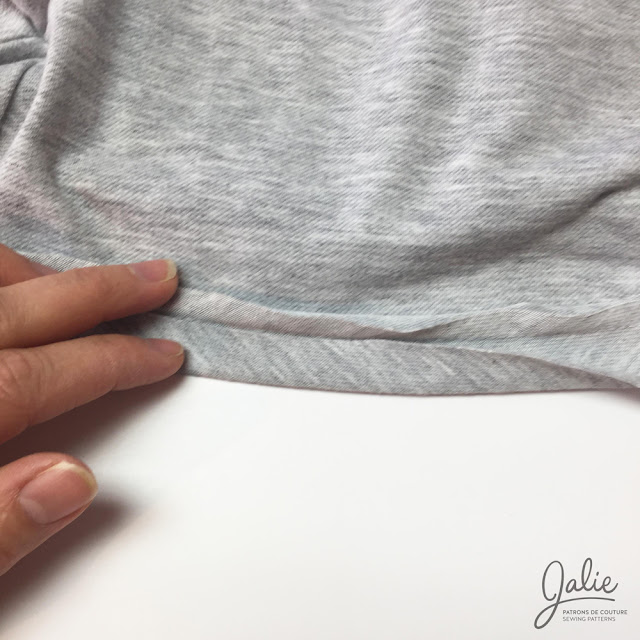
All that is left is hemming the bottom edge and sleeves! Finish the edges first, then fold to wrong side, press and topstitch!

Normally, we would use facing and thread color that matches the fabrics :)  
We hope this step-by-step tutorial will help. We can't wait to see the Eliane scrubs your make for yourself or people you know. Make sure you use the coupon code to get 25% off the PDF pattern before April 20, 2020!

Please note that the PDF pattern also includes a file edited especially for projectors. To learn more about projectors for sewing, visit the Projectors for Sewing group on Facebook. You will find plenty of information on this new technology that is making its way into many sewing rooms.

Stay healthy, stay safe.

FREDERIC HOODIE // TIPS AND TRICKS PART 1

$
0
0
The Frédéric Hoodie is a great pattern that looks great in kids and adult sizes. Some people do inquire about the level of difficulty because of the seaming, zippered pockets and lined hood. With this tutorial, we want to give you the confidence you need to tackle this project. If you take your time and use the tips and tricks in this tutorial, everything should go well and you will be sooo proud of the finished garment!


The pattern includes 27 sizes for boys and men. Women can make it too of course! If you like hoodies that go straight down from the bust, you will love this style.


In this first post, we will highlight some techniques that require more dexterity and preparation. They are not complicated but you do have to take your time.

We wanted this to be accessible to as many people as possible so we will used a regular sewing machine for all the steps. Everything is done with straight stitch and zigzag.

In this post, we will see how to:

- KEEP TRACK OF YOUR MAKES AND STAY ORGANIZED
- MAKE ZIPPERED KANGAROO POCKETS
- KEEP SEAMS LINED UP

Please note that complete sewing instructions are available on the website, on the FREDERIC HOODIE page (under "instructions and tutorials"). You can access them at any time, before and after you purchase the pattern. We will refer to the steps throughout the tutorial


KEEP TRACK OF YOUR MAKES AND STAY ORGANIZED

PROJECT BOOK. Go with a notebook and pencil. Keep it simple. It's the key if you want keep that kind of "sewing resolution". No printout that you run out of, no need to go online and get distracted by fabric sales... No excuses :)

For EACH project, we log the vital information. This way, when you pull out your Jalie pattern to make a new piece because your child outgrew the first one, you will know exactly what you did and have info about the fabrics you used and alterations you made a while ago.

  • Pattern used
  • Size used (it is good to keep dates on your measurements too!)
  • Where the fabric comes from
  • Issues / difficult steps / not to self for next time
  • How the garment fits / How happy you are about it

This log book is not only a great way to keep track of everything but is will also be a reminder of every you made. You will be filled with pride when you reach the last page and need a new notebook!


For the FREDERIC, you can play with different fabric weights and textures. Our favorite is fleece or stretch fleece as main fabric, jersey for the hood lining and binding, rib knit for the cuffs.  Have fun with color blocking!

We write the date on the pattern pieces and punch a hole to hang the pattern on a rod at the studio, using a pattern hook:


MAKE ZIPPERED KANGAROO POCKETS

The zipper application technique for the FREDERIC pockets is a bit unusual, but not complicated. We wanted the zipper to be covered (so that if your stitching is not perfect no one would notice) but did not want to go with a welt technique. You will only see the zipper tape when hands are in the pockets. You can go with a zipper tape of the same color as the fabric or have fun and use it to add a pop of color.


First, mark and press the pleat on the right side of the pocket (step 3 of the instructions). The pleat will be your guide when sewing your zipper:


Pin your zipper, face down, along the edge of the fabric and stitch.


Then, fold the pocket a the fold line so the zipper is under the pocket, hidden by the fold. It's now time to topstitch. Don't rush it or you might end up with something like the photo on the right. It is important to pin, trace and go slowly for topstitching that is nice and straight.


As shown in the instructions, stitch with the wrong side of the pocket facing up. Tracing the topstitching line on both pieces will ensure you have the same width on both sides. As you sew, don't forget to stop, needle down, pull the cursor down passed the needle and keep sewing. If you are not using a narrow zipper foot on your machine, sewing next to the cursor will make you swerve.


After one side of the zipper is sewn to the pocket, it is time to sew the other side to the lower front. Trust the pattern. Yes. It's wrong side of zipper on right side of the fabric :) Pin the layers so everything is nicely aligned and nothing moves when you sew:


For this tutorial, we are using a contrast thread. We recommend you use a thread of the same color as your zipper. It will be more forgiving. After the free edge of the zipper is sewn to the lower front, assemble front and back pieces and press the side seam allowances towards the back before you attach the hem band.


The lower front, with the pocket topstitched (you stitch across the fold at step 10 of the instructions).


ABOUT THE ZIPPER LENGTH:
Ideally, you will work with a zipper that is longer than the lower front piece (the length we indicate on the back of the pattern). When we gathered supplies for the post before lockdown, we did not have any zipper that were longer than that. If you are in the same situation, be very careful when you sew the hem band. You do not want to stitch over a bottom stop!

BONUS: ALTERNATE SEWING METHOD FOR MORE ADVANCED SEWISTS

You want your visible zipper to be a bit narrower? You can fold it under and topstitch down, using a zipper foot. This technique is more difficult (especially when you are sewing with one hand and filming with the other #lockdownsewingtechnique, but feasible.


IMPORTANT: If you are a beginner, follow to the regular instructions.


KEEP SEAMS LINED UP

This next tip applies to any garment with crossing seams. It is the first thing we look at when we turn something right side out. There is an easy way to make sure seams line up and it is quite simple, you'll see.

First, let's talk about seam direction. It is a good habit to press your seams and pick a direction, the same direction for both sides (left and right).

For example, when sewing the upper front to upper back at shoulder seam, press the seam allowance towards the back:


When seams intersect, press connecting seams in opposite directions. When you pin, it will stay flat and the seams will easily stay together.

When sewing lower front to lower back, press seams towards the back (step 11 of the instructions). For the upper part of the garment, press side seams towards the front (step 16).


When you pin upper and lower sections together, match seams and stitch:


Stitch only a small section, check the result on the right side and then keep going. It should look as neat as this:


In the next post, we will show you how to line the hood and finish with a binding, how to sew the front zip and how to make fabric drawstring. Stay tuned!


FREDERIC HOODIE // TIPS AND TRICKS - PART 2/2

$
0
0

Welcome to this second part of the FREDERIC HOODIE tutorial. If you missed the first part where we explain how to sew the zippered kangaroo pockets and line up construction seams, click here.

Today we will show you how to:
  • SEW A LINED HOODIE WITH GROMMET INSET AT THE ENDS OF THE CASING
  • HIDE A NECKLINE SEAM ALLOWANCE WITH JERSEY BINDING
  • EASILY LINE UP SEAMS THAT MEET AT THE FRONT ZIP
  • MAKE A DRAWSTRING WITH COORDINATING FABRIC

LINED HOOD

HOW TO INSTALL A GROMMET (INSTEAD OF MAKING BUTTONHOLES)

After the hood pieces are sewn together, pin pieces of interfacing AND woven fabric to the wrong side of the hood, at the buttonhole placement mark (black dot). 


If you are using an oversize grommet like are are doing, you will have to make a wider casing and reposition the mark. You want it to be centered on the casing. Turn your piece to the right side, draw the seam lines. Then position the grommet and determine the casing width you want, the line not too close to the grommet. Trace the casing topstitching line:


On one side only (right or left), trace the shape of the grommet opening and cut an X inside:


Then, insert the shank of the grommet from the right side of the fabric:


On the wrong side, place the washer part of the grommet onto the shank. Place the grommet on the base/die included with your kit (it will protect the grommet, otherwise it would become flat when you hit it!). Place the tool over the washer and hit it with a hammer:


Transfer the grommet placement from the right side to the left side and install the second grommet using the same technique:


You can now pin your hood to the neckline, matching notches and centers:


HOOD LINING

Lining a hood hides the construction seam. In the FREDERIC pattern, we also add a binding to hide the neckline seam. If you are using a heavy fabric like polar fleece for the outer fabric, we recommend you cut your jersey binding piece a bit wider. It will be easier to cover the beefier seam allowance when you get there.

Fold your binding lengthwise, wrong sides together and press:


Pin the FOLDED binding to the right wide of the assembled hood lining. Raw edges are together, the folded edge of the binding towards the lining and centers are together:


Put the hood lining aside. It's now time to add the front zip.

FRONT ZIP // ALIGNED SEAMS, THE EASY WAY

Prepping the zipper: With your seam allowances marked on the hood piece, position the zipper next to the center front and mark where the seam and top edge of the fabric hit on the RIGHT SIDE of the zipper. Then pin the zipper, face down, onto the right side of the fabric:


As you sew, make sure your seam allowances are in the right directions:


If you do not feel comfortable sewing with a straight stitch right away, you can baste with a zigzag first, remove the pins and then proceed to the straight stitch (only a straight stitch is shown here). 

On the right side of the free zipper tape, tranfer seams and top edge. Pin, matching the marks with the edge and seams on the left front. Baste (optional) and stitch.


Make sure your seams are aligned and that you are happy with the way everything looks on the right side BEFORE moving on. 

LOWER THE SLIDER as shown on the photo and cut the zipper tapes about 1 cm (3/8'') above the hood edge mark:


Remove zipper teeths from the seam mark up and install a new zipper stop:


Fold the binding down (folded edge towards the raw edge) and pin hood lining to hood, right sides together. Before you stitch, pay attention to two things on the photo: 1) the zipper is right sides together with the garment (in the position that it was when you sewed it) and 2) the binding is sewn FOLDED DOWN:


Turn the corner right side out and bring the hood lining and hood wrong sides together. Now, grab all the layers at the neckline, pin together and stitch over the visible seam.

PLEASE NOTE: You will not be able to stitch from one zipper to the other. Just go as far as you can. The purpose of stitching here is only to hold the layers together, it will not be visible from the outside.


Trim the seam allowance and cover the seam allowance with the binding and pin:


Topstitch along the folded edge. This topstitching will be visible inside and outside the garement:


CASING AND DRAWSTRING

CASING AND TOPSTITCHING

If they faded, redraw your casing marks. Use a ruler to keep your casing width equal all along, pin layers so they won't move and topstitch.


Then, topstich center front along the front zip:


MAKE YOUR OWN DRAWSTRING

You do not have drawsting on hand or want to match colors perfectly? Use one of the fabrics you used for the hoodie to make custom drawstring. Simply cut a strip of fabric that is 5 cm (2'') wide, long enough so you have extra hanging at the ends of the casing (no more than 10 cm (4'') should be outside the casing if the hoodie is intended for a child). 

Fold right sides together, sew with a serger or zigzag + long straight stitch, stretching gently as you sew to keep the stretch of the fabric: 


Turn drawstring right side out using your favorite tool (hair pin, safety pin, loop turner or quick turn tool), feed through the casing.

Distribute evenly, stitch in the ditch (on the seam) at the top of the hood to secure the drawstring in place and finish the ends of your drawstring my turning folding on themselves and topstitching or installing caps:


Here is the final result in sizes L(8) for kids:


We can't wait to see your versions of the FRÉDÉRIC in our photo gallery! Come and chat with us and Jalie fans in our Facebook group and check out photos on Instagram #jaliefrederic for inspiration.

Happy sewing!

JULIA Underwear Tutorial // How to finish with Foldover Elastic

$
0
0

What is more satisfying than using sewing our fabrics down to the remnant, not wasting anything? One of our favorite stash-busting patterns is the JULIA panties pattern. The JULIA sewing pattern includes a bralette, cami, and panties (with a low or high waist), all finished with foldover elastic.


We covered the bralette in an earlier post. Today we will walk you through the sewing instructions for the panties and show you 2 ways to finish the waist with foldover elastic. You can download the sewing instructions directly on the website if you want to have all the steps handy instead of keeping your pattern sheet next to you.

If you prefer PDF patterns, please note that the Julia panties pattern is only a 6-page printout! You can print one size at a time to skip tracing and start sewing ASAP.

GETTING READY

The panties pattern (view C for high waist, view D for low waist) includes 3 pieces: FRONT, BACK, AND CROTCH. In this tutorial, we are using the same fabric for the crotch and its lining. You could use a different fabric for the lining if you are using synthetic fabric for the panties but want natural fibers for the crotch lining for example.

You need to cut three pieces of foldover elastic (FOE): two for the leg openings and one for the waist. Lengths are listed in a chart on the pattern. To make sure you don't end up sewing a waist elastic into a leg opening, tie the leg elastics together before you start. This way, no matter if you get distracted or pause your project, you will always know which elastic is which.

Make sure the notches on the back piece (little triangles) are cut neatly so that they are visible. They are very important because they indicate where to start stretching the elastic when you sew it later on.


For the assembly, we will use contrast thread so you can see everything. Normally, we would use thread that matches the fabric for assembly, a thread that matches the FOE color for topstitching.

ASSEMBLY

Pin the crotch piece (narrowest end) to the front, right sides together, and stitch:


Pin the widest end of crotch piece to the back, right sides together, and stitch:


Place piece right side up on your sewing table. Roll the front and back piece onto the crotch piece, until you can see the seam allowances:


Pin your crotch LINING piece, right side against the rolls, at the seam allowances. Stitch over the visible seam:


Turn right side out and baste crotch edges together with a zigzag:


FOLDOVER ELASTIC AT LEG OPENINGS

The JULIA panties are quite unique. They do not have the usual side seam. We came up with a "wrap" effect that eliminate that seam. People with sensory issues love these because there is no seam allowance inside. The technique is easy, don't worry :)

Start by pinning (or clipping) the wrong side of the fabric to the wrong side of the FOE, the raw edge against the line running down the center of the elastic. For this project, we want the matte side of the elastic to be visible at the end so the shiny side is the wrong side.

Pin from back waist corner to the notch, then at the crotch and in the front leg opening curve WITHOUT STRETCHING:


Then, stretch the elastic between the notch and the crotch to fit the fabric and add a pin / clip in the middle:


Baste with a zigzag stitch (zig on the fabric, zag skimming the edge of the fabric), stretching ONLY between the notch and crotch to keep the fabric flat. Do not stretch too much. Only the FOE should be stretch, you do not need to stretch the fabric itself. When you are done, the fabric should look like this (flat elastic, little "waves" on the fabric):


Clip the notches and fold the elastic to sandwich the fabric edge:


Pin and topstitch with a regular zig-zag, three-step zigzag or cover stitch. Again, you only need to stretch gently in the back section where you stretched earlier to keep the fabric flat:


ASSEMBLY

On the front, mark a guide, 1 cm (3/8'') from edge to help you pin the back to the front straight:


Pin and stitch along the outer edge of the FOE. Stitch across (bar tack) the elastic to keep the corner down and reinforce it:


FOLDOVER ELASTIC AT THE WAIST

Now that you are done with the assembly, the only thing left to do is to apply foldover elastic at the waist. We will show you 3 alternatives that you can use for the JULIA panties waist. Have fun,  experiment and pick you favorite!

PREPPING THE WAIST ELASTIC

Pin and stitch the ends of the waist elastic ends right sides together, 1 cm (3/8'') from the edge. Open the seam allowance and topstitch it down as shown on the photo (a square is stronger than two lines). Mark half (opposite to seam) with a pin or marker:


TECHNIQUE 1: ELASTIC FOLDED OVER (BASIC TECHNIQUE SHOWN IN THE PATTERN INSTRUCTIONS)

Mark center front and back of the waist and pin WRONG SIDE of waist to WRONG SIDE of the elastic, along the center line. Match half mark with center front, seam with center back:


Baste with a zigzag, stretching the elastic between the pins to fit the waist opening. Then, trim the back elastic corner to have a straight edge. It will make the next step easier:


Fold elastic over the fabric and topstitch with a regular zigzag, triple zigzag or a cover stitch:


TECHNIQUE 2: OPEN ELASTIC ON THE OUTSIDE (IF YOU PREFER THE LOOK OF A WIDER ELASTIC OR WANT TO HIGHLIGHT A PRINTED FOE)

Mark center front and back of the waist and pin RIGHT SIDE of the waist to the WRONG SIDE of the elastic, along the center line. Match half mark with center front, seam with center back:


Sew with a regular or triple zigzag, close to the bottom edge, catching the fabric in the zigzag:


TECHNIQUE 3: OPEN ELASTIC INSIDE (FOR A NARROW SECTION OF THE FOE VISIBLE, WITHOUT FOLDING THE ELASTIC)

Mark center front and back of the waist and pin RIGHT SIDE of the waist to the RIGHT SIDE of the elastic, along the center line. Match half mark with center front, seam with center back:


With the FOE wrong side up, baste with a zigzag along the top edge, above the center line, stretching the elastic between the pins as you sew to fit the waist opening:


Brin the elastic to the wrong side of the waist and topstitch on the fabric:


Voilà! One pattern, 28 sizes, three FOE techniques. Enjoy :)


Share you JULIA panties on Instagram #jaliejulia and in our Facebook group!

Happy sewing!

BOBBIE V-NECK TOP // Color block and construction

$
0
0
Today, we will have fun with the  BOBBIE pattern! This minimalist top is the perfect blank canvas to create amazing color blocking for a unique garment or to use small fabric remnants in your stash.


We call the BOBBIE pattern the "magic v" top because its facing not only creates a clean finish but also helps keep the neckline close to the body thanks to its cropped cami shape. It also covers the bra at the armhole at the same time:


The pattern includes 28 sizes (girls and women) and is available in paper and PDF formats. The PDF version is a 19-page printout you can print at home and includes an A0 copy shop file as well as a PDF file edited for projectors. All PDF files are layered, which means you can print one layer at a time if you want to skip tracing.

PREPPING THE PIECES / CREATING YOUR COLOR BLOCK

Determine the seaming you want for your color block and the colors you want to use. We created a downloadable coloring page that you can draw on (or keep your kids busy while you make your Bobbie).

If you are making an asymmetrical design (not the same thing left and right), trace your front piece twice and place the second piece at the fold line to create an open front piece. Transfer your design onto the open front pattern piece:


These thick lines will be the seams. In order to assemble those sections together, you will need seam allowances.

Draw lines, 6 mm (1/4'') from and parallel to the seam lines. The outer line will become the cutting line (raw edge of your fabric) for each piece.

To make assembly easier on those long diagonals, you may want to add marks or notches (triangle going outwards) at approximately 1/3 of the distance, at the red marks on the images below:


Create all the pieces, making sure you use the thin line OUTSIDE the thick seam line as the cutting line.

We transferred the seam line onto the pieces on the next images so you can visualize the integrated seam allowances on all front pieces.


You are running out of fabric or can't find knit fabric in the color/print/thickness you want at your local fabric store? Upcycle an old t-shirt or go through the clearance racks at clothing stores. You can sometimes find gems at very low prices.

ASSEMBLY

Pin pieces together (in this example, pieces 1 and 2), matching notches/marks and stitch 6 mm (1/4'') from edge WITHOUT STRETCHING THE FABRIC. If your are using a straight stitch, you can use a zigzag (skimming the edge of the fabric) to mimic a serger finish.

If you are sewing triangles together like we are doing, it is normal that corners do not line up because the angles at the corners are not the same on the two pieces. The SEAM LINES match, not the CUTTING LINES.

Do not try to align raw edges, let those little corners exceed in order to match the seam lines:


The front is assembled. Pin front to back, right sides together at shoulder seams and stitch WITHOUT STRETCHING THE FABRIC:


Transfer the notch location at the side seam onto right and wrong side of front and back. Before moving on to the next step, finish the raw edge.

Then, pin front to back and stitch from the mark to the bottom edge, 1 CM (3/8'') FROM EDGE:


Press the seam allowance open, fold the armhole to wrong side by 1 cm (3/8'') (same as the side seam allowance) and topstitch with a straight stitch, as shown:


FACING ASSEMBLY

The cami-shaped facing is not assembled the same way you assemble a tank top. Pay attention to RIGHT/WRONG side indications in the next steps.

Pin front facing to back facing, WRONG SIDES TOGETHER at shoulder seams and stitch.

Turn wrong side out, pin RIGHT SIDES together at side seams and stitch. Pay attention to the difference between shoulder and side seams in the third image below:


Finish raw edge of armholes and bottom with the serger, fold armhole to wrong side by 1cm (3/8'') and topstitch. We recommend you start and end at the shoulder. This way you will be sure that the topstiching is nice and clean under the arm (no ends, no threads):


Pin WRONG SIDE of facing to RIGHT SIDE of neckline, matching notches (triangles).

Stitch and pivot, needle down, at the center to have a sharp V in the front. Then, clip the V up to, but without cutting the thread:


Understitch (bring seam allowance towards the facing and stitch close to the seam, on the facing), WITHOUT STRETCHING. This will prevent the facing from rolling outwards:


Turn wrong side out (your garment is inside the facing, the wrong side of the facing visible) and hand stitch the shoulder seam allowances together:


Fold hem to wrong side and topstitch. You are done! Your BOBBIE is ready to wear!


Ready, set, go! Print the instructions, le coloring page and have fun!

We are looking forwards to seeing your BOBBIE tops on Instagram #jaliebobbie
and in our Facebook group!


ROSE Shirt // Shirt Collar Tutorial

$
0
0
There are different ways to attach a collar to a shirt. After working on a few shirt, using sewing patterns from various designers, most people pick their favorite method and stick with it. On the ROSE pattern, we use a technique that is slightly different from the traditional methods you usually see in sewing books. We received a lot of positive comments about it so we are sharing it with you in a photo tutorial.


You can download the ROSE shirt instructions directly on the pattern page on our website, where you will also see inspiring customer photos. Fun fact: this pattern was named ROSE after Jeanne's mother's favorite flower.


This sewing pattern includes 28 sizes and is available in paper (mailed to you) and PDF formats (print at home, copy shop and projector file)

PREPPING THE PIECES // INTERFACING

For a nice and crisp collar, you need to interface one collar and one collar stand piece. Apply fusible interfacing to the wrong side of the two pieces. Make sure notches are cut neatly to differentiate between single (triangle) and double (trapeze) notches:


 Trace a line, 1 cm (3/8'') from edge, on the interfaced side of the collar with chalk or a pencil:


Pin collar pieces right sides together and stitch on the line. Trim seam allowances, turn right side out, press and topstitch close to the edge. Stitch all around to baste the open side shut at the same time, matching the double notches to keep everything straight.

To make sharp corners, make sure you pivot, needle down:


Fold bottom edge (with triangle notches) of the interfaced collar stand piece to the wrong side by 1 cm (3/8''). You can fold and press with a guide or ruler or sew a guide seam 1 cm (3/8'') from edge to fold precisely and quickly.:


Baste (sew with a long straight stitch that you can remove at the end) to hold the folded edge into position from one end to the other:


Pin NON INTERFACED side of the collar to NON INTERFACED collar stand piece, matching double notches and baste, 6 mm (1/4'') from edge:


Pin right side of interfaced collar stand to the collar (the collar is sandwiched between the collar stand pieces), matching double notches. Stitch as shown, 1 cm (3/8'') from edge, from one folded edge to the other:


Trim seam allowances and clip corners as shown:


Turn right side out, press and mark center (you can locate it by folding the collar stand in half, bringing its ends together):


Pin right side of NON INTERFACED collar stand to RIGHT SIDE of the neckline, matching centers and double notches, centers, and ends:


Stitch 1 cm (3/8'') from one end to the other. Notice how the seam allowances at the ends are folded to their wrong side and stitched down:


Clip the neckline as shown in step 26 of the instructions (available on the Jalie website) before moving on to the next step (the clipped section is hidden under the collar stand in the next photo).

Bring folded collar stand edge to the wrong side of the neckline, covering the neckline seam and pin:


Flip the garment so the right edge is on top. For the photo, we repinned on the outside before topstitching:


Topstitch along the edges of the collar stand, close to the edge (stitch on the collar stand side where there is no basting seam visible). For this tutorial, we are using white thread so you can see better but we recommend you pick a thread that matches your collar stand of course:


You're done! Your shirt has a collar :) Remove the basting stitch (extra stitch visible inside the collar stand) if you want. We left it on the photo below so you can see where all seams are located / visible when you finish sewing:


As we mentioned at the beginning of the post, you can use this technique on all projects where you have to attach a collar with collar stand.  Practice makes perfect (or at least much better :). We hope you enjoyed it and that it will help you make shirt that you love in the future.

Don't forget to share your photos in our Facebook group, on Instagram and on our website!

Happy sewing!

Drop Pocket Cardigan // Step-by-Step Tutorial

$
0
0
Since its launch, our drop pocket cardigan (3248) is a favorite because of its generous pockets and clever construction that hides most of the seam allowances. A knit cardigan with a professional finish that you can sew with a regular sewing machine!


This sewing pattern is only available in PDF format, which we managed to fit on 20 pages! If you are not a fan of taping pages together, you can use the copy shop or projector files that are also included in the pattern.

You get 28 sizes in one pattern (kids and adult sizes) but can print one size at a time so you do not have to trace.


FABRIC CHOICE

For the first run, picking fabrics that have different right/wrong sides will help you better understand the instructions. Using a contrast front lining fabric will also help.

For this tutorial, we will be using a printed polyester knit (ITY). This type of fabric is easy to find and usually very affordable. Perfect for your first drop-pocket cardi!

NECK BINDING

The first step is to finish the back neckline. Pin RIGHT SIDE of back neck binding to WRONG SIDE of back neckline, matching ends and centers. Baste with a zigzag and stitch 6 mm (1/4'') from edge, using a straight stitch:


Fold binding wrong sides together, its raw edge along the seam. Fold the wrapped seam allowance to the right side of the back and pin:


Topstitch along the folded edge of the binding:


FRONT ASSEMBLY

As you will see in the instructions available on the Jalie website, we refer to the front pieces as FRONT and FRONT LINING. The FRONT fabric is what is visible from the pocket up. The LINING is what you see at lower front and inside when you open the cardigan.

Pin each front piece to its lining, right sides together, and stitch, 6 mm (1/4'') from edge, without stretching the fabric as you sew:


Now, it's time to sew the shoulder seam. We start with the right shoulder.

VERY IMPORTANT: Open the front pieces before pinning the back shoulder to the FRONT shoulder. The finished edge of the back neckline it aligned with the seam. Baste with a zigzag, catching the back and front only (not the lining):


Bring the front LINING over the basted seam, pin and stitch 6 mm (1/4'') from edge, without stretching the fabric:


Turn the shoulder seam right side out. Look how clean the finish is! Repeat these steps to sew the left shoulder seam.


Bring front and lining wrong sides together and baste armhole and sides with a zigzag, down to the first notch. 


Pin sleeve to armhole, matching its center (notch) with the shoulder seam.

POCKET AND FRONT HEM

Fold front (all layers) to bring the notches together at the side. Then, lift the LINING fabric and pin the front layers together. Mark a seam line 3 cm (1 1/8'') from bottom edge that ends in a curve at the fold:


Stitch on the line and baste the side to keep the front layers together. Then, trim the bottom seam allowance 6 mm (1/4'') from the seam:


Bring lining back in place to better see the bottom edge notches you have to bring RIGHT SIDES together. Pin and stitch. This will close the bottom of the fronts (no need to hem later on).


This step is not easy to photograph so we made a video showing how to manipulate the fabric.

Bring the pocket back into position, matching side seam notches of the four layers of fabric together. Baste with a zigzag along the raw edge of the fabric:


Pin front to back at side and underarm seams, matching notches and seams, and stitch. The back will be longer than the front. That is ok. We will need this excess fabric for the next step:

BACK HEM AND FINISHING

If you have a serger, it is now time to finish the raw edges of the back and sleeve hem before continuing to the next steps (optional).

Bring right side of bottom BACK edge and bring it over the lining. Pin at side seam and stitch 6 mm (1/4'') from edge:


Turn corner right side out:


Pin back hem and topstich with a zigzag, coverstitch or double needle:


Fold sleeve hems to wrong side by 2.5 cm (1'') and topstitch:


You now have a comfortable transitional piece in your wardrobe! Layer it over a cami / tank top or sleeveless dress when it's cool outside or when the A/C is on at the office.


This cardigan may look complicated, but if you follow these steps, you will be surprised at how easy and quick it is to sew. It's one of those instant gratification pieces that you can make in different fabrics when you need to kick-start your sewing mojo :)

Happy sewing!

NIKITA // Workout Top Sewing Tutorial

$
0
0
Today we show you how to sew our beloved NIKITA workout top. We will go over the shorter (tank) view:


The NIKITA tank is great because it doesn't cling to your body and has funky seaming, an optional opening in the back and angled side slit that will have people tell you "where did you get this top?!" :)


The pattern also includes a dress version, a wonderful staple for your summer wardrobe. Like all Jalie patterns, it comes in kids' and adults' sizes. You can purchase it in printer/paper format that we mail to you, or as a PDF (that you print at home on Letter/A4 paper (20 pages), at a copy shop on one page of A0/36'' paper or use with a projector).


Let's get started!

FRONT YOKE AND BACK STRAPS

Front yoke and back straps have two layers for a clean finish without visible seam allowances inside. You can use the same fabric for the inner and outer layer or use contrast or complementary colors, whatever works best for you. For this tutorial, both layers are black so we will use a color code to better identify all layers correctly and help you better understand the construction.

When you cut your yoke pieces, make sure that your notches (triangles) are visible. Pin front yoke to back straps (OUTER FABRIC, right sides together) and sew the shoulders together:


Repeat for the pieces cut in the INNER FABRIC (colored in green in the next photos).


Open to visualize the neckline opening and pin INNER FABRIC to OUTER FABRIC, right sides together, and matching notches. Stitch, pivoting at the V, needle down, to have a sharp angle:


Clip the V up to the seam but without cutting the thread. Turn right side out (wrong sides together):


Pin OUTER FABRIC of front yoke to front piece and baste with a zigzag only. Place your pieces on the table as shown in the picture on the right, moving the INNER FABRIC piece away from the basting seam:


Roll the front piece over the RIGHT SIDE of the front yoke (OUTER FABRIC), until the seam allowance is visible:


Now, roll the back strap piece (both layers) onto the right side of the front yoke (INNER FABRIC) until the notches are visible. Bring those INNER FABRIC notches over the notches on the basting seam, pin and stitch:


Turn your "burrito" right side out. The seam allowance is now hidden between the yoke layers:


BACK

If you want an opening in the back, trace the line (marking on the pattern) onto your piece, at the fold, and cut that section away:


Finish raw edges of center back with a zigzag or your serger. Then, pin right sides together and stitch (stop at the beginning of the angled line if you are making a back with opening). Press the seam allowance open (if your fabric can withstand the heat of course!):


Topstitch along each side of the seam to hold the seam allowance down. Now, it's time to attach the back strap to the back:


Pin the upper edge of back to the back strap (OUTER LAYER ONLY) and baste with a zigzag:


Pin the right side of INNER FABRIC to the WRONG SIDE of the back. This step is very difficult to photograph... In a nutshell... you want to sandwich your back between the right sides of the back strap fabrics.

Stitch from one armhole to the other. Please note that if you are making the closed back in a larger size, you might have to stitch the left half and the right half as the "tunnel" can be too restrictive to sew in one shot:


Turn right side out. The seam allowance is inside the back strap. No raw edge is visible:


Baste the raw edges of the yoke and straps, inner and outer fabrics wrong sides together. Finish raw edges of the back piece with a zigzag or serger before the next step if you want a cleaner finish:


Fold the shorted edge to the wrong side by 1 cm (3/8') to the wrong side, press, and topstitch with a straight stitch. Pin the back piece to the front piece, right sides together, and matching notches at side seam. Stitch using the usual 6 mm (1/4'') seam allowance:


Press the seam allowance open and topstitch, meeting with the previous topstitching line:


Fold bottom edges to the wrong side by 2 cm (3/4''), press and topstitch with a zigzag, cover stitch or double needle:


ARMHOLE BANDS

Sew ends of each band right sides together and stitch across. Fold wrong sides together and mark quarters with pins on the band and the armhole:


Pin band to armhole, matching quarter marks. You may use the notch as a starting point or choose where you want the armhole band seam to be. Just make sure you do the same thing for both armholes and match quarters so that the tension is even all around.

Stitch, stretching the band between the pins. Bring the seam allowance towards the garment and topstitch:


Voilà! Your Nikita top is ready for the gym or a hot summer day!


Happy sewing :)

COCO Sports Bra // Step-by-step Tutorial

$
0
0
The COCO sports bra pattern stole the show when we launched our collection in May. We wrote this tutorial to walk you through the construction steps of this quite unique pattern. You will be able to see what makes the COCO so great: its pieces/seaming, clean finish inside and out, and the option for removable cups.


The pattern is available on our website, in both paper and digital/PDF formats (the PDF includes print-at-home, copy shop, and projector versions). You can also purchase it from your favorite reseller.


PATTERN PIECES

This tutorial shows how to make the X-back style (view A). The wide straps do not dig into the shoulder and stay in place when you move because they cross in the back. The racerback style that is also included in the pattern also has a clean finish inside and out. It provides more support / feels tighter since there is no opening in the back.

The COCO bra is a real scrap buster! If you have remnants from sewing other activewear like leggings, now is the time to use them. The main (outer) fabric is athletic knit. For the straps, we are using the same fabric but went with swimwear lining fabric and power net for the lining pieces. Look for a fabric that has approximately 50% stretch (length and width) and good recovery. If your fabric has too much stretch, the bra will grow and won't be supportive.


  • A - CENTER FRONT // Cut 1 on the fold, MAIN FABRIC
  • B - SIDE // Cut 2, MAIN FABRIC (we used two different fabrics and made sure one would be the mirror of the other (cut with the paper facing down for the second piece))
  • C - STRAP - VIEW A // Cut 2, MAIN FABRIC + Cut 2, LINING (INNER FABRIC) (we used the same fabric, in a different colour for each pair. This will result in straps that have the same fabric inside and outside, different colours left and right)
  • E - BAND // Cut 1 on the fold, MAIN FABRIC
  • F - LINING CENTER FRONT // Cut 1 on the fold, LINING (Power Net)
  • G - LINING SIDE // Cut 4 if you want to create a pocket for removable cups, Cut 2 if you don't. We are using swimwear lining but could have used Power Net for more support.
  • H - LINING BACK // Cut 2, LINING

OUTER FABRIC ASSEMBLY

Pin side pieces to center front piece, right sides together, and stitch 6 mm (1/4'') from edge (the seam allowance for the garment):


Pin straps (the fabric you want on the outside) to the center front piece, right sides together, and stitch. If you are using the same fabric inside and out, pay attention to the shape of the straps to avoid mixing them up:


LINING ASSEMBLY

Pin lining center front to lining side, right sides together and matching notches, and stitch:


If you are making the version with only one layer of lining, you are ready to assemble the other side of the lining. 

We are making the version with a pocket so we are adding another layer of lining side. Pin it over the center front lining (to sandwich it), lining sides right sides together, and stitch.

Repeat these steps for the other side and then bring the lining side layers wrong sides together:

POCKET FOR REMOVABLE CUP

This step is optional, it creates an opening for those who want to insert foam cups for extra support and modesty.

Place your lining with the center front right side up. Measure approximately 5 cm (2'') from the notch up and draw a curve on the top lining layer. Cut the fabric and use the cut-out to mark the opening on the other side. Finish the edge with a zigzag or your serger:


Baste sides with a zigzag. Then, pin the lining back over the opening, right sides together, and stitch:


STRAPS, ARMHOLES, AND NECKLINE

Pin right side of straps (inner fabric) to the lining (notice how the openings are facing up) and stitch:


LINING: Bring seam allowances outwards.
OUTER FABRIC: Bring seam allowances inwards.

Press at low temperature if your fabric allows it.  à basse température si le tissu le permet afin de maintenir les ressources de couture en position:


Pin outer fabric to lining, right sides together (the "right side of the lining is the side where you see the openings and right side of the center front piece). Because you pressed the seam allowances earlier, they will be easy to align and bulk will be minimized.

Stitch along neckline and armholes, stopping 4 cm (1 1/2'') before the ends, as shown in the photo on the right:


Apply clear elastic to the seam allowance, without stretching and sewing with a zigzag. The clear elastic should be the same length as the fabric so the ends will remain unsewn for now, as shown below:


FINISHING

Turn right side out and cross the straps:


Pin sides of the outer fabric together and stitch. Repeat for the other side. 

Then, pin facing with the inner fabric of the strap, right sides together, and stitch:


Bring sides/armholes right sides together and sew the clear elastic onto the seam allowance (the portion of elastic that was not sewn previously):


Bring lining and outer fabric wrong sides together, pin and baste bottom edge, matching centers:


BAND

Fold band right sides together and sew across the end, 1 cm (3/8'') from the edge. Press the seam allowance open:


Butt ends of the elastic, place over a scrap of fabric and stitch with zigzag stitches to keep in place.

Pin right side of elastic to the wrong side of the band (hiding the double notches) and baste with a zigzag along the bottom edge. Make sure the strap placement mark is visible on both sides:


Turn band right side out. Insert the band into the bra, with the elastic towards the top. RIGHT SIDE of the band should be against the lining:


Pin, matching the strap edges with the marks and baste with a zigzag. It is a good idea to move the elastic up to keep it away from the seam and avoid catching it by accident:


Pull band and elastic out of the bra and fold the elastic towards the wrong side of the band. The fabric should be taut, but not stretched out. Fold again to hide the basting stitch with the edge of the folded band:


 Pin generously, making sure everything is nice and straight. Topstitch with a zigzag or cover stitch with the outer fabric facing up:


Voilà! You are done! All you need to do now is insert foam cups through the openings and you can wear your COCO bra for your next workout!


Happy sewing!

Color-Blocked CLARA Leggings // Pattern Hack

$
0
0
As soon as we posted the first photos of our COCO sports bra, people started asking what that new leggings pattern was.


The jade/blush/black color combo was achieved with a rather simple hack of our popular CLARA leggings pattern. In this post, we will show you how to create the new pattern pieces and sew the leggings, step by step.


PREPPING THE PATTERN

On piece A, trace a line, parallel to the "cut here View A" line, about 2.5 cm (1'') above it. Make sure you transfer the notch (triangle) onto the new sewing line (this notch indicated the side of the leggings). 

On piece B, trace a line 2.5 cm (1'') from bottom edge, transferring the notch.

Cut on the lines and put the cutouts aside. You will not need them for this project:


Starting about halfway between the side notch and center front, draw an angled line that reaches the center back edge (about halfway between the top edge and double notch). You can freestyle this one, depending on the shape you want for your yoke.

Trace this shape onto another piece of paper. Your yoke piece is taking shape!


On this triangle piece, add a seam allowance by tracing a line 6 mm (1/4'') from the longest edge of your triangle. Along the short edge, trace a line 6 mm (1/4'') from the edge to create a fold line. The original pattern has a seam at center back but you want your yoke to be one, continuous piece.

Cut your yoke piece on those new lines:


On piece A, add a seam allowance 6 mm (1/4'') above the angled line and cut your piece on that new line. Your front/back piece is now ready to be cut in fabric!


Before cutting your fabric, add a double notch on the yoke and main piece, at about 1/3 of the seam. This will help you keep everything nice and straight when you assemble the garment.

Three pieces, ready to be cut, all on the fold of the fabric:


Very important: MARK CENTERS (fold) on all pieces. This mark will help align things when you pin and sew.

ASSEMBLY

You can skip this section if you have already made the Clara leggings and master the gusset application. If you did not want to sew these leggings because you were afraid of inserting a gusset, fear no more! These photos will walk you each step.

On the front piece, sew a guide seam 6 mm (1/4'') from edge and clip the curve up to the thread, but without cutting it:


Sew the gusset to one back edge (the edge where you see a double notch). The triangle notch on the gusset should point towards the inseam: 


Bring the other back edge, right sides together with the other long edge of the gusset. Pin the back to the gusset and the backs together above the gusset, matching the double notches, and stitch:


Topstitch the gusset seam allowance with a zigzag stitch. Then, pin the inseam, from one hem to the other, matching the center back seam with the gusset notch:


The clipping at center front will allow you to "unroll" the curve so it adapts to the shape of the back inseam edge. Start by sewing the section where you have a guide seam. Check on the right side to make sure you did not pinch your fabric. When you are happy with the way it looks, keep stitching from one hem to the other.

If you carefully stitch on the guide seam, it should not be visible on the right side when you are done:


Fold each waistband piece right sides together, pin and stitch across the end to form two loops:

Turn one of the waistband pieces right side out and insert it into the other one, matching seams and the half mark. Stitch along the top edge (edge without notches):


Stitch elastic ends together to form a loop and divide into fourths with pins.

Pin elastic on the SEAM ALLOWANCE, matching pins and sew with a zigzag stitch:


Bring the elastic towards one of the pieces and topstitch with zigzag, going through the fabric and elastic:


Bring waistband pieces wrong sides together and baste bottom edges together with a zigzag:


YOKE AND FINISHING

On the front/back piece, mark where the yoke starts:


Because the fabric we are using for the yoke is thinner we cut two pieces and join them, wrong sides together, with a zigzag to create a new, thicker yoke that will be more opaque:


At center back, on the legging piece, sew a guide seam 6 m (1/4'') from the edge, as shown below. Then, clip at center back without cutting the guide seam thread:


Pin yoke to the right side of the leggings, matching double notches start marks and centers. The clip at center back will help "open" the piece to match the yoke edge:


Stitch along the top edge, bring the yoke upwards and turn the garment wrong side out:


Insert the waistband into the leggings, the side without zigzag against the right side of the fabric, matching notches and centers and stitch. 

On the bottom photo, you can see the waistband, sewn and brought back upwards, in its "final" position:


All you need to do now is hem (fold to wrong side and topstitch with a zigzag and cover stitch) and you are done! Your Clara 2.0 are ready for a workout or cocooning :)


We want to thank FunkiFabrics for the printed spandex they provided for this tutorial.

Happy sewing!

Racerback COCO Sports Bra // Step-by-step Tutorial

$
0
0
Earlier this summer, we showed you how to make the COCO sports bra with a crossover back. Today, we are showing you how to sew the racerback view. 


The COCO pattern is available on our website, in printed (paper) format, but also in PDF format, which includes print-at-home, copy shop (A0) and projector files. You can also buy the paper patterns from one of our resellers.


The first ten steps of construction for both views are the same. This post will cover the straps, armholes, and back. These extra photos and explanations should help you with some steps that were a bit tricky to illustrate. For the steps common to both views, please read to the first COCO post.

STRAPS AND NECK OPENING

After you have completed the front assembly, in both main fabric and lining, you are ready to attach the strap to both pieces. Pin the outer fabric strap to the outer fabric front. Stitch and press the seam allowances towards the center.


Repeat for the lining, but press the seam allowances OUTWARDS: 


Pin main fabric to lining and sew along the neck opening:


Apply clear elastic to the SEAM ALLOWANCE, using a zigzag stitch:


ARMHOLES

Bring wrong sides together like this:


It's now time to bring the right armhole edges (main fabric and lining) right sides together. 

Fold the main fabric over and then fold the lining under so that the layers are right sides together:


As you pin, starting at the corner, towards the armhole, the left side of the bra will be squished / sandwiched into a "tunnel". If you are familiar with the burrito technique, it's the same idea.

We made a short video showing how to manipulate the fabric: How to pin the COCO racerback armhole

Stitch, starting and stopping 5 cm (2'') from ends:


Be careful not to catch the "content of the burrito" as you sew. Stitch clear elastic to the seam allowance, covering the section that is not sewn (the elastic is the same length as the edge of the fabric). After the zigzag stitch, you will have 5 cm (2'') of free elastic at both ends.

Turn right side out and use the same technique to sew the left armhole and apply clear elastic:


BACK ASSEMBLY

Pin outer fabric strap to outer fabric sides, right sides together and stitch. Repeat for the lining:


Turn wrong side out, pin and stitch armhole to connect the previous seam:


Pin and sew the free elastic ends in place with a zigzag. Bring wrong sides together and baste the bottom edges together with a zigzag stitch:


ELASTIC 

All that is left to do is to sew the band and elastic at the bottom of the bra. The technique is the same as the one used for the other view.

Did you know that the COCO bra makes a great bikini top? Pair it with the GIGI bikini bottom and enjoy water sports with confidence :)

Share your COCO bra and/or find inspiration on Instagram and our Facebook group!

Bonne couture!

CHARLIE - The Clever Bomber Jacket Pattern

$
0
0
Jalie needed a new jacket pattern. Something that would work for all our sizes. A bomber jacket was the obvious choice since we see them everywhere, from hip kids stores to classy women's wear collections.


Say hello to Charlie, our bomber jacket pattern designed for girls and women but that makes the cutest jacket for boys too!
Henri loves his Charlie jacket made of three different sweatshirt fleece!
Black front, charcoal grey back, heathered grey sleeves with striped ponte collar, cuffs and band.

To Line or Not to Line? 

Lining makes drafting so easy. No need to worry about how the pockets look inside, no need to figure out how to get a clean finish where the zipper meets the collar. At the beginning we were leaning towards the lined jacket idea...

However, for a knit jacket, you need a knit lining, which can be difficult to find with the right stretch and recovery. A lining that stretches too much can be a nightmare. Minus one for lining.

Furthermore, there are many knits with a super soft back (like this fleece from l'Oiseau that simply cannot be covered with a lining!). When wearing the jacket over a tank or t-shirt you don't want to touch a cold lining...  When putting on the jacket to get back from the gym, you would not want a silky lining sticking to your arms either.
So that was it: no lining!

More work for Jeanne, less fabric to buy for you. The drafting challenge was ON!

We wanted to avoid what I like to call "mitt pockets"... you know, when you unzip your jacket but cannot really put your hands in your pockets because they stick out like mittens? Taking the pocket in the seam allowance in the front or at the bottom made corners that were too thick... So Jeanne came up with a fun, "rainbow" pocket.

Charlie Jacket prototype in our smallest size - We used stretch twill / denim for front, back and pockets, fleece for the sleeves and ponts for the cuffs, collar and hem band.
The whole pocket is made with one piece of fabric (welt, facing and the pocket back itself)! No tiny piece to fiddle with, no "mitt pockets"! For best results, pick a fabric that you can press too, your welt will look better ;)


Main Fabric
  • Stable knit is super easy to work with and is quite easy to find in fabric stores. Look for scuba, double knit, sweater knit, beefy knits, sweatshirt fleece that do not have toooo much stretch (if you want a jacket with some structure of course).
  • If you use contrast fabric for the back, it will show a bit in the front because of the forward shoulder seam. It becomes a fun element that allows you to finish some fabric remnants that are too short for a front+back!
  • Make sure your sleeve fabric is comfortable, especially for kiddos. Mine prefer sweatshirt fleece to "cold knits" like polyester knits. This jacket is the perfect pattern to up-cycle an old pair of sweatpants (or buy sweatpants or a sweatshirt in plus sizes at a department store and you get super-soft fleece for your jacket sleeves AND matching ribbing!!!) I love the pleather look, but not all pleathers were created equal! Make sure it is nice and soft. You don't want cardboard sleeves!
  • For the front, have fun with a statement fabric! 
  • For kids, we did make it a few times using stretch woven. It works for adults too, but might require alterations if you usually do full-bust adjustment.


Cuffs, hem band and collar
  • Ribbing is what works best (especially for the collar, ribbing "opens up" and stays closer to the neck).
  • If you cannot find ribbing in local fabric stores and don't want to buy it online,  you can use a knit with some weight to it and good stretch across the grain like ponte or a medium weight jersey knit. 
Zipper
  • In a perfect world, zippers would come in 1/4'' (6mm) increments. They don't. Since we cannot grade our jackets to have 2'' (5 cm) increments in length you will have to cut your zipper (or shorten your pattern a bit, or cheat and leave a space at the top or bottom).
  • If you want your zipper to start and end where it is supposed to, you will need zipper stops (and pliers to remove zipper teeth). 
  • Zipper stops are super cheap so go ahead a buy a pack and you will be equipped to fix/shorten any zippers in your sewing career :) (this includes replacing broken zipper pull on jackets - I'm sharing this because it saved me so much time when Éléonore came home with a broken zip pull and I didn't want to replace the zipper on it!)
  • Metal zipper cannot be shortened as easily as plastic ones. If you like the look of metal and don't want to alter your pattern, look for plastic zippers in metallic color like the metaluxe zipper from YKK


Iron-On Patches
  • A low-cost solution to add fun and personality to a jacket. Save on the fabric (go with a versatile lower-cost solid knit you will have other uses for) and let your child pick his/her favorite iron-on patches! You can find cool iron-patches in some craft stores but it is online that you will have the best selection (at reasonable prices too!)
Tons of patches available on eBay!


Who is Charlie? 


I've always loved the sky and anything that flies, especially big noisy planes. When Top Gun came out in 1986, I HAD to see it!

110 minutes of fighter jets, perms and aviator looks... dubbed in French. An instant classic! I was hooked and dreamed to be as cool as Charlie when I grew up. I wanted to be an astrophysicist and civilian Top Gun instructor, nothing less! Today I have the big curly hair and sported the side-part bob a few years during high school, but I didn't turn out to be a pilot or an astrophysicist :)

However, I have everything I need to pull off her jacket + pencil skirt look! Charlie is the perfect name for this jacket and on top of that it's a unisex name, suiting for this pattern that works for boys too!

(Hmmm... I wonder if I could use the footed PJ pattern and these perfect iron-on patches to make Frédéric a Maverick jumpsuit to match my Charlie outfit for Halloween...) :)


Ready to sew?

  • Grab your sewing pattern in paper or PDF format (the pattern is layered so you can print one size at a time and also include a copy shop version)
  • Take a look at our inspiration board to get some ideas for fabric shopping!


SaveSave

VANESSA Fluid Pants - Comfy Trousers That are Not Leggings or Yoga Pants

$
0
0

Fluid Pants? You Mean Joggers, Right?

Joggers are everywhere! I love the look of the modern joggers... but only on my kids or on other people. Each and every time I try a pair on, they are too tight at the calf so everything looks like leggings with a baggy crotch. Not flattering. At all.

I did not want to give up on the idea so we started making joggers prototypes. There was nothing that would fit me in ready-to-wear and I assumed I was not the only one in this situation. The new pants would have to be comfortable but flattering. The Justin Bieber drop-crotch-pants look does not work for me.

The Fabric

The perfect jogger fabric is not too thick, not too thin, not see through, not a "cellulite-enhancer"... After so many tries with various fibres, I gave up. It's official. The perfect jogger fabric (at least one that would meet all my criteria) is the unicorn of fabrics. It does not exist.

Still. I was determined to have pants with an elastic waist and that doesn't scream I'm wearing PJ's on the street. We looked in our stash and found some challis. Rayon challis is what I like to call the "naked" fabric. It is opaque but not stiff, it flows, drapes beautifully and is cool to the touch. It was love at first try! The fluid pants pattern was born.  Something as comfortable as joggers, but a bit dressier. In the right fabric and shoes, you could easily wear these on a date or at the office!

Because our prototype had a little more ease at the calf (my #1 requirement), using a woven fabric did not pose any problem. If you find your perfect jogger knit, it will work too, no worries! You can go a size down if you want the more fitted jogger look in a stretchy fabric. If you have slim calves, go ahead and make the pants even more tapered! It's always easier to take in than to let out!

Picky Éléonore approved the rayon challis and tencel. She would wear her Vanessa pants with 3245 tank tops. It quickly became her favorite "after swim class" outfit. You know... when you want something long to cover your leg, but nothing clingy. When it's hot outside but don't feel like wearing shorts or a maxi dress...

Henri being a fan of pull-on pants, we had him try our size M in a camo baby corduroy and medium weight twill.  We even put shirting fabric to the test. It worked! He was happy with how comfortable the pants were and I was happy he was out of sweatpants :) The elasticized cuff was a perfect fit with his high top sneakers too!

The pattern is designed for women/girls, but they style works for boys too. For men, a longer, slimmer leg would be very easy to do. Simply hide the pattern cover, pretend you found a new pull-on pants pattern for men and you're good to go!

I also put the pants to the test on the other side of the planet. They are the perfect travel pants and I enjoyed wearing them during the 21-hour flight and when dealing with the A/C-to-tropics temperature changes. The busy print was very forgiving too. Challis does wrinkle... The print somehow camouflages that a bit.

The Pattern

Tencel prototype: a bit too long and to wide above the cuff.
But I love them anyway :)

We tweaked the pattern so there was enough ease for comfort but did not look like a potato sack because of the elastic waist.

Jeanne and I are pear shaped and usually dislike anything tapered or gathered at the waist. We adjusted the ease and lines until we both felt fabulous in the pants! Darts in the back reduce the amount of gathers.

We decided to add an inset at center front to give the waistband a little je-ne-sais-quoi and also reduce the gathers in the front too. It allows for fun color blocking and it is also very useful for grommets installation. If you want a soft, lightweight fabric for the waistband, you can make your live much easier using a heavier fabric for the inset only (buttonholes on sheer fabric? No thank you!). Also, if you mess up the installation, you do not ruin the entire waistband, only a tiny bit of fabric ;)

You can hem the pants (ankle length) or add a cuff (long pants). You might wonder why we did not include a shorts version. Yes, you could cut these pants at any length, but we have a little pattern hack post coming up. I think those of you looking for stylish shorts for the summer will enjoy it. Stay tuned! You can find the Vanessa pattern on our website. It is available in both paper and PDF (tiled and copy shop formats).

The Story Behind the Name

Mini Jeanne, 4 years old
One of Jeanne's lifelong dream was to learn to play piano. Because she grew up in a very humble household with 9 siblings, the idea of buying a piano or taking private lessons was unthinkable.

For her 60's birthday, she decided to realize that dream. She bought a piano and starting looking for a teacher who would teach her at home.

She found M Piano online, a small piano school offering that service. She talked to someone over the phone and had a good feeling. When Jeanne opened the door and saw her teacher, it instantly clicked.

The very bubbly Jeanne had met her match: Vanessa!


Vanessa convinced Jeanne to perform at the annual concert
with Henri.  She was the only adult student brave enough to do it! 
Vanessa has been teaching Jeanne for two years now. Every week, the notes blend with laughter during the whole lesson and Jeanne often has a prototype for Vanessa to try after the hour of piano flies by.

It's nice to see Vanessa feeling fabulous in her new clothes. At the same time, Jeanne's is proud of her achievements, her heart is filled with music AND we get review / approval of each design in size FF.

Vanessa is the PERFECT fit model. She knows what she wants, gives us her honest and constructive opinion about each design. The perfect win-win, sewing-music relationship! It was beautiful to see Vanessa bloom during those two years. Having clothes that fit, things designed for her, wearing fabrics / prints / colors that she would not dare to wear before she met Jeanne literally transformed her and boosted her self-confidence.


Guess which piece of the 
latest collection is Vanessa's favorite?
Yep! The Vanessa Fluid Pants... or joggers :)
To our great surprise, the very reserved and shy Vanessa said yes when we asked her to be our model. She nailed the photo shoots and everybody was super happy to see her in our promo photos that I shared in our Facebook group this spring. Our sizing is super inclusive and our photos now better reflect that reality.

We hope you like this latest pants pattern as much as we do. Join other Jalie fans on Facebook to discuss fit and fabric choice and don't forget to post photos of your creations on our website!

We look forward to seeing your versions of the comfiest pants ever :)

You can find styling and fabric inspiration on our Pinterest board:

SaveSave
SaveSave

The Perfect Gift for New Moms

$
0
0
There is no better than Mother's Day to introduce our new official collaborator: Mélanie, the mother behind the lovely Filles à Maman patterns (which translates to "mommy's girls"). You might have already read the Reversible Charlie Tutorial and How to color block a leotard on her blog. Here is her first post on the Jalie blog: 

First off, I would like to share some info about me :) My name is Mélanie but people in the online world know me as Mel Henry. There is one man and three girls (5, 5 and 12) in my life. My family is my everything, but sewing has been a great part of my life, since I am very young. I am super happy and grateful that Jeanne and Émilie, the talented "Ja" and "Lie", gave me the chance to share my creative world, ideas and creations with you. Yay!

For Mother's Day, we are treating a new mom and her little girl to a cute Jalie gift

Gift for Mom

 JALIE 3132The starting point for this project was the Jalie 3132 top with nursing option. This pattern is a versatile nursing top that includes different neckline, length and style variations:
  • Cap or 3/4 sleeve
  • Hood or V neck
  • Optional kangaroo pocket
  • T-shirt or tunique length
What is great about this pattern is that in includes a non-nursing version as well. This means that you can use the pattern for yourself if you are making a nursing top as a gift or you can make your own nursing top and keep the pattern to make yourself t-shirts or tunics years later, when you are no longer nursing. Don't worry if you change size along the way, we got you covered with 17 sizes in the same pattern, from 31'' to 50'' full bust!

Karine, the new mom we are making this for, is a modern young lady who likes classic, modern and comfortable pieces. We had the perfect off-white jersey with thin stripes in our fabric stash for the top!

The Joys of Learning Flat Lay Photography
Picture me holding the tripod with the camera attached to it, standing on a wobbly chair, with my 5 year-olds taking turns at pushing the button on the remote control when I say "GO"! Quite a setup! The lengths we go to so we have beautiful photos for Jalie fans! It's funny how it looks so quiet and simple on the photo. In real life it's a little... hmmm... complicated and hectic :) An epic moment for mommy and her little ones!

Nursing Top Jalie 3132 with matching bodysuit Jalie 3133

Gifts for the Baby

https://jalie.com/jalie3133-baby-bodysuit-sewing-patternOf course, we had to include something for the cute little Romy! She was born three weeks ago, but since new moms are usually well-stashed in newborn size items, we decided to go with the super-useful 6-month size.

We used pattern 3133. The pattern includes 9 sizes, which cover weighs from 5 to 30 lbs. It includes various styles and options, and works for both boys and girls:
  • Tank style
  • Short sleeve (regular or puff)
  • Long sleeve (regular or puff)
  • Round or boat neck
  • Appliqués (frill or tie)
We had some of the striped jersey left so we decided to go with a "matching outfit" idea. I picked a coral rib knit for the bindings that created a fun, lively color element to the bodysuit.

For a short sleeve bodysuit (view A), I picked a darker floral print cotton spandex with nice stretch and recovery that caught my eye, and used the striped jersey for the the bindings. Modern, comfortable pieces for mademoiselle.

Jalie 3133 tank bodysuit - (View C)
Baby Onesie Pattern Jalie 3133 - Tank Style (C) Short-Sleeved Crew Neck (A)

I would have loved to have these two patterns when I gave birth to my daughters! At 5' 10'', everything that was available in stores back then was too short and I was never happy with the fabrics or the styles. With the 3132 pattern, my closet would have been packed with stylish nursing tops with a perfect fit!

Same thing for bodysuits. They require so little fabric and sew up so quickly that I would have made tons with fabric scraps.

Émilie told me that these two patterns were drafted when Éléonore was born. She also disliked the styles off the rack with the too-many-layers or the maze-like designs.

Éléonore was tiny and most available bodysuits in stores were ill-fitting. They were also often pastel coloured, which washed her out. Jeanne made this pattern for her so she could have custom-made onesies in fabrics that made her dark eyes pop.

With this pattern you can make great baby shower gifts for years to come!
Jalie 3133 Bodysuits

Now, it's time for my gift to you. When picking gifts, I often go for things that I would love to receive myself and, what I would love for Mother's Day, is some sewing time. Here are printable coupons you can use for well-deserved Jalie time. Your loved ones will be grateful for this last-minute gift idea :)


Happy sewing,

Mel xoxo 


Vanessa Jogger Shorts // Pattern Hack (Jalie 3676)

$
0
0

You own (or are eying) the Vanessa Fluid Pants pattern and think "pants can wait, it will be summer soon (at least in Canada)"? We've got news for you! After reading this hack you will be able to wear this pattern year round as you will have anything you need to make great pants AND stylish, comfortable shorts!


First off, sizing. I go back to the Jalie Measurement Chart each time I make a garment, even if I made something the week before. Our measurements change all the time and my kids sizes change even more quickly.

Juju's measurements (as of today) are 28" waist, 37 1/2'' hips. Her waist corresponds to size S and  hips are between sizes S and T. The hips measurements is the most important when picking a size for pants.

I would normally go with size T, but I will use S for this project because:

  • Today's hack will add ease 
  • I will use a knit that stretches across the grain


Pattern Preparation

  1. Print / Trace the pattern (I am using the PDF pattern for this hack - the pattern is also available in paper (printed) format.

    If you are using the PDF format, remember that you can print one size at a time! Take a look at our tutorial How to print and assemble a PDF if you are not familiar with downloadable patterns and want to learn more about them.

  2. Cut the pattern pieces making sure all marking and notches are visible. They are very important and will make assembly much easier.

    In the following picture, I cut the notches flush with the cut line and trace the triangles inside. I usually clip the fabric instead of cutting the outward triangles that you see on the original pattern. However, I strongly recommend you keep the triangles outside, as you see them on the pattern, especially if you are working with a fabric that frays. This way you will make sure you can all see them.

  3. Measure approximately 4'' (10 cm) inseam (black line) on the front and back pieces.
  4. Measure approximately 5'' (12,5 cm) below the side seam notch (red line) on front and back pieces. 
  5. Trace from inseam to side seam to create a "temporary hem line". 


Pattern Alteration

Back Piece

  1. Cut or retrace your new short pieces.
  2. Draw the seam allowances (1 cm / 3/8'') from edge to visualize the actual seam lines.
  3. Divide in 4 sections, with lines parallel to center back
                

Front Piece

  1. Place the pocket bottom (D) piece under the front piece, lining up notches, to see the complete front waist and divide into fourths as shown.

Let's Have Fun! 


  1. Cut along the lines, leaving the top attached. Fan out to add about 2 cm (3/4'') between each section. If you want more ease, open up a little more. You can go up to 5 cm (2'') for a "culotte" look.


  2. Place a sheet of paper under your pattern and tape the sections in place.
  3. Trace a new hem line, square or curved, as you feel it. Follow your inspiration!
    You can see here that the dart is cut. I moved the point towards to the left to align it with the  "opening"

  4. On your front piece, start a line, square with your inseam.


  5. Use the front piece as a template for the back hem curve . When putting the pieces one on top of the other, always align the notches to keep everything straight and in this case, make sure you have identical side seams lengths.


  6. Cut your front hem along the line.


  7. Now it is important to check the pocket placement because you don't want pockets sticking out at the bottom! You simply have to lay the pocket and pocket facing pieces on top of the front piece and trim them if you need to. We decided to remove about 1'' (2,5 cm) since our pockets will be made of knit and therefore stretch downwards a little when Juju puts her hand in them.


  8. Trim the pocket (D) and pocket facing (C)


Time to Sew

  1. Cut 1 1/2'' (4 cm) wide strips on the bias (45 degree angle with selvage) for the shorts binding. 
  2. Overlap ends as shown and stitch at 45 degrees (diagonal). 
  3. Trim the seam allowance to 1/4'' (6 mm).


  4. Press seam allowances open. 
  5. Assemble the shorts, following the pattern instructions (you can read them on the Jalie website before buying your pattern!), but leave a section of the side seam open.


  6. Pin right side of bias to wrong side of shorts and stitch 1/4'' (6 mm) from edge.


  7. Bring the seam allowance upwards, on right side of shorts. 
  8. Fold bias wrong sides together, by 1/2'' (1,25 cm), its raw edge against the seam.


  9. Fold bias again onto the right side of the shorts.
  10. Pin binding generously.


  11. Topstitch binding 1/8'' (3 mm) from top edge.


  12. Finish the side seam (right sides together).
     
TERMINÉ!


Finished shorts - wrong side out


How to wear them?

Wear your new shorts with a Pika Tank 3679, a french terry sweatshirt 3355 or a sleeveless 2805!


Here is a Pinterest inspiration board with fabric, color and outfit ideas for your Vanessa shorts:


You like this tutorial? 

Pin the Pinterest-friendly image to one of your Pinterest board!


EnregistrerEnregistrer
SaveSave

MARIE-CLAUDE - Because One Raglan is Not Enough

$
0
0

As most of you know, our 3245 raglan top is very popular and you probably have it in your pattern stash already. Over the last years, many people have been asking how to raise the neckline. It's not impossible to do... but it's not a fun alteration so we decided to take care of it :)

It was 100% clear that we did not want to create an "add-on" package or do a copy/paste of the previous pattern. We started from scratch and kept one word in mind: versatility!


The Pattern

The new MARIE-CLAUDE (dear francophiles, you can listen to the pronounciation here) includes, a draping turtleneck, a hood (with an optional hole for the ponytail), a regular neck band. You have the choice between a regular cuff or a fun cuff with thumbholes.

This top is great for lounging, running, as a thermal layer. It is a top that you feel comfortable in, no matter what you are doing :) The curved hem provides a little more coverage without "cutting your silhouette in half".

It is less fitted than our Valerie Rashguard pattern. It skims the body without clinging. There is some ease in the sleeve, without having fabric bunching under the arm (which is often the case in loser-fitting raglan tops).

Hacks and Inspiration

For last year holidays, I lengthened the top and turned it into a lovely polka dot raglan dress. I used a oh-so-soft hacci knit and wore it over tights. Sorry... I forgot to take photos :/ 

I would love to try turning it into a sleeveless or cold-shoulder top this summer! I can't wait to see what people share in the Gallery!


Here is a Pinterest Board with ideas for fabric, color and styling:


Who is Marie-Claude?

Henri changed school two years ago and this past Christmas, he told be he would love to see his physical education teacher from his old school because he missed her too much.

I managed to get in touch with her and she surprised him at his tennis class. He was delighted to spend an hour with her to chit chat and I was very grateful that she took the time to come see him. A generous and kind gesture that we will both remember forever!

Miss Marie-Claude is a wonderful teacher who always goes the extra mile to make her students happy and enjoy sports as much as she does. This pattern is my way to thank her for making a difference in Henri's life :)


After our long chat filled with fun memories of the two years Henri spent with her, I thought her name would be the perfect pick for a versatile pattern for women who love to move. From running top to thermal underwear for skiing on Quebec hills, this pattern has got you covered!


A Special Prototype... 


Last summer, we spent a week at Village Vacances Petit-Saguenay (VIVA) (a wonderful all-inclusive camping in Saguenay - think Club Med along a Fjord... out of this world!), my little gymnast did a cartwheel in the grass and broke her arm.

Long story short, what should have been the worst summer-vacation-scenario turned out to be the most amazing customer service I ever experienced. The staff when above and beyond to make sure everything would go as smoothly as possible for everyone in the family. The VIVA team blew us away with their humanity.

A great team of fun people with big hearts! 

Bidule's Lucky Towel
The first thing Éléonore asked for when she woke up at the hospital was "mommy, can you pass me the lucky towel my new friend gave me yesterday?". I reached for the beach towel an animator gave her the night before and broke into tears when I saw, written with a Sharpie, "BE BRAVE, I AM THINKING OF YOU,  Bidule ". A totally unexpected, generous and thoughtful gesture that made a big difference for my little one.

What does this have to do with the raglan pattern!??!

When Éléonore saw her arm all wrapped up, she started crying. Not because she had a cast that would keep her from biking and swimming all summer, but because they had to cut off her favorite raglan tee.

I had kept the cut-off sleeve the doctor gave me and I turned it into a pirate hat for "Pin-Pin" to make her smile! Needless to say that we will keep this one-sleeved raglan tee in our memory box for a while :)


She did not want to drive back to Quebec City. She wanted to go straight back to VIVA for the remaining two days we had originally booked. "Mommy, our group has not found the Marshmallow Tree yet!". We stayed until the end of the week, sa planned.

She found the tree, everyone was happy :)

Yes. The place was THAT magical.


SaveSave

Sewing Outside The Box - Swimsuit Edition Blog Tour

$
0
0

We are really happy to join the Lulu & Celeste + Sprouting Jujube Productions tour: Swimsuit Edition. Thank you for stopping by :)

***Voyez la version française de cette publication ici:  Maillots de bain été 2017 avec Jalie *** 


When I suggested this idea to Jeanne and Émilie we thought it would be fun to have my twins and Éléonore model matching outfits. They said yes immediately!

Choosing the patterns

Jalie has a lot of swimwear patterns, but we took this blog tour as an opportunity to "sew outside the box". We brainstormed on the types of suits and features we were looking for and chose patterns that fit the bill. We are THRILLED with the results!

Open-back one-piece swimsuit

I used the Violeta dress/leotard pattern as is. The dance leotard has the perfect leg cut and a nice open back for a cute swimsuit with great coverage in the front, but the open back everyone loves.

Skirtini

I picked the LOULOUXE skort that makes an amazing beachwear item because of it's attached shorts that can be worn without underwear (they have a lined crotch panel). This is a wonderful beachwear skirt, but to go in the water I think the 3023 skirtini or 2796 multi-sport skort would be options that dry a little quicker :)

For the top, I used the PIKA sport bra. I love the look of the rounded yoke/strap in the front.

Springsuit (aka wetsuit without legs)

I wanted some sun protection (long sleeves), a one-piece (not a rashguard with separate bottoms), but my girly girl did not want a wetsuit look with long legs. I used skating dress pattern 2800 because it had everything on my list.

Skating dresses are made of spandex, are very fitted and have attached briefs. If you remove the skirt, it opens up a whoooole world of swimwear sewing opportunities! Jalie has tons of skating dress patterns so make sure you take a look at them for your next out-of-the-box swimsuit project :)

I left off the mandarin collar and I looked at the VALERIE rash guard instructions for the zipper and make a neck band and added a zip guard. Also, because my fabric print was way too pretty to put a princess seam there, I taped the front pieces to remove that seam.


Most important: The girls loved their swimsuits. It was so much fun to see how each outfit really matched their personalities. They get along so well that we call them the triplets :P 


Blog Tour Bonus Information and Giveaway

Today's giveaway: 

Enter the Rafflecopter below to wina Jalie $20.00 (CAD) gift card + Imagine Gnats $40(USD) gift card
a Rafflecopter giveaway

Grand Prize:
Two ways to enter: Enter the Grand Prize Rafflecopter, and/or post a swimwear item you’ve sewn on Instagram. Readers can enter more than once on Instagram but must use a different photo/different sewn swim item per entry. (Ie. multiple photos of the same outfit only count as one entry). Items allowed: swimsuits and swim coverups for the entire family (women, men, children). To enter on IG: Post your photo and use the hashtag #TheSwimsuitEditionTour and tag @luluandceleste and @debzaleski in your post. Items can only have been sewn since the beginning of June 2017. Closes July 2nd 11:59pm EDT.


Prize: Phat Quarters $25(USD) gift card + Boo Designs $100(AUD) gift card + Sewing by Ti -$20(USD) gift card + Made by Jack's Mum - swim pdf pattern bundle

a Rafflecopter giveaway

Follow our friends along the tour! 

Monday, June 26
Tuesday, June 27
Wednesday, June 28
Thursday, June 29
Friday, June 30


Happy sewing! 
Mel Henry
xxx

Viewing all 110 articles
Browse latest View live