Quantcast
Channel: Jalie Patterns' Blog
Viewing all 110 articles
Browse latest View live

NICO - Boys Want Raglan Tees Too!

$
0
0
Henri wearing kids size M (9)
Forest Origami knit printfrom L'Oiseau Fabrics
We received many requests from customers asking for a men's raglan tee. It is such a great staple garment that we had to include one in the lot :) So here is the NICO raglan t-shirt pattern for boys and men!


Not too fitted, no too loose... just enough ease to be forgiving and work with most knits. Short, 3/4 or long sleeve, curved or straight hem. The pocket on the photo is a last-minute improvisation (we drew the shape on a piece of paper 10 minutes before the photo shoot!). The statement pocket trend is big here thanks to Poches & Fils. You can find lots of inspirations on their website :)

Add a pocket to your Nico t-shirt  >> FREE POCKET PATTERN AND TUTORIAL


    Rashguards for Boys and Men

    Thanks to our small grading increments, you can easily go up or down a few size for a more fitted look (for a very fitted rashguard). If your fabric has 70% stretch across the grain and in the length, you can go down 3 sizes for a look like this:


    We would like to thank L'Oiseau Fabrics and Funki Fabrics (the link shows all the fabrics we used) for the beautiful fabrics that we used for our prototypes and cover photos!

    Who is Nico?

    I took a skydiving course in 2015 and convinced Jeanne to try a tandem jump that summer. She said yes! That is when she met Nicolas, her friendly cameraman:


    During the off-season, he helped us shooting and editing a few video tutorials. He became a dear friend of the Jalie family and was there when we drafted the pattern. Nico is stylish and opinionated (he can't help it, he's French :P). We tweaked the pattern until he was 100% happy with it. He liked it so much that he accepted to be our model for the photoshoot and that we named the pattern after him (since we are not ready yet for a skydiving jumpsuit pattern yet).


    Don't wait any longer! Grab your downloadable or paper pattern, a funky printed knit, and have fun making a Nico Raglan!

    How to Turn Straight-Leg Eleonore Jeans into Skinny Jeans

    $
    0
    0


    When we designed our now über popular Éleonore Pull-On Jeans, we went with a classic straight leg to make sure everyone's calves would be covered. We know that skinny jeans are a staple in many peoples' wardrobe and we knew many would want their jeans fitted all the way to the hem.

    Since not all legs are created equal and because fabric stretch can make a huge difference in the amount you have to take it for the transformation, we did not venture into giving people exact measurement.

    Instead, we went with a simple diagram showing where to start taking them in. We thought #EleonoreWeek is a good timing to publish this more detailed tutorial, where we show you how to take your straight leg in the right way and... end up with two identical legs :)

    We saw strange things on YouTube that would lead to crooked jeans. We think this post will be useful not only to people making the Eleonore pull-on jeans, but to anyone upcycling older jeans or patterns.

    Let's get started

    Marking the new seam line

    1 - Make your Éléonore jeans as is but SKIP THE INSEAM TOPSTITCHING.
    It is the only compromise you have to make for your first pair :)
    If you finish your seams with your serger, stop at the hips.

    2 - Turn the jeans inside out and put them on.
    3 - Pin along ONE leg (vertically), where you would like the new seam to be.
    It's good to have a sewing friend for this step!
    Start at the bottom, where you pin the same amount on both sides
    of the leg to keep the leg centred and straight.
    Pin all the way through the thigh but stop at the hips. 

    4 - Take the jeans off (careful not to scratch yourself with the pins!),
    mark the pin placement (the new seam) next to the inseam and side seam.
    Remove the pins and connect the marks with a ruler.

    5 - Baste with a long straight stitch on the lines.

    6 - Turn right side out and try the jeans on. If you are happy with the skinny leg, go to step 7.
    If you need more adjustments, pin / move the seam until you are comfortable.
    Mark the final length you want too (skinny jeans are shorter than straight leg jeans). 

    TRANSFERRING THE MARKS TO THE OTHER LEG


    With this technique, you make sure that the exact same adjustments are made to the second leg!

    7 - Fold the pants in half to lay one leg over the other. Make sure the inseams are together, side seams together. 
    8 - Pin on the new seam, through the four layers of fabric.

    9 - Flip the legs and mark the visible pin segments

    10 - Connect the marks so that your new seam line is clearly visible

    Stitch on the lines on the second leg and try the jeans one last time. It fits great?

    • Stitch again over your basting. 
    • Trim the seam allowance 1 cm (3/8'') from the new stitching line.
      VERY IMPORTANT: Keep your fabric scraps (and remember which one is the inseam, which one is the side seam)
    • Finish with your serger or zigzag stitch.
    Use the fabric scraps to transfer your modifications to your pattern for your next pair because we all know that you can never have too many Eleonores in your closet :)


    You enjoyed this tutorial?
    Don't forget to pin the image below onto your Pinterest board!


    Share photos of your Éléonore Jeans in our Facebook Group, our Photo Gallery and on Instagram with hashtag #JalieLife #JalieEleonore #SkinnyEleonoreJeans

    How to Add Ruffle Sleeves

    $
    0
    0

    Our 3352 dolman top is a favorite in my wardrobe since its launch. With the big ruffle trend we see lately, I thought it would be fun to take one to the next level and hop on the bandwagon.


    Adding this ruffle/bell sleeve to our dolman top is really easy AND you get to skip armhole / sleeve hemming in the process because it it folded in half!

    1 - Assemble front and back, hem the bottom and finish the neckline, following the pattern instructions


    2 - Measure the armhole opening and your torso (the torso measurement is included in the dolman top's sizing chart)

    3 - Cut two rectancles (your sleeves).

    The measurements for each rectangle is: (OPENING x 1,5)  by (25% of TORSO measurement).  Torso?!?! Yes! Because the taller you are, the longer it has to be :)

    Of course, instead of the torso measurement, you can simply go with the finished ruffle length you want. In this case the calculations would be: (FINISHED RUFFLE LENGTH + 1 cm (3/8'')) x 2.


    For my size (U), this means a 24'' x 15'' (60 cm x 38 cm) rectangle for a finished ruffle that will be approximately 7'' (18 cm) long.


    You haven't had your morning coffee yet? Here is a little cheat sheet for you. You can use the for the dolman or any other opening (t-shirt sleeve, hem) you have!


    You can cut them along the grain or perpendicular to the grain, as long as the two rectangles are identical :)

    Note that the longer the rectangle, the more gathered it will have to be. Since this sleeve is folded, 1.5 is a good ratio. For a single layer or a lighter weight fabric, you could make it longer, to make it more gathered.

    5 - Fold the sleeve RIGHT SIDES TOGETHER and stitch to form a loop.


    6 - Fold the sleeve WRONG SIDES TOGETHER, matching the half mark.


    7 - Sew two rows of gathering stitches (longest straight stitch setting) within 6 mm (1/4'') of the edge.


    8 - Pull the bobbin threads to gather,


    until the sleeve matches the armhole.


    8 - Turn the top WRONG SIDE OUT, pin the sleeve to the right side of the armhole, matching the sleeve seam with the side seam, the half mark with the shoulder seam.


    Distribute the gathers evenly between the pins and add more to keep everything in place while you sew.

    9 - Stitch 1 cm (3/8'') from edge, on the ruffle, without stretching the armhole.

    Turn to right side and press gently.


    Have fun with print direction and textures! A lace sleece with a knit of the matching color, vertical vs horizontal stripes... This hack is a real stash buster and you can even use it to update the look of any dolman top or t-shirt you have in your closet!


    Don't forget to share the love on Instagram with hashtag #jalielife #jaliedolman, in our Photo Gallery. and on your Pinterest boards :)

    Happy sewing!


    Quick Sewing Ideas for Busy Elves

    $
    0
    0

    Only 10 days before Christmas, you are busy and running out of time or ideas? Don't worry, we are here to help! We put together a list of 10 sewing project ideas for unique gifts. Avoid the crowds, put on some music and spend quality time in your sewing room rather than running in a shopping mall. Hostess gift, teacher gift, stocking stuffers, last-minute party outfit items... we got you covered.

    1- Cocoon Cardigan

    For you (yes, you deserve it too!), your mom, godmother or a friend. A quick project that requires minimal adjustments and that has that wow effect!

    2- Thermal Socks

    To keep small and big feet warm during winter. Made with Polartec Power Stretch or in a french terry (if it has 40% stretch BOTH ways), it will be a success!

    3 et 9- Slippers and Aviator Hat 

    The 2318 pattern is a classic. It includes mitts, tuque, aviator hat and slippers! It is one of the rare Jalie patterns that starts in newborn sizes. All the items in the pattern can be made with polar fleece and are quick and easy to make.

    For the aviator hat we made for Eleonore, we used Windpro fabric from Discovery Trekking with fluffy fabric for the inside to keep her warm. The harder face of the Windpro is great because it blocks the wind and is water resistent, perfect for spending long hours making forts and playing in the snow. We have already lots of snow on the ground in Quebec City and are sure to have a white Christmas this year!

    4- Éléonore Pull-On Jeans

    Super easy to make and very comfortable, this pull-on jeans is the answer to last-minute outfit planning! Use a shiny fabric or stretch velvet for a festive look.

    5- Gift Card

    You know someone who loves Jalie patterns? Email her a gift certificate or print it out (send it to yourself to keep it a surprise ;)) to give in a card.

    6- Marie-Claude raglan pullover

    The oh-so-soft cotton/lycra/rayon fabric from l'Oiseau was the perfect choice to make a raglan pyjama top. They have a wonderful selection for everyone, go take a look at their beautiful printed knits.

    7- Legging

    Another classic that you can cut and sew in less than an hour. As a PJ bottom with the Mare-Claude or under a sparkly tunic, we want a pair in every color, don't we?

    8- Galaxie

    Jupiter will come to the rescue to carry your shoes from one party to the other! You need to carry shoes for the whole family? Go with the larger version, Sirius!

    In the Galaxie pattern, you will also find great gift ideas that you can make with easy-to-find fabrics: lunch bag, beach bag, pencil case.  It is a great stash buster. With Pluton and Neptune, easy-to-make bento bags, you can turn a plain food container into the cutest gift under the tree when giving home-made goods, from fudge to fruit cake.

    10- Loungewear (Snow Day uniform) (aka Jalie 3355)

    There is nothing like wearing something comfy by a fire after playing outside. This sweatshirt and sweatpants combo is made of stretch fleece with "furry" back. Éléonore likes a fitted ankle so we tapered the leg and sewn ribbing instead of an elastic at the cuff. The starry fleece is a gift from l'Oiseau. This specific print is no longer available, but they do have a few options in their stretch fleece section that will make you want to make matching outfits :)

    The pattern includes both the sweatshirt and sweat pants, and works for men and women, boys and girls.

    We hope this list will inspire you and help you complete your gift list in time. Sewing gifts are special. They will be cherished and remembered for years by those who receive them.

    We wish you and your loved ones a wonderful holiday season and a very happy new year.

    Jeanne, Émilie et Mélanie


    Jalie 101: What's in a Jalie Pattern

    $
    0
    0
    Many people wonder how Jalie is different from other patterns they have tried. We thought it would be a good idea to sum it all up in a few blog posts. It will also give you useful info about patterns, things you perhaps never noticed before ;)

    Format

    99% of our sewing patterns are initially released in paper (printed) format and then converted in PDF (a digital format that works on Mac and PC) in house, for those who prefer printing at home (or copy shop). We make exceptions for design ideas that would not fit on the standard 38x50 sheet (like our circle skirt pattern or the Galaxie bags pattern)

    Whenever a printed sewing pattern is discontinued to make more room in the warehouse, the PDF pattern stays to keep the pattern available to people who might have missed it during the 8-10 year period where it was available in print.


    You are getting the exact same product whether you buy a paper or PDF pattern, but the information that comes with the pattern pieces is simply packaged a bit differently. 

    With a printed pattern, it's all on that one giant sheet of heavy white paper. You have to trace the piece in order to use the pattern in more than one size.

    With a PDF pattern, you have a separate file where all the precious information you need to assemble your pages and the garment is grouped. You can either print that information or only download it on a tablet to save paper and ink. You can print one size at a time and reprint as many times as needed, cutting your pieces each time (if you are not a fan of tracing).

    What's in a Pattern?

    Here are the main sections that we will cover in this series:

    A - Measurement chart / Sizes (once the sheet is folded it becomes the "back of the pattern")
    D - Sewing Instructions


    The main areas that you will find on a printed (paper) pattern


    Where you will find the same info with a PDF purchase

    Free Instructions vs. Instructions in the PDF pattern

    Free sewing instructions for all our patterns are available online.  You will find a link under the "tutorials and instructions" tab). This way, you can read them before purchasing to assess the skill level required, if you feel comfortable tackling the project. You might also find free video tutorials for select patterns.


    The instructions included in the PDF patterns include the free instructions but also everything else you need to complete the project (sizing, cutting layout, PDF assembly) that you will NOT find in the free download.

    We say "READ FIRST" in the file title... we mean it :)

    Next up...

    Stay tuned, in a few days we will explain in more detail the back of the pattern and the wealth of information it contains!

    While we prepare the next post about the different sections, you can flip through our catalog to find inspiration for your next sewing project ;)

    À bientôt!


    Jalie 101: The Back of a Jalie Pattern

    $
    0
    0
    Before you open any printed pattern, most people first turn the envelope over to look at the back of the envelope, right after looking at the cover photo. If you purchased a downloadable (PDF) pattern, you will find that information in the Instruction package.


    When looking at a the back of a Jalie patterm for the first time, you might be a bit overwhelmed for various reasons:
    1. French and English coexist on the same page (and English is not listed first)
    2. Both metric and imperial units are used (for measurements and yardage)
    3. There is usually over 20 sizes on the pattern (up to 28 sizes in one pattern!)
    Don't worry, you'll get used to it :)

    Let's break it down together:


    A: Pattern General Information

    You will always find the pattern number, name and description at the top. At the bottom, you will always see the pattern pieces, line drawing showing the views included.

    B: Body Measurements

    We work very hard to have good fitting garments that fit true to the Jalie size. The Jalie size is a letter, not a number. We did that on purpose to make sure people take a few minutes to take their body measurements. RTW size or age provides an ok estimate, but for a good fit (which is probably one of the reasons why you are sewing rather than buying clothes off the rack), you need to know the body measurements in order to prick the proper size.

    In most recent patterns, we put the most important one in red. In all patterns, we also include that information at the very beginning of the sewing instructions (bust for tops, hips for bottoms and girth for swimsuits and leotards, etc).

    All the sizes you see there is what the pattern includes. You do NOT need to pick a size when buying the pattern. You get them all! Both printed and PDF patterns come with all the sizes you see in the chart. This means that, once you have your pattern, you can make a garment again and again for kids and adults of all shapes and sizes!

    C: Yardage

    That is the amount of fabric you need, in yard and meters. It is sometimes listed per view or per section (if there is color blocking) or by fabric width. Look closely on the left to identify the correct label for the correct fabric.

    If notions are required, you will find them listed, by size group, in the bottom of the page (bottom right corner usually ;))

    D: Fabric Info

    We always provide a brief description of the type of fabric recommended for the pattern. Those are fabrics we most probably tested and / or know they will work. We do not include all fabrics under the sun so if you find a mysterious fabric with a funky name that feels right (because it feels like another knit top you own or drapes like the garment on the cover photo, it's ok. Trust your sewing instinct. Just make sure it has the correct amount of stretch if it's a pattern with a stretch requirement guide.

    Speaking of fabric stretch, it means the percentage by how much it stretches, NOT the spandex content. You need to hold a fold of fabric, a few inches away from selvage, position your fingers on the ruler and stretch EASILY to the end of the ruler. You could also do the math and hold 10cm (or 10inches) and looking at the final length you get when stretched comfortably. If the fabric calls for 60% stretch, it means it has to stretch from 10 to 16 (10 + 60%).

    E: Seam allowance info

    Even though the seam allowance is indicated in the instructions, we always listed on the back as well as some people may not feel comfortable working with patterns that have a seam allowance narrower than the 5/8'' they are used to. Seam and hem allowances are ALWAYS included in the pattern. You don't need to add anything. You can cut and sew without the need for an extra coffee or special ruler :)


    How to Color Block a Leotard

    $
    0
    0
    Last year you bought a gymnastics leotard pattern with classic, plain front for your daughter. Like easy-to-make 3138. However, this season, after browsing on Pinterest for a little too long, she found THE leotard. The style every cool kid at the gym is begging their mom to buy (or make). A beautiful two-tone leo with a bright, oddly-shaped appliqué between the two colours.


    You look online but obviously cannot find a pattern with the exact same cut your daughter has been dreaming about. The solution? Draw on your pattern and cut!

    Yes. You can do it.

    It is actually much easier than it sounds. You will not have to buy another pattern or a RTW leotard!

    Mel Henry from Filles à Maman (who is also a Super Mom to a stylish teen) shows you how to do that. A step by step color-blocking tutorial, with lots of beautiful photos. Take a look, find your craziest fabrics to mix and match and have fun!


    Jalie 3022 Hack - Tie-Side Shorts by Dawn

    $
    0
    0
    Hi guys! It's Dawn, of Two On, Two Off, doin' a little guest blogging over at the Jalie blog. You knew it would happen eventually. I'm just waiting to get my Canadian citizenship so I can move into Jalie headquarters and be even more of a superfan. If they won't let me live there, I will be that creepy woman around the corner that asks for sugar at your door and then peeks around at the inside of your house. I'm sure they will love that . . .

    Anyhoo, do you ever need some mind-numbing vegging time? On the computer? With Pinterest? I swear that site has caused several remodeling projects and several garments over the years. My husband has grown leary of my glassy-eyed admiration.

    Me: Honey, what do you think about painting our bedroom Whispering Spring?
    Honey Bear: Uh-huh.
    Me: Ooooh, what about Quiet Moments?
    Honey Man: What? Quiet what??
    Me: You know, calm blue shades that will help us unwind. Ooooh, how about Beach Glass?
    Him: *blink, blink*
    Him: Oh crap, are you looking at Pinterest again?

    Well this time I was not looking at paint. Instead I was flipping through the Jalie Inspiration photos. Have you seen those? They have inspiration photos and say, “Use Jalie XXXX and add length to make this summer cardigan.” I stumbled upon the Inspiration – Swimwear category and saw a few side gathered swim bottoms (go look, you know you want to). I knew if I added an inch or two of length, I would have a pair of cute running/summer shorts. So, voila, here you are. I wrote a little tutorial and everything. Aren’t you guys lucky?

    First, you should know what I used for my base pattern. I used Jalie 3022 which is a yoga pants/shorts pattern. The pattern is available in both paper and PDF.
    j_3022 


    Okay, how cute are these shorts?? And really, they'd be cute even without the side detail.
    j_3022_1


    I love the little tie detail on the side!!
    j_3022_4


    j_3022_2

    j_3022_5

    j_3022_6


    And, as promised a little tutorial for you! Toot! Toot!!
    j_3022_3


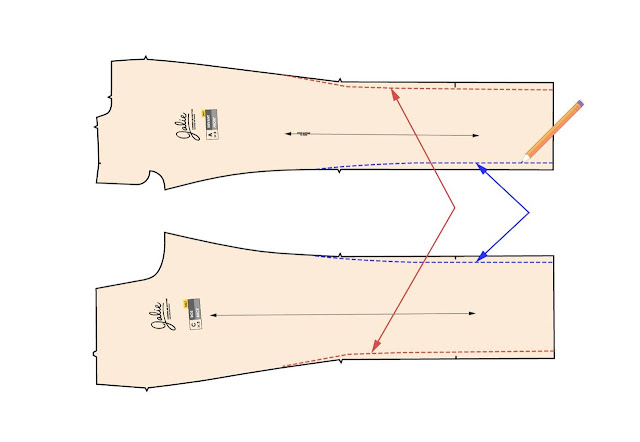
    Trace off your normal size for all the pieces, one front, two back pieces, two waistband pieces, and a waistband facing. Once you are done, add an EXTRA 1/2” seam allowance to the SIDE SEAMS of the front and back pieces. Be sure to transfer your notch marks to the new side seams. Don’t do anything to any other seams.
    j_3022_8


    j_3022_7


    Cut out your fabric and sew the front and back together like this. You will be tempted to go ahead and sew your side seams too, DON’T.
    j_3022_9


    Sew your inseam. I always serge this and do an extra zigzag there just to provide some secondary clothing malfunction safety. Eep! While you are at it, hem your shorts. Your side seams are still not sewn.
    j_3022_10
    j_3022_11


    NOW, you can sew your side seams, but DON’T SERGE THEM! REMEMBER you are sewing this at 3/4” seam allowance!!! Your original seam allowance was 1/4” and you added another 1/2” allowance! You want a straight stitch. Yes, I know these are knit. You can either stretch the fabric while you sew (like I did) or use the lightening stitch. You want those seam allowances to lie flat when you are done!
    j_3022_12


    Now, press those seam allowance open and sew them down. This creates a casing for your ties. I go from the inside and make sure my bobbin thread matches the outside. I used gray in the bobbin for my pair.
    j_3022_13


    Here’s your hem.
    j_3022_14


    This is what it looks like from the right side.
    j_3022_15


    Make some knit tubes and thread them through your casings.
    j_3022_16


    You want a little extra tube to stick out the top where you will attach it to the waistband.
    j_3022_17


    Sew the waistband together and attach it like normal to the top of the shorts. When you sew this at the side seams, this will close the casing and secure the ties in the waistband seam.
    j_3022_18


    From the inside. Yes, I use varigated thread in my serger loopers. :)
    j_3022_19


    From the outside.
    j_3022_20


    BOOM!
    j_3022_6

    Mini-Catalog

    $
    0
    0
    We recently shared this mini-catalog on our Facebook page and it was a big hit. I thought it might be a good idea to post it here so everyone can flip through the pages.

    To save the catalog in PDF format that you can view offline, click the OPEN button. You will see an option to save as PDF:

    Also, we linked every photo to it's pattern page on the website to make your shopping faster and easier. We will include a printed copy of this mini-catalog with every shipment too so you can share it with sewing friends, coaches or keep in your sewing room for inspiration :)


    The Jalie blog has moved

    $
    0
    0

    Looking for a Jalie blog post / tutorial? 

    Don't worry, they are not gone for good, they just found a new home: NEW JALIE BLOG

    We transferred our most popular tutorials to our new website, where we added a filter to help you find posts linked to specific patterns or narrow them down to a type of post (video tutorial, photo tutorial, pattern hack, freebie, etc).


    Here are links to a few of them:

    Vanessa Jogger Shorts

    Color Blocking Technique

    Nursing Top Sewing Tutorial

    How to Pick the Right Leotard / Dress Size

    Free Pocket for Nico


    See you on the website :)


    The Jalie team


    Viewing all 110 articles
    Browse latest View live