Quantcast
Channel: Jalie Patterns' Blog
Viewing all 110 articles
Browse latest View live

Sewing Outside The Box - Swimsuit Edition Blog Tour

$
0
0

We are really happy to join the Lulu & Celeste + Sprouting Jujube Productions tour: Swimsuit Edition. Thank you for stopping by :)

***Voyez la version française de cette publication ici:  Maillots de bain été 2017 avec Jalie *** 


When I suggested this idea to Jeanne and Émilie we thought it would be fun to have my twins and Éléonore model matching outfits. They said yes immediately!

Choosing the patterns

Jalie has a lot of swimwear patterns, but we took this blog tour as an opportunity to "sew outside the box". We brainstormed on the types of suits and features we were looking for and chose patterns that fit the bill. We are THRILLED with the results!

Open-back one-piece swimsuit

I used the Violeta dress/leotard pattern as is. The dance leotard has the perfect leg cut and a nice open back for a cute swimsuit with great coverage in the front, but the open back everyone loves.

Skirtini

I picked the LOULOUXE skort that makes an amazing beachwear item because of it's attached shorts that can be worn without underwear (they have a lined crotch panel). This is a wonderful beachwear skirt, but to go in the water I think the 3023 skirtini or 2796 multi-sport skort would be options that dry a little quicker :)

For the top, I used the PIKA sport bra. I love the look of the rounded yoke/strap in the front.

Springsuit (aka wetsuit without legs)

I wanted some sun protection (long sleeves), a one-piece (not a rashguard with separate bottoms), but my girly girl did not want a wetsuit look with long legs. I used skating dress pattern 2800 because it had everything on my list.

Skating dresses are made of spandex, are very fitted and have attached briefs. If you remove the skirt, it opens up a whoooole world of swimwear sewing opportunities! Jalie has tons of skating dress patterns so make sure you take a look at them for your next out-of-the-box swimsuit project :)

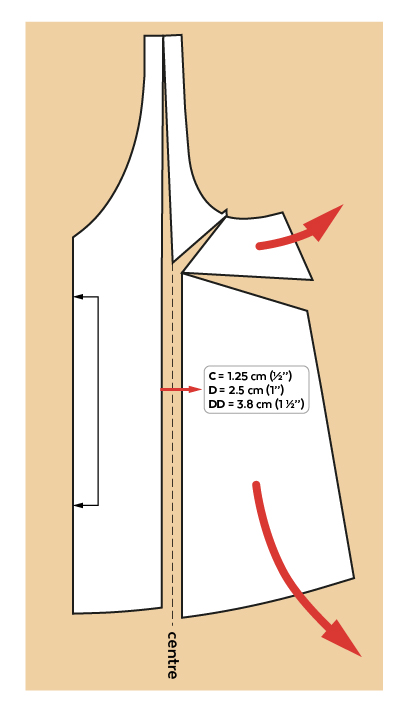
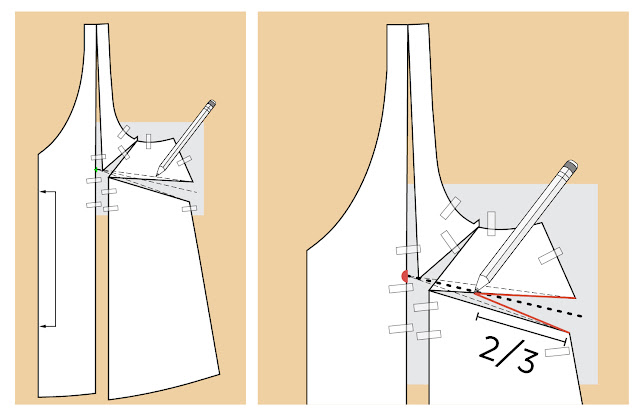
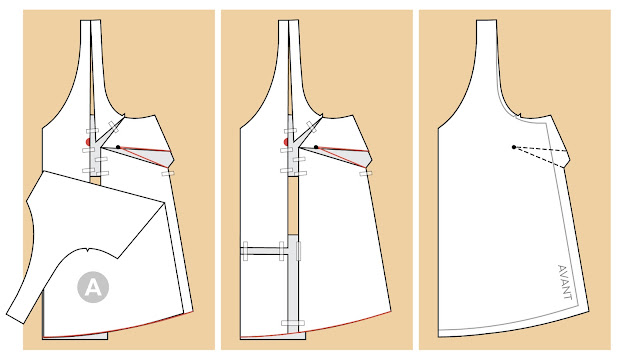
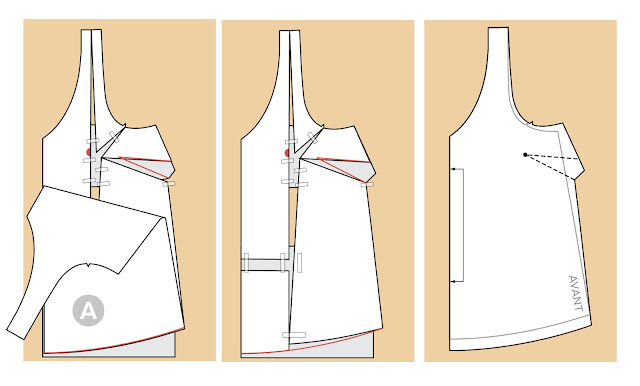
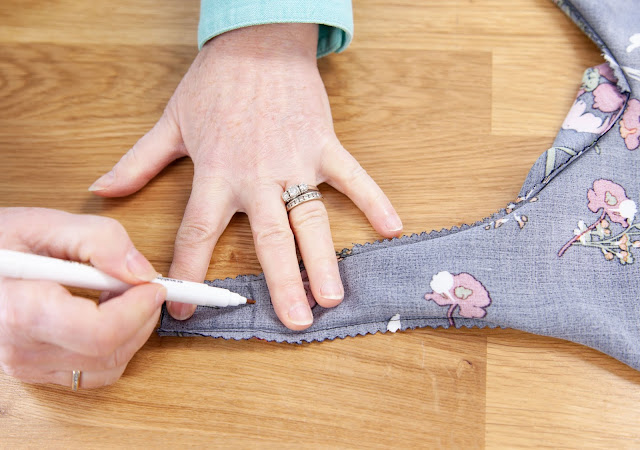
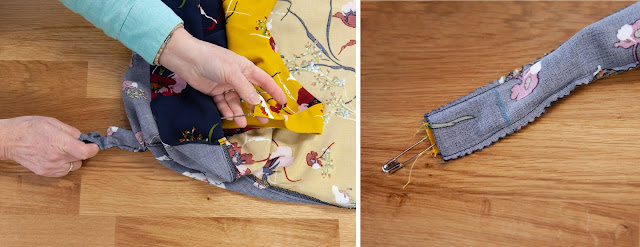
I left off the mandarin collar and I looked at the VALERIE rash guard instructions for the zipper and make a neck band and added a zip guard. Also, because my fabric print was way too pretty to put a princess seam there, I taped the front pieces to remove that seam.


Most important: The girls loved their swimsuits. It was so much fun to see how each outfit really matched their personalities. They get along so well that we call them the triplets :P 


Blog Tour Bonus Information and Giveaway

Today's giveaway: 

Enter the Rafflecopter below to wina Jalie $20.00 (CAD) gift card + Imagine Gnats $40(USD) gift card
a Rafflecopter giveaway

Grand Prize:
Two ways to enter: Enter the Grand Prize Rafflecopter, and/or post a swimwear item you’ve sewn on Instagram. Readers can enter more than once on Instagram but must use a different photo/different sewn swim item per entry. (Ie. multiple photos of the same outfit only count as one entry). Items allowed: swimsuits and swim coverups for the entire family (women, men, children). To enter on IG: Post your photo and use the hashtag #TheSwimsuitEditionTour and tag @luluandceleste and @debzaleski in your post. Items can only have been sewn since the beginning of June 2017. Closes July 2nd 11:59pm EDT.


Prize: Phat Quarters $25(USD) gift card + Boo Designs $100(AUD) gift card + Sewing by Ti -$20(USD) gift card + Made by Jack's Mum - swim pdf pattern bundle

a Rafflecopter giveaway

Follow our friends along the tour! 

Monday, June 26
Tuesday, June 27
Wednesday, June 28
Thursday, June 29
Friday, June 30


Happy sewing! 
Mel Henry
xxx


NICO - Boys Want Raglan Tees Too!

$
0
0
Henri wearing kids size M (9)
Forest Origami knit printfrom L'Oiseau Fabrics
We received many requests from customers asking for a men's raglan tee. It is such a great staple garment that we had to include one in the lot :) So here is the NICO raglan t-shirt pattern for boys and men!


Not too fitted, no too loose... just enough ease to be forgiving and work with most knits. Short, 3/4 or long sleeve, curved or straight hem. The pocket on the photo is a last-minute improvisation (we drew the shape on a piece of paper 10 minutes before the photo shoot!). If you have our 3137 in your pattern stash, you could use that pocket. The statement pocket trend is big here thanks to Poches & Fils. You can find lots of inspirations on their website :)

There are a few tutorials online too if you don't feel 100% confident about adding the pocket :):


    Rashguards for Boys and Men

    Thanks to our small grading increments, you can easily go up or down a few size for a more fitted look (for a very fitted rashguard). If your fabric has 70% stretch across the grain and in the length, you can go down 3 sizes for a look like this:


    We would like to thank L'Oiseau Fabrics and Funki Fabrics (the link shows all the fabrics we used) for the beautiful fabrics that we used for our prototypes and cover photos!

    Who is Nico?

    I took a skydiving course in 2015 and convinced Jeanne to try a tandem jump that summer. She said yes! That is when she met Nicolas, her friendly cameraman:


    During the off-season, he helped us shooting and editing a few video tutorials. He became a dear friend of the Jalie family and was there when we drafted the pattern. Nico is stylish and opinionated (he can't help it, he's French :P). We tweaked the pattern until he was 100% happy with it. He liked it so much that he accepted to be our model for the photoshoot and that we named the pattern after him (since we are not ready yet for a skydiving jumpsuit pattern yet).


    Don't wait any longer! Grab your downloadable or paper pattern, a funky printed knit, and have fun making a Nico Raglan!

    A Patch Pocket for your Nico (free template)

    $
    0
    0

    In our last post, we introduced our new men's raglan t-shirt pattern and the inspiration behind the name. Today, we show you how to add a pocket to the pattern (or any other t-shirt pattern). 

    Adding a pocket is not complicated, but there are some tricks to doing it right. In this post, you will learn how to make a symmetrical pocket with sharp corners that will be nice and straight.. 

    Keep reading and don't forget to post pictures of you Nico tees in our Facebook group or on Instagram with hashtags #jalielife #jalienico !

    You will need: 

    - Your Nico t-shirt pieces, cut and ready to sew
    - Cardboard (cereal boxes have the perfect thickness)
    - Glue stick
    - Scissors (fabric and paper/cardboard)
    - Something to mark your fabric (tailors chalk, disappearing ink pen), iron, pins... the usual :)

    The Nico pattern is available on the Jalie website, but you can also purchase it from a retailer near you. In this tutorial, we will only cover the pocket application, not the t-shirt construction.

    Like all other Jalie patterns, sewing instructions are available directly on the pattern page before you purchase the pattern. You can download and read them over while you are waiting for the delivery of your paper pattern or before downloading your PDF pattern.  

    Instructions:

    1- Download the free POCKET PATTERN AND TEMPLATE.  The document prints on US Letter or A4 paper. Make sure you print it at 100% (actual size). DO NOT select "fit to page" or "resize". Measure the TEST rectangle to make sure the document printed correctly. Choose the size you want to use (the template includes 5 pocket sizes, ranging from toddlers to adults).

    2- After cutting roughly around the paper template, glue it to the cardboard and cut along the line.

    3- Cut one pocket in the fabric of your choice (woven or knit), using the POCKET piece.
    Mark the top hem (dotted line) on the wrong side of your fabric. 

    4- Place the TEMPLATE piece on the wrong side, along the line.

    5- Press the fabric over the template (sides first, then top and bottom), along the edges of the cardboard.

    6- Remove the template and press again so the pleats are as flat as possible.

    7- Unfold left and right edges and topstitch the top,  2 cm (3/4'') from the fold.. 


    8- Use the TEMPLATE to mark the pocket position on the t-shirt front.

    Width: Fold in half twice to mark quarters (with pins or chalk) with vertical lines. 

    Height: Trace a horizontal line from one side seam/armhole corner to the other. Place the TEMPLATE 2,5 cm (1''') above that line. 

    Trace around the template (or mark the corners) on the right side of the front. 

    *Please note: This placement is only a suggestion with easy-to-mark guides. Feel free to experiment and move it a bit if you think it would look better in a different position. Pinning on a finished shirt is also possible, but it makes it a bit more challenging to sew it straight. 

    9- Pin the pocket in place and topstitch, following the guide above.
    Press again and... you're done!


    Did you like this tutorial?


    Pin the photo below to your Pinterest board:


    Mel xoxo


    SaveSaveSaveSave

    How to Turn Straight-Leg Eleonore Jeans into Skinny Jeans

    $
    0
    0


    When we designed our now über popular Éleonore Pull-On Jeans, we went with a classic straight leg to make sure everyone's calves would be covered. We know that skinny jeans are a staple in many peoples' wardrobe and we knew many would want their jeans fitted all the way to the hem.

    Since not all legs are created equal and because fabric stretch can make a huge difference in the amount you have to take it for the transformation, we did not venture into giving people exact measurement.

    Instead, we went with a simple diagram showing where to start taking them in. We thought #EleonoreWeek is a good timing to publish this more detailed tutorial, where we show you how to take your straight leg in the right way and... end up with two identical legs :)

    We saw strange things on YouTube that would lead to crooked jeans. We think this post will be useful not only to people making the Eleonore pull-on jeans, but to anyone upcycling older jeans or patterns.

    Let's get started

    Marking the new seam line

    1 - Make your Éléonore jeans as is but SKIP THE INSEAM TOPSTITCHING.
    It is the only compromise you have to make for your first pair :)
    If you finish your seams with your serger, stop at the hips.

    2 - Turn the jeans inside out and put them on.
    3 - Pin along ONE leg (vertically), where you would like the new seam to be.
    It's good to have a sewing friend for this step!
    Start at the bottom, where you pin the same amount on both sides
    of the leg to keep the leg centred and straight.
    Pin all the way through the thigh but stop at the hips. 

    4 - Take the jeans off (careful not to scratch yourself with the pins!),
    mark the pin placement (the new seam) next to the inseam and side seam.
    Remove the pins and connect the marks with a ruler.

    5 - Baste with a long straight stitch on the lines.

    6 - Turn right side out and try the jeans on. If you are happy with the skinny leg, go to step 7.
    If you need more adjustments, pin / move the seam until you are comfortable.
    Mark the final length you want too (skinny jeans are shorter than straight leg jeans). 

    TRANSFERRING THE MARKS TO THE OTHER LEG


    With this technique, you make sure that the exact same adjustments are made to the second leg!

    7 - Fold the pants in half to lay one leg over the other. Make sure the inseams are together, side seams together. 
    8 - Pin on the new seam, through the four layers of fabric.

    9 - Flip the legs and mark the visible pin segments

    10 - Connect the marks so that your new seam line is clearly visible

    Stitch on the lines on the second leg and try the jeans one last time. It fits great?

    • Stitch again over your basting. 
    • Trim the seam allowance 1 cm (3/8'') from the new stitching line.
      VERY IMPORTANT: Keep your fabric scraps (and remember which one is the inseam, which one is the side seam)
    • Finish with your serger or zigzag stitch.
    Use the fabric scraps to transfer your modifications to your pattern for your next pair because we all know that you can never have too many Eleonores in your closet :)


    You enjoyed this tutorial?
    Don't forget to pin the image below onto your Pinterest board!


    Share photos of your Éléonore Jeans in our Facebook Group, our Photo Gallery and on Instagram with hashtag #JalieLife #JalieEleonore #SkinnyEleonoreJeans

    How to Add Ruffle Sleeves

    $
    0
    0

    Our 3352 dolman top is a favorite in my wardrobe since its launch. With the big ruffle trend we see lately, I thought it would be fun to take one to the next level and hop on the bandwagon.


    Adding this ruffle/bell sleeve to our dolman top is really easy AND you get to skip armhole / sleeve hemming in the process because it it folded in half!

    1 - Assemble front and back, hem the bottom and finish the neckline, following the pattern instructions


    2 - Measure the armhole opening and your torso (the torso measurement is included in the dolman top's sizing chart)

    3 - Cut two rectancles (your sleeves).

    The measurements for each rectangle is: (OPENING x 1,5)  by (25% of TORSO measurement).  Torso?!?! Yes! Because the taller you are, the longer it has to be :)

    Of course, instead of the torso measurement, you can simply go with the finished ruffle length you want. In this case the calculations would be: (FINISHED RUFFLE LENGTH + 1 cm (3/8'')) x 2.


    For my size (U), this means a 24'' x 15'' (60 cm x 38 cm) rectangle for a finished ruffle that will be approximately 7'' (18 cm) long.


    You haven't had your morning coffee yet? Here is a little cheat sheet for you. You can use the for the dolman or any other opening (t-shirt sleeve, hem) you have!


    You can cut them along the grain or perpendicular to the grain, as long as the two rectangles are identical :)

    Note that the longer the rectangle, the more gathered it will have to be. Since this sleeve is folded, 1.5 is a good ratio. For a single layer or a lighter weight fabric, you could make it longer, to make it more gathered.

    5 - Fold the sleeve RIGHT SIDES TOGETHER and stitch to form a loop.


    6 - Fold the sleeve WRONG SIDES TOGETHER, matching the half mark.


    7 - Sew two rows of gathering stitches (longest straight stitch setting) within 6 mm (1/4'') of the edge.


    8 - Pull the bobbin threads to gather,


    until the sleeve matches the armhole.


    8 - Turn the top WRONG SIDE OUT, pin the sleeve to the right side of the armhole, matching the sleeve seam with the side seam, the half mark with the shoulder seam.


    Distribute the gathers evenly between the pins and add more to keep everything in place while you sew.

    9 - Stitch 1 cm (3/8'') from edge, on the ruffle, without stretching the armhole.

    Turn to right side and press gently.


    Have fun with print direction and textures! A lace sleece with a knit of the matching color, vertical vs horizontal stripes... This hack is a real stash buster and you can even use it to update the look of any dolman top or t-shirt you have in your closet!


    Don't forget to share the love on Instagram with hashtag #jalielife #jaliedolman, in our Photo Gallery. and on your Pinterest boards :)

    Happy sewing!


    Quick Sewing Ideas for Busy Elves

    $
    0
    0

    Only 10 days before Christmas, you are busy and running out of time or ideas? Don't worry, we are here to help! We put together a list of 10 sewing project ideas for unique gifts. Avoid the crowds, put on some music and spend quality time in your sewing room rather than running in a shopping mall. Hostess gift, teacher gift, stocking stuffers, last-minute party outfit items... we got you covered.

    1- Cocoon Cardigan

    For you (yes, you deserve it too!), your mom, godmother or a friend. A quick project that requires minimal adjustments and that has that wow effect!

    2- Thermal Socks

    To keep small and big feet warm during winter. Made with Polartec Power Stretch or in a french terry (if it has 40% stretch BOTH ways), it will be a success!

    3 et 9- Slippers and Aviator Hat 

    The 2318 pattern is a classic. It includes mitts, tuque, aviator hat and slippers! It is one of the rare Jalie patterns that starts in newborn sizes. All the items in the pattern can be made with polar fleece and are quick and easy to make.

    For the aviator hat we made for Eleonore, we used Windpro fabric from Discovery Trekking with fluffy fabric for the inside to keep her warm. The harder face of the Windpro is great because it blocks the wind and is water resistent, perfect for spending long hours making forts and playing in the snow. We have already lots of snow on the ground in Quebec City and are sure to have a white Christmas this year!

    4- Éléonore Pull-On Jeans

    Super easy to make and very comfortable, this pull-on jeans is the answer to last-minute outfit planning! Use a shiny fabric or stretch velvet for a festive look.

    5- Gift Card

    You know someone who loves Jalie patterns? Email her a gift certificate or print it out (send it to yourself to keep it a surprise ;)) to give in a card.

    6- Marie-Claude raglan pullover

    The oh-so-soft cotton/lycra/rayon fabric from l'Oiseau was the perfect choice to make a raglan pyjama top. They have a wonderful selection for everyone, go take a look at their beautiful printed knits.

    7- Legging

    Another classic that you can cut and sew in less than an hour. As a PJ bottom with the Mare-Claude or under a sparkly tunic, we want a pair in every color, don't we?

    8- Galaxie

    Jupiter will come to the rescue to carry your shoes from one party to the other! You need to carry shoes for the whole family? Go with the larger version, Sirius!

    In the Galaxie pattern, you will also find great gift ideas that you can make with easy-to-find fabrics: lunch bag, beach bag, pencil case.  It is a great stash buster. With Pluton and Neptune, easy-to-make bento bags, you can turn a plain food container into the cutest gift under the tree when giving home-made goods, from fudge to fruit cake.

    10- Loungewear (Snow Day uniform) (aka Jalie 3355)

    There is nothing like wearing something comfy by a fire after playing outside. This sweatshirt and sweatpants combo is made of stretch fleece with "furry" back. Éléonore likes a fitted ankle so we tapered the leg and sewn ribbing instead of an elastic at the cuff. The starry fleece is a gift from l'Oiseau. This specific print is no longer available, but they do have a few options in their stretch fleece section that will make you want to make matching outfits :)

    The pattern includes both the sweatshirt and sweat pants, and works for men and women, boys and girls.

    We hope this list will inspire you and help you complete your gift list in time. Sewing gifts are special. They will be cherished and remembered for years by those who receive them.

    We wish you and your loved ones a wonderful holiday season and a very happy new year.

    Jeanne, Émilie et Mélanie


    Much More than 14 New Patterns!

    $
    0
    0
    As you probably know, we recently launched 14 new patterns. We are really proud of the new designs and how we were able to cover so many options (knits, woven, women, men, sportswear) all in one collection!

    There is indeed a little something for everyone: women's tops (Bobbie, Rose, Adèle and Mimosa), men's underwear (Gérald) and hoodie (Frédéric), a dance leotard (Joëlle), a skating dress (Tessa), a swimsuit (Diane), a scrub top (Éliane), women's underwear (Julia), kimono (Mélanie), skirts (Lisette) and new leggings (Clara), a special design without center front seam!

    Big Move!

    When we decided to go with 14 new patterns and could not discontinue 14 all at once, it became obvious that we needed more room for the warehouse. We started looking for storage room and found a wonderful space, not far from the family house where Jalie had been growing since 1983.

    This meant not only we had to finalize a giant collection, but we also had to pack and move nearly a thousand cases and hundreds of meters of fabric, all in the ridiculously short amount of time.


    Family and friends helped with the move and before we knew it, we were set up in time for the photo shoots! The new warehouse layout and improvement in our workflow allowed us to ship the tsunami of orders when the collection launched. A record number of package made their way to customers around the world within our usual ONE BUSINESS DAY!

    The new sewing studio, with big windows and tons of natural light is almost ready. We can't wait to start working on new designs in that new room and share more photos with you on social media!

    On top of designing new patterns, we always try to innovate, improve and come up with things to make your sewing experience better. Here are some of the little things we implemented recently:


    Save with our New BUNDLE Option!

    We added the feature when we revamped the website a while ago because we wanted to make sure everything would work without a glitch for the big launch.

    With the new bundle, you get both PAPER (mailed to you) and PDF (instant download) for much less than it would cost to buy the two versions separately! This is a great way to try the PDF format for the first time or reach the free-shipping threshold with fewer patterns.


    With the bundle, you get the best of both worlds:
    • While waiting for the paper pattern, you can start your sewing project right away 
    • If something happens to your paper pattern, you have a PDF "backup" forever! 
    • You can store your PDF printouts / piece in the pattern pouch 
    • You reach the free shipping threshold with fewer patterns 
    • You have a paper version that will last forever (in case you move to a remote area without computers or wi-fi access :)) 


    Extended Size Range!

    5 of the new patterns (Bobbie, Rose, Julia, Adèle and Mimosa) include 28 sizes (one more size than our usual 27-size range). The 28-size chart has one more size: GG!


    We also extended our sizing to CC (instead of AA) for the Tessa skating dress and to FF for the Joëlle leotard pattern.

    A New, Helpful Icon

    If you are used a Jalie pattern before, you know that we sometimes break down graded pieces in little group to make tracing easier. Since it's quite an unusual feature, some people were worried when they could not find their size in the first group they saw on the pattern.

    Example of the icon on piece E, which is split into two stacks on the pattern
    In the PDF patterns, it would also mean that some piece labels would appear without any line around it, like this:

    On the new patterns, whenever a piece is split into different stacks, we added this icon to indicate you should look for other stacks of sizes.

    Better Printing Guide (on our PDF patterns)

    You are making a tiny size and don't want to waste paper? We got you covered!

    When opening your new pattern (tiled, print-at-home format) in Acrobat Reader, you will notice the usual tile diagram. In the layers panel, disable the sizes you do not need to keep only the size you want to sew. The unused sizes will disappear from the diagram, leaving only the exact location of the pieces in your size.


    Here a little video to show you how easy it is:


    All you need to do is write the pages numbers you need in the printing dialog window. In this example of a Mimosa in size F, you would write: 1, 2, 4, 6, 8, 9, 11, 13, 16, 17, 18, 20. You save 9 pages (that would normally be empty, with the header and footer)! Wonderful, isn't it?


    For more information on how to print and assemble our PDF patterns, please visit our website: How to Print and Assemble a PDF Pattern.


    Share Your Makes

    You love the garment you made and would like to share photos with the world but wonder which hashtag to use for people to find you post? From now on, you will find this box on every pattern. It includes all the information you need to find or share photos on social media:

    Here are direct links, in case you are curious to see what Jalie fans are up to:

    Facebook groups

    FRENCH // ENGLISH
    Ask questions, share photos. Anything Jalie-related. Informal, informative, no drama. Only people who know Jalie or who are interesting in knowing more about our pattern before tackling their first project.

    Instagram
    Where we post exclusive photos, sneak peeks, behind the scene shots. We promise to work on our Instagram feed in the year to come!

    YouTube
    FRENCH // ENGLISH
    Step-by-step video tutorials for specific patterns

    Pinterest
    Follow our boards to see inspiration photos and links to interesting sewing tips and tricks

    Facebook Page
    Where we post official announcements and where we tell you about new blog posts or important information.

    Creations Page
    The quickest and easiest way to share your photos with Jalie fans! We pick a random photo each month for a $25 gift card prize. Don't be shy, show us what you have made with your favorite Jalie patterns :)


    Jalie 101: What's in a Jalie Pattern

    $
    0
    0
    Many people wonder how Jalie is different from other patterns they have tried. We thought it would be a good idea to sum it all up in a few blog posts. It will also give you useful info about patterns, things you perhaps never noticed before ;)

    Format

    99% of our sewing patterns are initially released in paper (printed) format and then converted in PDF (a digital format that works on Mac and PC) in house, for those who prefer printing at home (or copy shop). We make exceptions for design ideas that would not fit on the standard 38x50 sheet (like our circle skirt pattern or the Galaxie bags pattern)

    Whenever a printed sewing pattern is discontinued to make more room in the warehouse, the PDF pattern stays to keep the pattern available to people who might have missed it during the 8-10 year period where it was available in print.


    You are getting the exact same product whether you buy a paper or PDF pattern, but the information that comes with the pattern pieces is simply packaged a bit differently. 

    With a printed pattern, it's all on that one giant sheet of heavy white paper. You have to trace the piece in order to use the pattern in more than one size.

    With a PDF pattern, you have a separate file where all the precious information you need to assemble your pages and the garment is grouped. You can either print that information or only download it on a tablet to save paper and ink. You can print one size at a time and reprint as many times as needed, cutting your pieces each time (if you are not a fan of tracing).

    What's in a Pattern?

    Here are the main sections that we will cover in this series:

    A - Measurement chart / Sizes (once the sheet is folded it becomes the "back of the pattern")
    B - Pattern Pieces
    C - Cutting Layout
    D - Sewing Instructions


    The main areas that you will find on a printed (paper) pattern


    Where you will find the same info with a PDF purchase

    Free Instructions vs. Instructions in the PDF pattern

    Free sewing instructions for all our patterns are available online.  You will find a link under the "tutorials and instructions" tab). This way, you can read them before purchasing to assess the skill level required, if you feel comfortable tackling the project. You might also find free video tutorials for select patterns.


    The instructions included in the PDF patterns include the free instructions but also everything else you need to complete the project (sizing, cutting layout, PDF assembly) that you will NOT find in the free download.

    We say "READ FIRST" in the file title... we mean it :)

    Next up...

    Stay tuned, in a few days we will explain in more detail the back of the pattern and the wealth of information it contains!

    While we prepare the next post about the different sections, you can flip through our catalog to find inspiration for your next sewing project ;)

    À bientôt!


    Jalie 101: The Back of a Jalie Pattern

    $
    0
    0
    Before you open any printed pattern, most people first turn the envelope over to look at the back of the envelope, right after looking at the cover photo. If you purchased a downloadable (PDF) pattern, you will find that information in the Instruction package.


    When looking at a the back of a Jalie patterm for the first time, you might be a bit overwhelmed for various reasons:
    1. French and English coexist on the same page (and English is not listed first)
    2. Both metric and imperial units are used (for measurements and yardage)
    3. There is usually over 20 sizes on the pattern (up to 28 sizes in one pattern!)
    Don't worry, you'll get used to it :)

    Let's break it down together:


    A: Pattern General Information

    You will always find the pattern number, name and description at the top. At the bottom, you will always see the pattern pieces, line drawing showing the views included.

    B: Body Measurements

    We work very hard to have good fitting garments that fit true to the Jalie size. The Jalie size is a letter, not a number. We did that on purpose to make sure people take a few minutes to take their body measurements. RTW size or age provides an ok estimate, but for a good fit (which is probably one of the reasons why you are sewing rather than buying clothes off the rack), you need to know the body measurements in order to prick the proper size.

    In most recent patterns, we put the most important one in red. In all patterns, we also include that information at the very beginning of the sewing instructions (bust for tops, hips for bottoms and girth for swimsuits and leotards, etc).

    All the sizes you see there is what the pattern includes. You do NOT need to pick a size when buying the pattern. You get them all! Both printed and PDF patterns come with all the sizes you see in the chart. This means that, once you have your pattern, you can make a garment again and again for kids and adults of all shapes and sizes!

    C: Yardage

    That is the amount of fabric you need, in yard and meters. It is sometimes listed per view or per section (if there is color blocking) or by fabric width. Look closely on the left to identify the correct label for the correct fabric.

    If notions are required, you will find them listed, by size group, in the bottom of the page (bottom right corner usually ;))

    D: Fabric Info

    We always provide a brief description of the type of fabric recommended for the pattern. Those are fabrics we most probably tested and / or know they will work. We do not include all fabrics under the sun so if you find a mysterious fabric with a funky name that feels right (because it feels like another knit top you own or drapes like the garment on the cover photo, it's ok. Trust your sewing instinct. Just make sure it has the correct amount of stretch if it's a pattern with a stretch requirement guide.

    Speaking of fabric stretch, it means the percentage by how much it stretches, NOT the spandex content. You need to hold a fold of fabric, a few inches away from selvage, position your fingers on the ruler and stretch EASILY to the end of the ruler. You could also do the math and hold 10cm (or 10inches) and looking at the final length you get when stretched comfortably. If the fabric calls for 60% stretch, it means it has to stretch from 10 to 16 (10 + 60%).

    E: Seam allowance info

    Even though the seam allowance is indicated in the instructions, we always listed on the back as well as some people may not feel comfortable working with patterns that have a seam allowance narrower than the 5/8'' they are used to. Seam and hem allowances are ALWAYS included in the pattern. You don't need to add anything. You can cut and sew without the need for an extra coffee or special ruler :)


    Jalie 101 : Pattern Pieces

    $
    0
    0
    The most important section of the pattern is of course the pattern pieces themselves. As any sewist knows, they are much more than just a pile of lines. Let's look at them closer to better understand some little things that will help sew a perfect garment.


    Pattern Sizes

    In Jalie patterns, you will find LETTERS on the pattern edges, not numbers. We have been using letters for nearly two decades now. It simplifies things (8... would it means kid size 8 or women size 8?) and as explained in the post about the back of the pattern, it requires you take a few measurements and increase the chance of getting better results.

    Size labels on the Bobbie's center front

    Patterns 2907 and up have colour-coded lines. Once you know which size you want to use (the Jalie size, which is a letter between F and GG), locate it on the piece and follow the line all around. The tiny letters you see on the pieces are added manually. It might happen that two letters were inverted by accident on a pattern. Don't worry about it. If you are on the right line, have seen the same letter all around, keep going on your line (and send us a quick email so we correct it for the next reprint).

    Whenever the same line is used for many sizes and space is too limited to list all the letters, you will see something like "F - L" or "S - GG". This means "All sizes from F to L" or "All sizes from S to GG".

    When using a layered PDF pattern, you don't have to worry about a thing. You can print one size at the time by toggling the other sizes of in the layers menu. This means you print, cut and are ready to cut your fabric in no time.

    Piece Label

    On the label, you will find:
    • The pattern number and name
    • The view (if the pattern includes more than one view / option)
    • The name of the piece and letter code (that we refer to in the sewing instructions)
    • The cutting information (how many you need, in which fabric, on the fold or not)

    If you are tracing your pattern, copy as much of that info as possible so you don't have to go back and forth, looking at the original piece for reference.


    Pattern Markings

    On the piece, you will see:
    • The straight grain / grainline or fold line arrow to help you position the piece onto the fabric (that we will talk about in in more detail in the upcoming post about the cutting layout)
    • Shorten / lengthen line (when the size nesting allows us to include one line for all sizes)
    • Size stack info (that we explain in more detail in this post) // On some pieces (smaller pieces or pieces with a complex shape)
    • Notches
    • Notches
    • Notches
    • Did we say "notches'?

    The notches

    Notches are your best friends. They are guides that allow you to align pieces when sewing them together. If notches are off, it means something is wrong somewhere (wrong piece, inverted piece, you are not attaching the right things together).

    Jalie notches come in two shapes:

    TRIANGLES // SINGLE NOTCHES // These are used on front pieces and side seams: 


    TRAPEZOID // DOUBLE NOTCHES // These are used on back pieces (center back seam, between center back and back side panel, etc.)

    You will also see the notches in the illustrations and we always say "pin [...], matching notches" when you are assembling two pieces with notches:

    See how notches are important to align all layers with the burrito technique where we assemble the back yoke, front and back of the Rose shirt!


    If you cut your fabric with scissors, take the time to cut around them so that the triangle is visible on your fabric piece. If you are using a rotary cutter, take the time to mark the notch location on the paper and transfer it onto the fabric piece with a marker or by clipping the fabric a tiny bit (a clip shorter than the seam allowance!).

    Mark the notch location BEFORE cutting your piece with a rotary cutter and transfer those markings onto the fabric pieces
    Notches will disappear if you use a serger. For that reason, if you don't have a lot of experience or want to be on the safe side when assembly is not 100% obvious (take the Cora Leggings for example), don't hesitate to baste with a long zigzag stitch first. This is really good advice for slippery fabrics to make sure edges and notches are perfectly aligned. You can see this technique in action in many of our Video Tutorials.

    Shorten / Lengthen Lines

    These lines show you where you can slash your pattern to add or remove length. These lines are suggestions. You may shorten or lengthen in different places, depending on the effect you want.

    If you are shortening pants because your inseam is shorter than the inseam the pants pattern is designed for, you will want to remove at the knee or equally above and below the knee. However, if you want to shorten pants because you want capri, then you shorten only below the knee (or simply at the hem if the leg is straight from the knee down.

    What matters most is that if you are shortening front and back, you need to look at the notches to alter the pattern in the same areas and keep the notch position intact.


    If you lengthen / shorten in an area where there is a binding, elastic or zipper don't forget to take note of the change you made to edit your binding piece, elastic or zipper length!

    Jalie 101: The Cutting Layout

    $
    0
    0
    After finding your size on the back of the pattern and having read the labels on your pieces, it's time to lay them out on the fabric.

    The cutting layout we provide will allow you to use the yardage listed on the back of the fabric. It is a recommendation and is very helpful for people who want a little guidance to minimize fabric waste. If you have serious Tetris skill, could save even more fabric but it is important to understand the theory behind the cutting layout and follow the rules to have garments that hang straight.

    Terminology

    You will find on the cutting layout some symbols or terminology that you may not be familiar with if you are new to the sewing world. They are crucial to understanding why some pieces are positioned a certain way. Once you know what those words mean, you will have more confidence when cutting or altering pattern pieces.


    SELVAGE / SELVEDGE
    No markings on the pattern
    Finished edge of the fabric that does not unravel. Its texture might be a little different than the rest of the fabric and it could even be blank or have the manufacturer's information printed on it. 

    The selvage is important, it is your guide to find the grainline easily.  

    FOLD / FOLD LINE
    Double-Point Arrow with Two Corners

    When you buy your fabric at the store, it will most probably be folded on the bolt. That fold is "a" fold, but not might not always be exactly parallel to selvage. We will cover the fold position a little later. You know your foldline is correct and parallel to selvage when the fabric does not twist when you smooth it out. Remember to use selvage as guide, not the cut edges (fabric is very rarely cut at a perfect 90 degree in store :))

    That original fold can be stubborn and difficult to remove when ironing or can sometimes be stained if it's a fabric that has been a long time on the shelf. Be careful not to have it on your piece if it's the case.

    STRAIGHT GRAIN / GRAINLINE
    Double-Point Straight Arrow

    On woven fabric, the warp thread is easy to find and selvage is most of the time nice and flat. The grainline is the vertical line that is parallel to selvage. It is very important to know where your grainline is in order to have a "straight" garment.

    In knits, selvedge can be difficult to find (or inexistent if you buy a tubular fabric). You can find it by folding and pinning along the rib that runs parallel to selvage, on the right side of the fabric.

    The fold, straight grain and selvage are always parallel. If you had a vertical stripe print, the stripes would run along all three.

    WEFT
    No markings on the pattern

    The thread running from selvage to selvage. It is square with the grainline. Anything going straight across the body (horizontal seam, straight hem, sleeve hem) is most of the time aligned with it. 

    TRUE BIASNo marking on the pattern

    This one is invisible. It runs 45° with the selvage and is used when stretch is required in a woven fabric (for binding pieces for example). 

    How to Cut Multiple Pieces on the Fold

    When many piece are cut on the fold, you may find a layout like this where we show you to create a new fold line for each piece:


    You can also create two fold lines at once like this:


    Understanding your pieces - It's as easy as A, B, C :)


    The information in the cutting layout reflects the information you see on the pieces:
    A // KNOW WHERE THE TOP OF YOUR PIECE IS
    The cutting layout is pretty straight forward, but you have to pay attention when positioning your fabric. The top of the layout is the top of the garment. This means that if your fabric has a nap, you have to make sure the fabric had the top in the right position. You would not want to end up with upside-down birds on your shirt!

    Coton Rifle Paper Co de chez Club Tissus 


    B// STRAIGHT GRAIN / GRAINLINE
    Those lines always have to be parallel to the fabric grain. Measure from selvage to the marking, at both ends to ensure the piece is nice and straight.

    C// HOW MANY PIECES YOU NEED
    Here are the most common options for cutting:
    • ✂︎1: Cut one // It means you only need one.
      It's always a good idea to cut it with the right side of the fabric facing up, especially for asymmetrical designs. For example, on the 3136 skating dress, if you want the long edge of the skirt on the right or leg leg, or on the 3354 asymmetrical gymnastics leotard if you want the contrast strap on the right or left shoulder.
    • ✂︎2 : Cut two // It means you need two pieces.
      We take into account that you use the cutting layout (cut your piece on the folded fabric). This means that two pieces will be mirrored, not identical. 
    • ✂︎4 : Cut four // This would mean you have to use the paper piece twice in most cases.
      You will cut two pairs to have a total of 4, two pairs or mirrored pieces.
    • ✂︎1 on fold // You need to fold your fabric (remember, the fold being parallel to the selvage / grainline, not necessarily the fold from the bolt).
      A good habit is to mark the fold position on your cut piece (with a marker or tiny clip) as it will most often be the center of something (center front or center back for example).
    • ✂︎2 on fold // Same thing as above but you have to do it twice.
      It is most often seen on our sleeve pieces or things like pockets or shirt collars. It means you have to use the paper piece twice. Cut one piece on fold, then repeat for the other one (keeping the same fold line or refolding to waste less fabric as shown in the cutting layout example above) 


    Good layout = Free Undies!

    With the same length of fabric, folding the fabric properly can either end up with tiny scraps you can't make anything with OR enough fabric for smaller garments like underwear or even a fun contrast sleeve on a t-shirt! 

    It's always a good habit to fold the fabric to cover only the pieces you need to cut. Don't fold the fabric in half if you don't need to. Here is an example of the difference in the sizes of the remnants with a different fold position for the Clara Leggings:

    If you fold the fabric to the width of your pieces (instead of folding in half), you could get enough fabric for Julia panties!

    The exception to that rule would be with some prints where you have to position pieces carefully to avoid the odd "boob flower" or "eyes" or having a large diamond or beautiful panel repeat slightly off-center on the front of your top or worse!


    Washing the Fabric

    Some fabrics shrink a lot, even without putting them in the dryer. The last thing any sewist would want is to see a perfectly sewn shirt, with the sizing chosen carefully go 1-2 size smaller after a wash. Even though it takes some extra time, wash your fabric before cutting your garment. Some fabrics can be a bit trickier to manipulate after a wash, but that is a small price to pay for clothes that fit. Also, if it's wrinkled, take the time to iron it before your fold it / put it away.


    Jalie 101 : Sewing Instructions

    $
    0
    0
    What would a pattern be without instructions? One big puzzle!

    Since the very beginning, Jalie pattern have always included illustrated instructions with French and English text, along with black and white illustrations.

    Jeanne always sketches the instructions first and then they are redrawn in Illustrator and translated to English

    People were not keen on having to go back and forth between text and illustrations. To solve that, we decided to put everything together, images in the middle and texts on both sides, like this:


    Instructions of our latest Bobbie top

    That is the format used for all patterns since 2014 (pattern numbers 3460 and up). We are always happy when we can find ways to make our customers' lives easier :)

    A Very Important First Page

    Always take the time to look at the first page of the instructions! It contain essential information:

    A // LINE (TECHNICAL) DRAWINGS
    Front, back and different views that are included in the pattern. You might have to come back to this section when you select the pieces you need to trace for a specific view.

    B/D // SEAM ALLOWANCE INFORMATION
    Seam allowances are always included. We indicate here whether to sew 6 mm (1/4'') or 1 cm (3/8'') from edge.

    C // SIZING TIPS
    This is where we indicate which measurement is most important when choosing your size.

    E // PATTERN PIECES
    All the pieces are listed here with the same names, labels and cutting info that you find on their respective labels.

    F //  COLOR CHART (LEGEND)
    We use white for the right side, grey for the wrong side. Dotted white for right side of lining, dotted grey for wrong side of lining.

    G // EXTRA INFORMATION 
    If we have tips / tricks or other information that you need to know before cutting, we will put it there.

    Short and Sweet... but Complete

    One of our objectives when we write our instructions is to get to the point, be clear but helpful, guiding you step by step. For some patterns, we also provide you with a free video tutorial. We do not include general sewing information (thread, needle, sewing lexicon), because there is simply not enough room on the pattern sheet.

    That being said, if you are a beginner and have questions or get stuck at any point when sewing your garment, we are here to help! Don't hesitate to ask questions in our sewing group on Facebook or email us, letting us know what step is puzzling you.

    That being said, don't overthink! Don't try to "sew in your head" and understand every single step BEFORE you even touch the fabric. Some steps can look tricky at first, but it should all make sense once you have the pieces in your hands, ready to sew. 

    One Big Sheet

    On our paper patterns, the instructions being printed next to the pieces, it requires good folding skills to keep the text next to you while you sew. 

    No need to be a Black Belt in origami to read your instructions :)

    This is why we make them available online to be downloaded and printed.


    With the free downloadable instructions, you can view the instructions on a tablet (this means you can zoom in too!) or print on regular paper to keep the instructions next to your sewing machine while the complete pattern is stored in its pouch.

    Instructions downloaded on a tablet, ready to cut and sew a swimsuit!

    You will find the downloadable instructions on the pattern page (on www.jalie.com). Simply click "PATTERN INSTRUCTIONS" under the INSTRUCTIONS AND TUTORIALS tab and you will see the PDF document that you can download or print. Whatever works best for you!


    Happy sewing!


    Which T-Shirt are you?

    $
    0
    0
    You will find many t-shirt options in our catalog. You have never sewn one and wonder which one would be the best option for you? This post will help you pick the right pattern and also compare our top 5 t-shirt patterns, showing the tops in the same fabric and size so you can compare apples with apples.

    First off, let's have fun with a little quiz helping you pinpoint what you are looking for in a t-shirt pattern:

    WHAT DO YOU LOOK FOR IN A GREAT T-SHIRT PATTERN?


    FIT / EASE
    • I prefer when t-shirts are fitted, with slim sleeves that you can wear as a base layer. 
    • I feel more comfortable in semi-fitted tops 
    • I am really into the new boxy trend, still looking for a loose-fitting top that is not boxy  
    LENGTH
    • I am tall and longer t-shirts look better on me 
    • I am petite and I don't want the hem to go lower than my hips 
    NECKLINE FINISH
    • I prefer bands over binding because it is easier to sew. No fuss. 
    • I think bindings make a more professional finish 
    • A t-shirt without band or binding would be even better! 
    HEM
    • I prefer straight hems  
    • I think curved hems look better on me 
    • I can't decide... What about straight in the front, curved in the back? 
    OPTIONS
    • I could never have too many t-shirts in my wardrobe so the more options the pattern has, the better! 
    • Many views in the same pattern confuses me. I prefer when there is one design (but I can handle sleeve length options!) 
    • I want to focus on one view only 
    The color with the highest score is the one that is closest to what you are looking for!


    Jalie 2805  

    CHOICE OF T-SHIRTS 

    As the title says, this pattern has many neckline and sleeve length options. It uses a clever "puzzle piece system" so you can flip top sections and switch from one option to the next with a few paper pieces. This pattern works great as a base layer and is the only one with a crew neck and mock neck. Because of the fit, it requires a fabric with nice stretch and recovery BOTH WAYS.


    View: A (crew neck) with short sleeve
    Size:  Y (40'' / 102 cm bust) Fabric: Rayon Spandex
    PDF and Printed pattern available on www.jalie.com

    View / Options:
    • 4 necklines: Crew neck, mock neck, V-neck and henley
    • 3 sleeve lengths: cap sleeve, short sleeve and 3/4 sleeve
    • Neckline finished with band (but also looks great turned and topstitched ;))
    Fit / Style:
    • Close to the body, the most fitted of the 5 patterns.
    • Great for layering

    Jalie 3245  

    RAGLAN TEE AND TUNIC 

    This pattern includes both a raglan tee and racerback tank (again using the puzzle piece system) but we only talk about the raglan tee option here. It has a relaxed fit (body and sleeve) but is not slouchy. The waist shaping makes highlights the waist without clinging to it. The neckline is a classic scoop neck, a bit lower than the latest Mimosa tee. The tunic version is longer and has patch pockets in the front. Both version have a flattering curved hem. The raglan sleeve (also called baseball sleeve) can bring a little change in your closet and a fun to sew. This patterns is in the only one in our top 5 to start at size 12M for little ones!

    View: A (raglan tee with half sleeve)
    Size:  Y (40'' / 102 cm bust) Fabric: Rayon Spandex

    View / Options:
    • Raglan tee or tunic (the pattern also includes a racerback tank style)
    • Sleeve length: Half sleeve
    • Neckline finished with skinny binding
    Fit / Style:
    • Skims the body
    • Great for relaxed, sporty look. Have fun with contrast fabric on the sleeves!
    • The tunic length worn with leggings makes a great, easy-to-wear outfit.


    Jalie 3352  

    DOLMAN TOP 

    A wonderfully simple design! Also called "dropped shoulder" top, the sleeve is part of the front and back pieces. For the short sleeve option, there are only four assembly seams and you're done! It does not get any easier than that! The 3/4 sleeve option is super easy to sew because the sleeve piece has a very flat cap.

    View: A (raglan tee with half sleeve)
    Size:  Y (40'' / 102 cm bust) Fabric: Rayon Spandex

    View / Options:
    • A: Sleeveless
    • B: 3/4 sleeve
    • Neckline can be finished with binding (apparent or invisible) or turned and topstitched.
    Fit / Style:
    • Skims the body
    • The sleeve is not too wide so it is comfortable under a coat or jacket (nobody likes sleeve bunching!)
    • The hem is shorter in the front, curved and longer in the back


    Jalie 3880  

    BOBBIE - THE MAGIC V-NECK TOP 

    You love comfy tops and have always dreamt of wearing a low-V neckline top that would not be too revealing when you bend over to pick up something on the floor? Bobbie is there for you! It has an ingenious facing that keeps the V neck against the body. It also allowed us to lower the armhole while keeping your bra covered.

    Size:  Y (40'' / 102 cm bust) Fabric: Rayon Spandex

    View / Options:
    • One view but you can play with fabric types to create very different looks. For our sample top, we used a white poly knit for the facing:
    The magic behind (under) the Bobbie - We've got you covered! 
    Fit / Style:
    • Very loose at bust level, tapered at the hips. The facing is fitted but is not a shelf bra, has no compression.
    • There is no bind or binding to sew! 
    • This pattern includes ou new size GG (51'' bust)


    Jalie 3890

    MIMOSA - THE MODERN T-SHIRT

    Are you one of those people who like the loose-fitting look on other people but think you look silly in a boxy shirt? The Mimosa will be you new best friend! Straight sides that give you some room around the waist, without looking like a tent! The length and curved side-slit hem prevent the t-shirt from clinging to the hips and causing the dreaded lowerback-fabric-pool :) The sleeve options and optional pocket allow you fill your closet with Mimosas, sporting a different look everyday.

    View: A (rolled sleeve and check pocket)
    Size:  Y (40'' / 102 cm bust) Fabric: Rayon Spandex

    Views / Options:


    • A: Rolled sleeve with chest pocket (great for jersey with a little less drape)
    • B: Long sleeve with optional flounce (get your soft rayon jerseys out!)
    • C: Short self-tie sleeve

    Fit / Style:

    • Straight side seams make the tee loose but not boxy
      (because there is not too much ease at the bust)
    • The sleeves are looser than on other patterns
    • The t-shirt has a curved hem with side slit
    • The neckline is finished with a band
    • This pattern also includes our new size GG (51'' bust)


    Here are the tops side by side for comparison
    SAME SIZE, SAME FABRIC


    We hope this post will help you pick the best pattern for your next t-shirt project. Don't hesitate to ask questions in our great Facebook group. For more inspiration, checkout the photo gallery on our website to see many tops and t-shirts made by Jalie fans around the world.

    Happy sewing!

    Le Petit Binding

    $
    0
    0
    There are many ways to bind a neckline but there is one we like in particular. We use it for the dolman and raglan tee we talked about in our previous post about our top 5 t-shirt patterns, we use what some customers refer to as a "skinny binding".

    The binding is indeed fairly narrow, but what is special about it is that it sits on one side of the garment, not both.  As you can see in the photo below, there is also no raw edge visible anywhere, no special needle or machine required.

    It is a delicate, "petit" binding :)

    You will find a photo tutorial on our website, in the "Learn" section.

    WHERE WE USE IT 

    Well... on quite a few patterns :)


    You can also see it in action in our 3136 Skating Dress Video Tutorial (at 1:29):


    Julia Bralette Hack

    $
    0
    0


    For the cover of our latest Clara leggings pattern, we wanted a cute sport bra to go with it. We hacked our Julia bralette pattern into a low impact bra with exposed elastic band and hook-and-eye closure in the back.

    We changed a few things but kept the modern design with curved V neckline and delicate racerback finished with foldover elastic, with adjustable straps.

    HOW TO REMOVE THE DART


    On piece C, you will find a small, rounded dart in sizes P and up. To remove it:
    • Using a ruler, trace a line from the tip of the dart to the tip of the piece
    • Cut on the line, keeping a tiny bit of paper at the tip as a hinge
    • Close the dart by bringing its corners together and tape
    • Redraw the bottom edge of the piece
    • Remove excess paper. You have your new front piece!


    Removing the dart this way will remove some fabric overall. This means more compression, which is what you need in a sport bra(lette). 

    PREPARING THE ELASTIC

    Soft, wide elastic band is not always easy to find. You might be lucky and find some at your local notions / fabric store. You can upcycle elastic waistband from underwear (usually the elastic outlasts the fabric) or look online for it.  Here are a few options:

    The underbust band piece (front+back) will be your guide to cut your elastic. 
    • Butt fold line edges of pieces E and F and tape
    • Your elastic, FOLDED IN HALF, should match the combined bands (don't forget to take into account the 6 mm (1/4'') allowances!
    If you are lucky, the elastic you find will be the same length as standard hook & eye closures :)


    Pin and sew hook and eye fastener to the ends of your elastic. If you found a gorgeous elastic that only comes in a different width than the standard closures you find in stores, you can use continuous hook & eye tape for your project.

    Continuous hook & eye tape we purchased from Bra Makers Supply that we used for this beautiful elastic band we found at Fabricland in Brampton, ON during the last PR Weekend.

    CUTTING AND ASSEMBLING THE BRALETTE

    For this post, we used spandex from the Fabric Fairy for the outer fabric and PowerNet for the lining. We picked a colorful foldover elastic for the finishing. Foldover elastic is getting easier to find. For large quantities, Aliexpress is interesting but shipping takes forever. For a few garments only, you can purchase it at a reasonable price in many stores, in many fun colors. Google "foldover elastic" and the color you want and you will find something I'm sure!


    Pin back to front at side seams and stitch. Pin outer fabric to lining, wrong sides together and baste with a zigzag. You are ready to sew the foldover elastic (FOE)! Cut it to the length indicated in the chart and MARK the strap length (also indicated for each size).


    Pin wrong side of neckline elastic to the lining. You only need to pin at ends and center, the fabric edge along the line that runs down the center of the elastic. Baste with a zigzag (over the basting zigzag that is visible on the fabric). You will need to stretch the ELASTIC gently as you sew to fit the fabric edge.


    Fold the elastic to wrap the raw edge of the fabric and stitch again with a zigzag along the edge of the elastic. When we say "along the edge"... we mean it :). The basting and topstitching are visible inside, only the topstitching zigzag is visible on the outside:


    Use the same technique to apply the foldover elastic to the armhole, using the marks as guides indicating where to pin. At center back, the first elastic will be encased in the second one to create a strip of the width of one folded FOE.


    Install rings and sliders as per the instructions for adjustable straps. Rings and sliders are available in a ton of colors, metal or plastic. You can find them on Etsy, eBay and in specialized notions stores like Bra-Makers, Emerald Erin, Sew Sassy and many more!

    OPENING IN THE BACK

    In order to create some space to attach the closure, we need to cut an opening at the back. Cut the piece in the shape you want (after a few tests, we settled with a narrow, slightly curved triangle shape. Draw it on the piece, cut the paper and use it as a template to cut center back of the bra.


    Apply a piece of FOE to the edge of the opening, using the same technique you used before. Then, sew a guide seam, 1 cm (3/8'') from bottom edge, using a long straight stitch:


    EXPOSED ELASTIC

    Mark center front of the bra and elastic with pins and pin wrong side of elastic to outside of bra, along the guide seam. Stitch on the elastic, along its edge, stretching it as you sew to fit the bra. Make sure the top edge of the elastic is always on that guide seam. We use a zigzag because it is easier to control on the fairly narrow black line, but a cover stitch would have worked too.


    Turn inside out. You can see the guide seam (fabric basting (white), guide seam (blue) and elastic seam (black). Remove the guide seam only.


    Happy sewing! 

    We look forward to seeing you sporty chic Clara bralettes in our photo gallery and on Instagram #jaliejulia #jalie3886 #jaliepatterns!


    Show off Your Elastics!

    $
    0
    0
    Many garments are designed with an encased elastic because the technique is quick and easy. Also, it hides the plain elastic. Did you know that you can totally change the look of the garment by applying an exposed elastic instead? Here is how to do it!


    The trend is getting more and more popular and goes far beyond the men's underwear world! You can use a wide exposed elastic on pretty much anything: shorts, top, leggings... Have fun!

    INSPIRATION / COMPATIBLE PATTERNS 

    The exposed elastic is flatter than the casing on fleece sweatpants. 3355 would be the perfect pattern for that and can be used for boys, girls, men and women because of it's straight shape.


    For decades, designers have been putting their logos on waistband elastics (remember that scene from Back to the Future? :)). The Gerald underwear pattern can easily be made with exposed elastic. Same thing for the women's bikini pattern in pattern 3242 (the men's briefs pattern is already designed for exposed elastic)!


    We see more and more sportswear brand using comfortable elastic featuring their logos for the waist. It promotes the brand but is also a fun way to add a pop of contrast color or print. This is something you can easily mimic with your favorite leggings pattern. The Clara, with is seamless front, or 2920 leggings would be great patterns for that.


    You are a fan of the matchy-matchy sportswear kits? Use the waistband elastic to finish the bottom edges of a crop top / sports bra! Pattern 3247 includes both the tops and shorts. Make sure you use view D, which is the one designed for encased elastic on which the technique we show below can be used.


    BEST PLACES TO BUY WIDE ELASTIC


    Finding soft elastic in the color / style you want might be the trickiest job. Your husband has an old pair of boxer briefs, the fabric is disintegrating but the elastic is still as good as new? Unstitch it and keep it in your sewing stash!

    Wide elastics are more and more common in chains like Fabricville (Fabricland), Club Tissus, JoAnn and even Walmart. They come and go, when stock is available.  Same for smaller local stores. Sometimes they get their hands on a small overstock from a local designer and have limited quantities. This means that whenever you see something you like, get it while you can!

    Fore more selection, you will have to look online. Look for  "waistband elastic" on Google and you will find elastic in different widths, styles and textured (jacquard, solid, plush...).

    Here are some websites where we found interesting options:

    Etsy (designer logospatternedsolids)
    Bra-Makers
    Emerald Erin
    Aliexpress (prévoir plusieurs semaines pour la livraison)

    PREPPING YOUR PATTERN

    Before you start sewing, you need to adjust the seam allowance. The pattern was drafted with extra fabric to create a casing. You have to remove it.

    To do so, look in the elastic chart to see for which elastic width was taken into account. On the Clara leggings (view B), the allowance is for a 2 cm (3/4'') elastic. Therefore, we trace a line 2 cm (3/4'') along the top edge of the leggings (where the elastic will go) and then cut to remove the extra paper :

    (don't throw that piece away! You will need it if you want to eventually make a pair with encased elastic!!!)


    Cut your fabric with that trimmed paper piece and cut your wide elastic to the length indicated in the chart for the size you are making. Assemble the garment, following the pattern instructions. For leggings, attaching the elastic will be the second-to-last step (before hemming).

    SEWING THE ELASTIC 

    Overlap the ends of the elastic by approximately 1 cm (3/8''). Sew with a zigzag stitch as shown in the photo, starting along the raw edge of the elastic. This technique keeps the layers to a minimum and wraps the end of the elastic.


    Now that your elastic forms a loop, mark half with a pin by folding at the seam. Bring the seam and pin together to mark fourths. Do the same with the waist opening, using center front and center back marks to find fourths.


    Pin the wrong side of the elastic to the right side of the garment, matching the pins and aligning the top of the elastic with the edge of the opening.

    Stitch on the elastic, along its bottom edge. You can use a zigzag stitch or cover stitch (or double needle) if you don't like the look of zigzags. Stretch the elastic between the pins so the fabric is flat against it. DO NOT stretch the fabric.


    Trim the fabric along your stitch. Your done!
    Here are quick links to the patterns mentioned in this post with which you can use this technique:


    How to Make a Lined / Reversible CHARLIE jacket

    $
    0
    0


    Our CHARLIE bomber jacket pattern has been amongst the best-selling patterns since its release. People love the free step-by-step video tutorial but many asked us how to line the jacket.

    A lining hides pockets and seam allowances, can add a pop of colour to a solid jacket and making it reversible is pretty fun. We lined a CHARLIE for the HENRI joggers pattern photo shoot:

    Lined CHARLIE bomber jacket with HENRI joggers and NICO t-shirt


    Here is how we did it. This tutorial complements the pattern instructions (included in the pattern and available online).

    PATTERN PIECES


    Cut your pieces as shown above. You do not need to modify / alter any pieces for this.
    1. Main fabric: As shown in the pattern (jacket + pocket welts)
    2. Ribbing: As indicated in the pattern (collar, cuffs and hem)
    3. Lining: Two sleeves, one back (cut on fold) and two front pieces
    For the pockets, use the fabric you want (outer fabric or lining). 

    ZIPPER


    Reversible zippers can be a bit difficult to find and are quite expensive. A good workaround is to use a SEPARATING zipper and buy a REVERSIBLE ZIPPER SLIDER separately. Those are easier to find and more affordable. The cursor comes with a zipper stop.


    At step 12 of the instructions, when you cut the excess zipper (removing the stop at the same time), remove the regular cursor, replace with the reversible cursor. Then, remove the teeth with pliers as shown in the instructions and install the new stop. You now have a reversible zipper!

    ASSEMBLY

    Follow steps 1 to 16 (which includes the pockets) to assemble the outer fabric and lining separately. IMPORTANT: Leave a section open when sewing one of the pockets. That opening will be used to turn the garment right side out at the end:

    Opening in the pocket pouch to turn the jacket right side out

    Here are the outer layer and lining, ready to be sewn together:

    Outer fabric with pockets

    Lining

    RIBBING (CUFFS AND HEM)

    Assemble the waistband with its facing (step 17). Sew one long edge of the band to the bottom edge of the outer fabric, right sides together. 


    Bring the hem band down, pin it to the bottom edge of the lining, right sides together and stitch.

    SEWING THE ZIPPER

    Pin right side of zipper to right side of front, with the bottom of the zipper aligned with the center of the facing and stitch.


    On your machine, set needle position to "left" to make your life easier and stitch closer to the zipper teeth:


    Little trick: Mark the band seam location on both sides of the zipper. This mark will be your guide when pinning the other side to the front.


    Pin the other zipper tape to the other side of the front and stitch. Your zipper is in!


    COLLAR

    Attach the collar to the outer fabric, steps 24-26 of the pattern:


    Then, bring outer fabric and lining right sides together and stitch along front edges and at neckline, making sure shoulder and waistband seams are aligned.


    Clip corners:


    Bring hem band wrong sides together and baste to hold together:


    Sew cuffs to bottom of sleeves (steps 31-34):


    Fold bottom of sleeve lining wrong sides together like this: 


    Insert the folded sleeve (lining) into the outer fabric sleeve so that raw edges are together. Align seams, make sure the sleeves are not twisted and stitch:


    Tack armhole / underarm intersection of outer fabric and lining together.


    Your jacket now looks like a bit puzzle. Rest assured, everything is alright! Remember that opening in the pocket pouch? Turn the entire garment right side out through it. Then, take the pocket pouch out and stitch the small opening shut (hand stitch or with your machine).

    You now have a lined / reversible CHARLIE jacket!


    How to Make CLARA Leggings without a Gusset

    $
    0
    0


    When we made the outfit for the Nikita cover photo, we decided to go with a gusset-less version of the CLARA leggings. This tutorial will show you how to make this already simple garment even simpler :)
    NIKITA top with CLARA leggings (view B) (printed spandex from The Fabric Fairy)


    Many people have asked us if the gusset could simply be removed. The answer is: NO. The gusset cannot be omitted. In order for the leggings to fit, it has to be morphed with the main piece. This tutorial will show you how it's done.

    GATHER YOUR SUPPLIES


    You will need:

    • Your CLARA Pattern (all the piece, including the gusset)
    • Some paper scrap
    • Tape
    • Paper and fabric scissors (or rotary cutter)
    • Pencil (s)
    • Ruler
    • Your fabric / elastic / thread to complete the project

    MARK THE SEAM ALLOWANCES

    Along the back crotch, draw the seam line location, 6 mm (1/4'') from edge.


    This line will be your guide for the next step. Fold the gusset in half (at the notch and tip) and put it over piece A, matching the seam lines.


    Tape the folded gusset in place. Since the paper gusset does not follow the crotch curve, you will have to redraw it. First, tape some paper under the piece. Then, with a French ruler, draw a new curve and keep the new straight edge 6 mm (1/4'') away from the gusset folded edge (this will create your new seam allowance). Cut along your line and you have your new pattern piece, ready to go!


    When you place your pattern piece onto the folded fabric, make sure the straight edge (center front) is at the fold, with the inseam going away from the fold. The following photo shows View B leggings (high waist finished with elastic). If you are making View A (with the waistband, the main piece would be cut at the lower line, as indicated on the pattern).


    Before removing the pins, mark center front with little clips where the fabric fold is.

    Sew a guide seam 6 mm (1/4'') from edge at front inseam, in the curve. Clip as shown up to the thread, but without cutting it.


    Sew the back crotch, right sides together, matching the double notches. Pin front to back, matching the back crotch seam to center front. The clips at the front will help you "open" the front curve so it becomes straighter and easier to pin to the back inseam.


    Stitch as indicated in the pattern, from ankle to ankle. Once you are done, you can reinforce the seam intersection with a tiny zigzag stitch, WITHIN the seam allowance to make sure it is not visible on the right side.


    Here are the finished leggings! No center front seam, no gusset!


    Happy sewing!

    MICHELLE // Full Bust Adjustment (FBA) (on a Dartless Tank)

    $
    0
    0


    The MICHELLE tank/dress pattern is a minimalist design without dart, drafted for B cup. If you are larger than a B cup and want a perfect fit, a full bust adjust and a dart will help the garment fit better. This post will show your our favorite Full Bust Adjustment (FBA) technique.

    You can find our Michelle pattern in PDF or paper format on our website 

    TRACE YOUR BASE SIZE

    Measure your full bust and find the size on the pattern. Go down by the number of sizes :
    • C Cup: Go one size down
    • D Cup: Go two sizes down
    • DD Cup: Go three sizes down
    For example, if your full bust is 40'' (102 cm ) - which corresponds to a size Y - and you have a D cup, trace size W (two sizes down). 


    PREP THE PATTERN

    Trace an extra copy of the main piece and facing (if you are making view B). Put those pieces aside, they will be the back and back facing. You do not need to alter them. The original design has an identical front and back. The FBA will change the proportions and there will be more fabric in the front than in the back.


    On your new front (A) piece, trace a line parallel to the center front, from the center of the strap to the hem (LINE 1).


    Measure from shoulder to apex (wearing the same bra you would wear with your MICHELLE). On LINE 1, transfer that measurement, STARTING 3 cm (1 1/4'') from the edge of the paper. For those who wonder why there is such a big seam allowance there... It is "insurance" fabric for those would would need to lengthen the strap for a better fit, we will tell you more on that in a future post.


    Draw a line (LINE 2) from the apex point to the armhole notch. Then draw another line (LINE 3) from apex to side seam (where you want your dart to be).


    SPREAD AND CREATE THE DART

    Cut the paper as shown, leaving some paper at the strap, at the notch and where lines 2 and 3 meet to create hinges. They will help you handle the paper more easily to create a Y-shaped FBA.


    Spread the pattern apart at LINE 1, by the amount shown in the image above. The triangle of your "Y" should be approximately in the centre of the space you created.

    Here is how much you need by cup size.
    • C cup: Open line 1 by 1.3 cm (1/2'')
    • D cup: Open line 1 by 2.5 cm (1'')
    • DD cup: Open line 1 by 3.8 cm (1 1/2'')
    Now the hem. Position the corner section the way you prefer, whether you need more room over the abdomen, down to the hem, or not.


    You new front now has extra room across the bust and a dart for shaping. Place some paper under the piece where there are openings and tape in place. The next step is to draw the dart.

    1. Trace lines from the apex to the corners of the opening you created earlier. 
    2. Add a third line in the center to indicate where the center of your dart will be.
    3. Mark at 2/3 of the center line. That will be the tip of your dart.


    REDRAW THE SIDE SEAM

    With a ruler, prolong the side seam line above the dart as shown below. Then, draw a line from the "center line / new side seam intersection" to the bottom corner of your dart. This will ensure that the side seam is nice and straight when your dart is folded.

    The last step for your front alteration is to adjust the length. An FBA adjustment adds fabric in the width but also in the length to make sure there is enough fabric to cover the bust and keep the hem nice and straight.

    Use the back piece (remember, the front and back used to be the same) and transfer the hem curve onto your new front:

    FBA with more ease at the bottom

    FBA with same width at the hem
    If you are making view A (fully lined, reversible tank), you are ready to sew!


    TRANSFER THE ADJUSTMENT ONTO THE FACING (VIEW B AND C)

    Trace a copy of your modified front. Measure the side seam length of your facing and transfer it onto your front copy (above + below the dart). Transfer the center front length onto the facing and trace the curve.

     Draw a notch at the half mark if you are making the dress (view C).


    Happy sewing!

    Don't forget to share pictures of your Michelle tank or dress on social media #jaliemichelle #jalielife

    MICHELLE // Strap Adjustment

    $
    0
    0


    In the previous post, we explained how to adjust the Michelle pattern for a full bust. If you often do upper bodice adjustments when making tops (shoulders, bust height), you might need to adjust the straps on the Michelle. In this blog post, we will show you how to adjust the straps for armholes and neckline that sit exactly where you want them to.

    To make photos easier to understand, we used a navy fabric for the front, yellow for the back.

    DO I NEED TO ADJUST THE STRAPS?

    Your garment might fit as is but you might need to tweak it if:
    • Your neckline and armhole are too low / too high
    • If one of your shoulders is higher than the other
    DETERMINE BY HOW MUCH YOU NEED TO SHORTEN / LENGTHEN

    Start by unpicking the shoulder seam. Then, put on the tank and have someone pin the straps in the optimal spot, keeping a neutral body position. It is very likely that the adjustment will be different from one shoulder to the other. That's totally normal. If you need to lengthen, don't worry, there is already an extra 3 cm (1 1/4'') at the shoulder planned in the design!

    The perfect alteration will bring the neckline at a reasonable place (not too much clivage, but enough to be flattering) and the armhole should just cover your bra. Be careful not to pull too much. That would cause other fitting issues.

    MARK THE FINAL SEAM LOCATION

    Take off the tank. Mark the pin location on front and back straps, left and right. This will be your new shoulder seam.

    Different adjustment left and right / Same adjustment front and back
    ** If you need to alter the front or back strap differently, cut the longest strap so that the length from the line to the end of the strap is the same for front and back as you can see in the image above.**

    Turn front straps wrong side out and transfer the seam location to the wrong side.


    SEW THE NEW SHOULDER SEAM

    Insert back straps into front straps, using a safety pin or long hook. Pull until the ends are aligned.


    Pin, press straps flat and stitch on the seam line your marked earlier. Trim the seam allowance to 1 cm (3/8'').


    Turn right side out and press.


    Happy sewing!


    Viewing all 110 articles
    Browse latest View live