Quantcast
Channel: Jalie Patterns' Blog
Viewing all 110 articles
Browse latest View live

How to Attach the Collar to our Footed Pajama (3244)

$
0
0
Our footed pajama pattern is available as a PDF pattern and as a printed pattern. It includes 29 sizes, from 12 months to Plus Sizes.You only need one pattern for the whole family!


Since the pattern was released, we received a few emails from people who were puzzled when reading the collar attachment instructions. Here are some photos that show every step of this great technique:

Mark half (center back) and center of point (center front) on the collar piece:


Here we mark the sewing line and fold line to help later on (you do not need to add those marks):


Make sure you clip excess zipper before attaching the collar:


Pin open collar band to right side of neckline, with the edge of the zipper matching the point center mark (6 mm (1/4") from the point edge):

From wrong side

From right side - see how it stops at the center of the point

 Sew from the point center mark to the notch WITHOUT STRETCHING the band:


Now that the ends are attached, pin the center of the collar (mark you made previously) to the center back and stitch, stretching the band between the stitch and the pin, as you sew.

One edge of your collar is now attached to the neckline and should look like this: 

Fold collar right sides together, matching notches to sandwich the center front edges inside the collar piece:

Sew from the tip of the point to the notch (6 mm (1/4") from edge, as always). You will have to be careful not to catch folded fabric in the stitch. As you can see, you are sewing over the first stitch (when you attached the first side to the neckline:

Turn right side out and admire the neat finish! We pinned the seam allowance so you can see what will have to be folded under:

Carefully pin the folded edges along the neckline/collar attachment seam, making sure everything stays nice and straight - you do not want a crooked collar:


All you have left to do is hand stitch to attach the folded edge with the neckline seam! No visible seam allowance!

Happy sewing!


New Collection - The Cora Running Tights

$
0
0
Last year, a customer made a special request for stretch breeches. We really liked the idea of pants without an inseam. After looking at many breeches in specialized stores, we realized customers would have a hard time finding the right fabric for them. We decided to keep the idea of a no-inseam pants, and took it to the next level.

Jalie 3462 - Cora Running Tights
Fabrics RUB695 + MF 5001 from FunkiFabrics
We used lycra and as soon as I put on the first prototype last summer, we knew we were on the right track! A few pairs later, we came up with the back pocket idea. A wonderful, magical pocket that keeps your phone (of your favorite little music machine) in place. No bouncing. I even tried with a key. It didn't move around.

Jalie 3462 - Cora Running Tights
Fabrics RUB695 + MF 5001 from FunkiFabrics

It fits an iPhone perfectly (adult sizes) and Henri wanted me to tell you that in kids size, the pocket is perfect for storing Pokemon cards :)


Jalie 3462 - Cora Running Tights
Practical Pocket at the Back

Many of you already know Dawn,  the blogger from Two On Two Off. She is a long-time fan who sews, blogs, teaches AND runs (she also tested many patterns in this collection). We named this pattern after Cora, one of her twins who has already started running like her mom :)

Jalie 3462 - Cora Running Tights - Printed fabric: TS165 from FunkiFabrics

What makes this pattern so special is the funky seaming that allows you to play with color blocking, totally transforming the style every time. We included a biker short version that has a thigh band, which stays in place better than the usual hem.

Jalie 3462 - Cora Running Tights and Shorts

We hope those of you who were looking for expensive-looking running tights will be happy that you can now make them yourselves without breaking the bank.

Don't throw away your fabric scraps! You really don't need much fabric to make mini leggings for your little ones!

New Collection - The Lillie Leotard

$
0
0
Jalie 3464 - Lillie Gymnastics Leotard (with 3/4 stretch mesh sleeve)

The Name 

It has been a great honour to count Fiona Buttery as our friend AND gymnastics critic/expert since 2010. She is a super talented sewist who makes stunning leotards for elite/international competitions. She is the designer behind the Team GB RG leotards for the London 2012 Olympics. Yes. She is THAT awesome!


It is with great pleasure that we named this new gymnastics pattern after Lillie, her youngest daughter who was an elite gymnast and starred in Chalk, a short film a short film directed by BAFTA winning film-maker Martina Amati (for which Fiona made stunning leos too!).

Lillie on the Chalk movie poster wearing a leotard made by Fiona

The Inspiration


Everyone in Quebec remembers young Nadia Comaneci at the 1976 Montreal Olympics. The stripes that ran under the sleeves and on the sides made her arms look a mile long! We wanted to replicate that effect, but on a more modern leotard.

The Pattern

Jalie 3464 - Lillie Gymnastics Leotard


As we were making prototypes, we added a princess seam that 1) makes it suuuuper easy to adjust for a perfect fit and 2) is very flattering, slimming the waist and creating a lovely, feminine shape. 

Jalie 3464 - Lillie Gymnastics Leotard
Sleeveless, long sleeve, 3/4 sleeve

At first, we wanted to make only a long-sleeve leotard with a nice fit at armhole (not batwing effect!), at every fitting, Éléonore insisted on having a sleeveless leotard.

We figured out she was probably not the only stubborn 4-year-old gymnast who prefers sleeveless leotards so we worked hard to squeeze new pieces on the pattern sheet to include a "real" sleeveless leo, with its own side pieces.

Here is mini-me, taking her modelling job very seriously:

Jalie 3464 - Lillie Gymnastics Leotard (Sleeveless)
Printed Fabric: RO244 from FunkiFabrics
and... she insisted on showing off her "serious-seal" pose...


It's hard to believe that it was me, posing for Jalie in oh-so-cool leotards back in the 80's! I didn't do gymnastics or anything. I was just a little girl who was happy to play with giant ballons and pretend I was the Athlete of the Year for the day :)


Hope all gym moms out there will be happy with this new pattern! 


New Collection - The Anne-Marie Tanks and Dress

$
0
0

Jalie 3463 - Anne-Marie Dress
Fabrics FLO237  from FunkiFabrics + ITY knit

The Name 

The pattern is named after our dear friend Anne-Marie. She is a super creative sewist (check out her blog I Mani D'Oro to see her lovely creations!) and also an avid cyclist who is stylish, even with a helmet on. We met at PR Weekend in Montreal back in 2010 and kept in touch since then.

We loved her idea of a cycling dress, but thought is was targeting a very niche market. After attending a tennis lesson with my first prototype, I made everyone jealous with my super-duper back pocket. I was official: this little pattern was going to be wayyyy more than just a cycling dress!

Jalie 3463 - Anne-Marie Fitted Tank
Fabrics TS455 + MF5001 + NE3052  from FunkiFabrics

The Design

The dress has:

  • a soft V neck (not too high, not too low)
  • a shelf bra (with a clever sewing technique for a clean finish - no binding!)
  • princess seams, no side seams
  • racer back (you can have fun color blocking!)
  • optional pocket that can hold up to 4 tennis balls (adult sizes - apple purée packs or My Littlelest Petshop toys in kids sizes :))
Jalie 3463 - Anne-Marie Peplum Tank
Fabrics TS222 + MF5022  from FunkiFabrics

This pattern includes three views:
  • Fitted tank (fitted at the sides, great for inverted poses at yoga)
  • Peplum tank (lower side panel flares out a little, doesn't cling to our pants!)
  • Dress (tennis dress, cycling dress, summer dress, swim dress... you decide!) - I wear mine over my 3462 shorts when I go for bike rides and over my 3247 shorts when I play tennis.


    We hope you will like it as much as we do! Stay tuned for more sneak peeks :)

    New Collection - The Anne One-Piece Cheerleading Uniform

    $
    0
    0

    Jalie 3466 - Anne One-Piece Cheerleading Uniform
    (in mystique with skort option)

    You spoke, we listened.

    One of the most frequently asked questions is:
     "Do you have any cheer patterns?"
    Some people were looking for tops, bodysuits with shorts, skirts or bodysuits with skirt. We noticed that people were struggling most with one-piece uniforms so we decided to make a pattern for everyone out there who has been hacking/combining/altering patterns for cheerleading squads and dancers, to make their lives easier :)


    Jalie 3466 - Anne One-Piece Cheerleading Uniform
    (in a regular spandex with shorts option)

    The Name

    While we were testing the pattern, I saw cheer photos of Taylor, my friend Stacy's daughter on my Instagram feed. I have been following Stacy's blog for many years. She is a long time Jalie fan, one of the first bloggers who ever wrote about us. She is always there for us whenever we need her opinion or advice on something. Too sad Wichita, Kansas is too far from Quebec to go for coffee together while our kids are at school :)

    I offered to name the pattern after her daughter who just graduated from high school where she was a cheerleader. Anne is her middle name and I thought it was perfect for this pattern.

    Photo by Shelli Compton (SC Photography)

    The Design


    • Designed for stretch fabrics
    • Interesting seams for unlimited color blocking options.
    • Empire waist seam for those would you like to use mesh for the middle section or to make a cropped top
    • Optional appliqués for those who master the art of color matching :) The appliqué technique is similar to the one we use on our 3241 gymnastics leotard pattern.
    • An optional skirt panel you can add to the front for a "skort uniform". Skirt in the front, short in the back. No more skirts riding up!


    Éléonore does not really know what cheerleading is, but as soon as she saw a red/navy/gold prototype, she shouted "IT'S THE NEW WONDER WOMAN COSTUME!"


    The little triangle weapons at the cuffs are not included in the pattern. Hers are custom made because she kept stealing our point turners... Éléonore likes strong female superheroes with cool, practical outfits for kicking, jumping and running. No bling bling, no pink, no rainbows. She rocks.


    But wait, there's more!

    Another popular request is:
    "How to I add shorts to the ____ skating dress bodice?" 
    Great news! The pattern is compatible at the waist with our new skating dress pattern (next sneak peek). This means that you can make this bodice with a skirt or briefs and you can use the shorts/skort with the skating dress bodice! Stay tuned!

    New Collection - The Carmen Skating Dress

    $
    0
    0
    Jalie 3465 - Carmen Skating Dress
    (long sleeve with point and finger loop, nude glitter mesh sleeve with lace-over-neon spandex bodice and skirt)
    Jalie 3465 - Carmen Skating Dress
    (long sleeve, in a printed stretch mesh / neon spandex combo)
    Making a seamless sleeve was no easy task, but we worked hard and are so happy with the final result and very proud to share it with you today!

    Who is Carmen?

    We did not name this dress after the famous opera or famous detective. Carmen is the owner of Entreprises Rodebec, our town's best kept secret. She opened the store in the 70's, selling speed skating skates and has now become a reference in the region for gymnastics, skating, synchro swimming, dance.

    At 78 (going on 30!) she is always there, welcoming young athletes every day with her beautiful smile, singing as she cuts fabrics and counts rhinestones.

    Whenever we need something for a skating costume or photo shoots (fabric, feathers, ballet slippers, rhinestones, skates, chiffon in 750 different color, tiaras, name it!) we call her to the rescue, even when the store is closed!

    We go there so often that Rodebec was the kids' first official Jalie fabric shopping experience!

    2-week old Henri and 6-month old Éléonore shopping for fabric at Rodebec

    The Dress


    • Seamless sleeve: three-quarter length, long or with point and finger loop
    • Keyhole back with clasp to hold the sleeve at center back.
    • A-line skirt with hem shape than makes the leg look longer

    The seamless sleeve style has been very popular in skating competitions in the past years. Nude mesh for a strapless dress illusion and tone-on-tone were the two styles we would see.

    Jalie 3465 - Carmen Skating Dress
    (three-quarter sleeve, in a blue glitter mesh / blue glitter velvet combo)


    For a little inspiration, take a look at Yuna Kim's seamless sleeves that were absolutely stunning: nude mesh sleeve with lots of rhinestones, black mesh sleeve with gradient bodice and skirt.

    We played around with fabrics and loved printed sleeves (in opaque spandex or stretch mesh). You can find lots of stretch mesh fabric at Funki Fabrics. They also carry stretch lace that has a lovely stretch both ways. They would make stunning dresses for a flamenco / latin program with matching velvet or solid spandex.

    Éléonore trying a blue mesh / blue spandex Carmen Dress prototype

    It also makes a great Elsa dress (Frozen... sooooo 2014):
    Carmen Dress prototype as Halloween costume... why not?
    Jalie 3465 in white glitter mesh, mystique bodice and nylon spandex skirt

    Mix and Match

    As we explained in the Anne Cheerleading Uniform blog post, the two patterns are compatible at the waist. This means that you can use the Carmen bodice and pair it with the Anne shorts or skort! Awesome, isn't it?


    New Collection - The Bella Fit and Flare Dress

    $
    0
    0
    Jalie 3460 - Bella fit and flare dress
    (in a drapey polyester knit)

    How it all started

    Last October, we received this email:
    This is my heartfelt plea for you to expand your ballroom dancing section to include dresses suitable for competition and exam use. Like so many young dancers' mums (I'm actually a grandmother), I'm struggling to find suitable patterns for juvenile (under 12s) and junior (12+) dancers.
    At first, we thought we could never, e-v-e-r fit a ballroom dress pattern onto a pattern sheet. We were not sure we wanted to launch a two-sheet pattern but because we were absolutely stunned by the price of ready-to-wear ballroom dresses out there ($300+ for a very basic dress), we thought it would make many mom (and grandmothers) happy with a pattern.

    Jalie 3460 - Juvenile ballroom dance dress with bishop sleeve
    (stretch crushed velvet dress, stretch lace sleeve and lightweight knit leotard)

    The pattern includes a leotard that is attached to the dress at the armholes (this way, there is no pulling at the neck if the fit on the leo is a little short and less layers at the neckline). Needless to say that it was not difficult convincing our little model to wear a "princess dress" and twirl for the photo shoot :)

    Jalie 3460 - Bella fit and flare dance dress with attached leotard
    Stretch lace over polyester knit leotard - Many stretch laces available at FunkiFabrics

    Love at first twirl

    Knowing Dawn sews at lightning speed, I asked her if she was willing to test the pattern (with a regular sleeve, without the leotard), just to see how it would fit on her tall and slim twins.

    The response was, let's say, pretty positive :)
    There was too much begging, I had to make another one [...] The dress is amazing. Bella is asking me to wash it so she can wear it again. :) Both of the twins have been wearing it in the evenings and twirling in it. Obviously a winner. 
    We were so focused on the original request that it hadn't even crossed our minds to make it as an everyday, fun little dress too! We decided to add a cap sleeve and voilà! The Bella dress was born!

    The pattern


    We went all out! Here are the specs:

    • Two lengths: knee and ankle
    • Princess seams - great for fitting, color blocking (or mixing a bold print for the center front panel with solid side panels) or adding pockets!
    • Three sleeves: long, cap or bishop sleeve
    • Optional leotard (I plan on hacking that piece to make a fitted slip under a lace dress like this Boohoo Ivy Dress!)
    • Scoop neck (higher in the front, lower in the back)
      • I tried the dress backwards and guess what?! I love it even more! Thanks to the generous stretch of the fabric (60% in the length and width), it fits perfectly both ways!!! Here is our model, wearing the dress backwards:


    Jalie 3460 Bella Dress - Backwards for a lower front neckline

    This dress is perfect for twirling, and we mean it! The skirt is a full circle and the great thing about it is that the flare starts lower than the waist. This means no wardrobe malfunction when twirling too much. You will only be showing a lot of leg :)

    Jalie 3460 - Bella Dress - Full-circle skirt hem finished with horsehair braid

    Éléonore wore a prototype last Christmas in glitter velvet with a lighter knit sleeve. Jeanne finished the hem with horsehair braid for a special touch. It really gives more oomph to the circle skirt and it is almost easier to sew than a regular hem!

    Jalie 3460 Bella Dress - In stretch velvet with polyester knit sleeve and leotard
    More recently Jeanne made her a new "beach-cover-up" version in a printed spandex that matches her bikini! It is basically a knee-length rash guard that covers the bikini bottom (and the legs, when she is crouching). Great for building sand castles AND stopping for ice cream on the way from the beach :)

    We love it when specialized patterns like this one turn out to be so versatile!

    New Collection - The Éléonore Pull-On Jeans

    $
    0
    0
    Jalie 3461 - Éléonore Pull-On Jeans

    The Surrender

    By now, you probably know that my daughter Éléonore is a little girl who knows what she wants. When it comes to pants, here is what a pair of pants need to have to get her approval:
    • comfy low rise waistband (the belly button is off limits!)
    • no buttons (not quick enough!)
    • slim leg (but not too tight!)
    • stretch woven (non-stretch denim is not comfortable enough, she wants her knits for leggings only and she claims lightweight non-stretch woven fabrics are "shorts fabrics")
    Her requests did make sense (and aren't we all picky when it comes to jeans?) but being as stubborn as her, I tried to have her wear yoga pants, poplin pants, cute jeans with appliqués. She.would.not.budge. 

    I decided I had to pick my battles and let her win this one because I don't want her to wear leggings until she goes to college (and I also wanted to avoid going insane... arguing with a pre-schooler about pants rise before 7am is not my favorite thing to do). 

    Finding pants like that in stores is not impossible. The only problem is that she is 4 1/2 but her hips measurement is closer to a size 2. This leaves us with the usual two ready-to-wear options that I'm sure many of you face when shopping for pants: huuuuuge waist and ok legs or ok waist but legs that are way too short. 
    In Québec, we have a familiar expression "Avoir de l'eau dan' cave" that literally means "to have water in the basement". We use it to describe pants that are too short, when kids outgrow their pants. Cute, isn't it?
    Jeanne came to the rescue. Éléonore now has comfy pull-on jeans that fit at the waist and "has no water in the basement" :)

    Jalie 3461 - Éléonore Pull-On Jeans
    Also know as The Best Jeans in the Universe (according to this little model)

    What started as a side project for my little one became an "official" pattern idea when a friend of Jeanne's came over and mentioned how difficult it was to find a great-looking pair of pull-on jeans/trousers. That's what we call great timing!

    She preferred the feel of a wide waistband to the usual zipper fly and button but did not want to have pants that looked like denim jogging pants either. Pull-on pants and much quicker to sew too!


    That's all Jeanne needed to hear to start grading her grand-daughter's pattern! We both tried the jeans in our size. We fell in love with the very first prototype! That's how our new pull-on jeans pattern was on its way to becoming one of our favorite items in this collection!

    She loves her new jeans AND is thrilled that I own a matching pair!
    (Éléonore is wearing the 3352 Dolman Top

    The Pattern

    Here is the nitty-gritty (which is pretty close to Élé's wish list!):
    • Designed for stretch woven fabrics withAT LEAST 20% stretch across the width
      • Please do not email me to know if your 10% stretch denim of if your lightweight poplin will work. You need 20% stretch or more.
      • Order samples when buying online as descriptions do not always include the fabric stretch. Here is how you measure fabric stretch.
        • Éléonore's favorite pair is made in this stretch twill. It is listed as a fabric with 15% stretch, but it's closer to 20%. Because of its lighter weight, it worked beautifully.
    • Wide waistband that hits just below or at the belly button
      • There is a one inch elastic inside the waistband. You can use a wider elastic if you have some on hand, it's really up to you.
      • We used the main fabric for the waistband, but you can also use a knit to make the jeans easier to pull on. 
      • You will have to use a knit waistband if you want to sew a waistband in a smaller size than your jeans (for example a size T waistband onto a size V jeans) and you want to make sure the waistband is nice and snug against your lower back.
    • Faux pockets at the front
      • Less bulk and much quicker assembly. 
      • With the yoke piece, you can easily hack the pattern and create your own pockets. I'm confident someone will blog about that hack or share something on PatternReview about this eventually ;)
    • Fitted through waist, hips and thighs, straight from the knee down
      • These are not skinny jeans, but are "skinny friendly". As a big-calf girl, I is SO frustrating when a pair of skinny jeans fits perfectly everywhere but that just want to explode at the calf! It's easier to take in than to let out.
      • With a straight leg, you make a first muslin and then decide by how much you want to take in your next pair (because you will want many, many Éléonore jeans in your closet). 
        • For example, Dawn took in 3/4'' at each side of the hem, 1/2" at the knee whereas I only had to take in 1/2'' at the hem and 1/8'' at the knee for the same fit.
    Jalie 3461 - Éléonore Pull-On Jeans
    Easy to turn into skinny jeans!
    • Yoke and real pockets at the back
      • For a "real-jeans" look and because pockets are on MY wish list.
    • 1 cm (3/8'') seam allowance
      • You can sew it with your serger at 6 mm (1/4'') for a little more ease
    • Two lengths
      • Long and cropped (pixie, pedal pusher, capri...).

    This sewing pattern is now available on our website in paper and PDF formats.

    How to Buy a Jalie PDF Pattern

    $
    0
    0
    You are not familiar with PDF patterns? Don't worry, we will show you how easy it is to order, download, print and assemble our downloadable patterns.

    Why buy PDF pattern?

    5 EASY STEPS FOR PURCHASING A PDF

    From the catalog (quick purchase without going to the pattern detail page): 

    1. Move your cursor over the pattern image, then over the shopping cart icon to open the little tab and click ADD TO CART and select PDF (if you only see Paper, it means that the patterns is only available in printed format)
    2. Click the ADD TO CART button


    From the pattern detail page: 


    1. Check the PDF box
    2. Click the Add to Cart button

    3. The item will appear in your Shopping Cart.

    4. Click "GO TO NEXT STEP" when you are ready to check out.
    5. Complete the Order Form and Submit your order

    How to Download your Jalie PDF Patterns

    $
    0
    0
    You purchased a PDF pattern on the Jalie website and are not sure how to download and print it? This blog post if for you!

    HOW TO I GET TO THE DOWNLOAD PAGE?

    All roads lead to Rome! Here are three easy ways to get to your PDF patterns:

    1 - Immediately after you submit your order

    Click the link in the confirmation message to go directly to the Download Page

    Oops! You hit back, closed the window? The link is no longer there? No worries you can still download your patterns:

    2 - Through your Jalie account

    Click "My Downloadable Pattern" under the "My Account" tab or the link at the very bottom of the page to see the list of PDF Patterns linked to your account.
    Drop-Down Menu in the upper-right corner of the screen.
    If you are logged out, you will need to log in to see it.


    Links in the footer section, on all pages of our website. Visible at all times (logged in or not)

    3 - Through your email confirmation

    In your order confirmation (you receive the email within seconds after placing your order), you will see the pattern you purchased with a link next to the file name (in blue). Those links will take you to the download page.

    You may have to enter your login information if you have not been on the Jalie website for a while. Your credentials are the email and password you used at checkout.


    I AM ON THE DOWNLOAD PAGE. WHAT DO I DO NOW?

    The My Downloadable Patterns is where you will find all PDF purchases, grouped by order and listed by date (the most recent purchases first). You can see how many downloads you have left for each file.

    When you click the download button, the PDF will open in your browser. Once it is open, you can print and/or save the file locally to print later.  Once a file is saved to your computer, you can print it as many times as you need to.

    The buttons may be slightly different on your computer / browser.
    You might have to go through the File menu to save or print.

    Another way to save is to right-click on the download button and select "save target as..." or "save linked file as...". This can help if you are downloading a big file like our cycling apparel pattern or men's pants pattern that are scans or the original patterns. 

    Quick and easy way to save the patterns to your computer.
    After saving, locate the files, open and print as many times as needed.


    How to Print and Assemble your Jalie PDF Patterns

    $
    0
    0
    You successfully purchaseddownloaded and opened your Jalie PDF pattern in Adobe Reader or in your browser. You are now ready to print and assemble it.

    1 - PRINT THE TEST PAGE FIRST

    • Locate the page where you see a TEST rectangle. 
    • Print (it can be an icon in your PDF viewer or browser or you might have to go through the File menu to select print) that page only. In the Éléonore Jeans PDF, the TEST rectangle is on page one, so we set the printing range to page 1 only:
    Printing the test page // page range: 1, fit to page NOT selected

    When printing, make sure that:
    • You print at 100% scale. The labels in your dialog window may vary:
      • FIT TO PAGE: NO (or unchecked)
      • PRINT AT ACTUAL SIZE: YES
      • SCALE = 100% 
    • You use a fast printing option, not high quality (to save ink)
    • You print on one side only
    • If your pattern is layered (the information in included in the instructions when they are), hide the layers you do not wish to print, to print your size only.

    2 - MEASURE THE TEST RECTANGLE

    • If the measurements are ok:
      • Go ahead and print all the pages
    • If the rectangle is too big:
      • Change the scale to 99% or 98% until it is the right size
      • Print the other pages
    • If the rectangle is too small:
      • Change the scale to 101% or 102% until it is the right size
      • Print the other pages

    3 - ASSEMBLE THE TILES

    On each page, you will see a border with thick corners. That is the edge of your pattern TILE (which is 7 1/2'' x 10'' in order to print on both Letter and A4 paper).

    Fold one margin and tape the sheet onto the next one, matching marks and pattern lines

    A diagram on one of the first pages shows you how to position each tile.
    • Cut or fold the right margin of each page
    • Tape/glue the tiles together, matching the border lines and corners (to form a little diamond), inside pattern pieces
    • Work row by row, left to right
    • Cut/fold the bottom margin of row 1 and tape it to row 2. Repeat for the other rows
    Trim bottom of row and tape it to the following row

    Once your pattern is assembled, you can trace or cut it. Remember that you can print your PDF sewing pattern as many times as you need, once it is saved to your computer.

    If you reached the download limit because you forgot to save / had trouble downloading / hit the button too many times because of slow connection, do not hesitate to contact us.

    We are always there to help :)

    Happy sewing!

    4 Things to Know about Shipping

    $
    0
    0
    Your favorite retailer does not have the patterns you want on hand? You can order directly from us. We ship worldwide via Letter Mail (postal service) and Parcel services (Canada Post and UPS).

    1 - Always enter your complete address

    If you enter only a partial address, you will not see all options available and the quote might be incorrect.

    Click anywhere on the page after entering the postal code to trigger a refresh of your shipping options

    It is important that you enter not only the country, but also the state/province AND postal code in order for the shipping options to refresh.


    2 - Use gift cards to get free or discounted shipping

    We offer FREE SHIPPING on Canada / US orders $70 or more (international orders get a $20 discount). The thing is... you don't necessarily need 6 paper or PDF patterns that day.

    To get to the $70 total, you can also use gift cards from you to you!

    THREE PATTERNS ($39) + $40 GIFT CARD (to yourself) = ENOUGH FOR THE SHIPPING PROMO!  (you save $14.51 - not bad!)


    If you always buy a gift card for the amount you need to reach a total of $70 you will never pay for shipping again! The gift cards are yours and never expire. Yes, buying a gift card means you "pre-pay" your future orders, but for many people, it is much better than paying for shipping :)

    (By the way, this little trick may work on other websites too...)

    3 - Choose the best shipping option for you

    Here is a break down of the most popular options. Some are faster, some are cheaper...

    Canada Post

    EXPEDITED PARCEL (Canada)
    Pros: Tracking, guaranteed delivery time, usually a bit faster than regular mail
    Cons: More expensive than letter mail

    AIR MAIL (US and International)
    Pros: Reasonable price, 5-10 business days to all major cities, no customs
    Cons: For 1-3 patterns only (500g max), no tracking

    SMALL-PACKET (AIR) (US and International)
    Pros: Usually the cheapest option, up to 2kg (8-14 patterns), 5-10 business days to all major cities
    Cons: No tracking, no insurance (because no delivery confirmation), goes through customs (service fees may apply to collect VAT)

    TRACKED PACKET (USA)
    Pros: Usually the cheapest option, up to 2kg (8-14 patterns), 5-10 business days to all major cities, tracking, insurance
    Cons: More expensive, goes through customs (service fees may apply to collect VAT)

    XPRESSPOST (USA and International)
    Pros: As fast as UPS, tracking, insurance, processing fees at customs may be less than UPS in some countries, no brokerage fees for US shipments
    Cons: More expensive than UPS, still goes through customs (service fees may apply to collect VAT)


    UPS (Canada)
    Pros: As fast as Canada Post, more reliable in some areas. Next-day delivery available for some major cities.
    Cons: More expensive than Canada Post in remote areas

    UPS Standard (USA)
    Pros: Usually a bit faster and cheaper than Canada Post / USPS
    Cons: Brokerage fees on orders valued at $200 or more

    UPS 3-day Select, Expedited, Saver, Express (USA)
    Pros: Suuuuper fast, brokerage fees included, no surprises at delivery
    Cons: More expensive

    UPS Worldwide Expedited, Saver, Express (International)
    Pros: Quick and reliable
    Cons: Ships to less countries than Canada Post, fees will be charged upon delivery (check with UPS in your country to know exactly what they will charge you for brokerage and for paying the VAT on your behalf to clear customs)

    4 - Avoid / minimize fees at delivery

    INTERNATIONAL CUSTOMERS

    UPS may charge brokerage fees and/or disbursement fees that can quickly add up to almost the full value of your pattern order! Before choosing UPS as your shipping option, we strongly recommend you check with them first to see if there is any way to avoid at least the disbursement fee.

    In some countries, the postal service is the cheaper option overall. We never found all the import information for all countries gathered in one place, so Google, your local UPS office and postal service in your country is the best way to go to get that information.

    We know that in France and Germany, the UPS fees are around 30 Euros for brokerage and disbursement. You know about the fees in your country? Please comment below. The more information everyone has, the better!

    SALES TAXES

    We charge GST only to orders shipping to Canada and QST (Quebec Sales Tax) to orders shipping to Quebec.

    Depending on the value of your shipment, you may have to pay local taxes upon delivery (VAT in Europe for example). Some countries waive taxes on imports of smaller value, some others don't.

    Sewing patterns are usually not subject to duty.

    Please comment this post to share any information / experience about delivery by UPS or postal service in your country!


    Jalie 3022 Hack - Tie-Side Shorts by Dawn

    $
    0
    0
    Hi guys! It's Dawn, of Two On, Two Off, doin' a little guest blogging over at the Jalie blog. You knew it would happen eventually. I'm just waiting to get my Canadian citizenship so I can move into Jalie headquarters and be even more of a superfan. If they won't let me live there, I will be that creepy woman around the corner that asks for sugar at your door and then peeks around at the inside of your house. I'm sure they will love that . . .

    Anyhoo, do you ever need some mind-numbing vegging time? On the computer? With Pinterest? I swear that site has caused several remodeling projects and several garments over the years. My husband has grown leary of my glassy-eyed admiration.

    Me: Honey, what do you think about painting our bedroom Whispering Spring?
    Honey Bear: Uh-huh.
    Me: Ooooh, what about Quiet Moments?
    Honey Man: What? Quiet what??
    Me: You know, calm blue shades that will help us unwind. Ooooh, how about Beach Glass?
    Him: *blink, blink*
    Him: Oh crap, are you looking at Pinterest again?

    Well this time I was not looking at paint. Instead I was flipping through the Jalie Inspiration photos. Have you seen those? They have inspiration photos and say, “Use Jalie XXXX and add length to make this summer cardigan.” I stumbled upon the Inspiration – Swimwear category and saw a few side gathered swim bottoms (go look, you know you want to). I knew if I added an inch or two of length, I would have a pair of cute running/summer shorts. So, voila, here you are. I wrote a little tutorial and everything. Aren’t you guys lucky?

    First, you should know what I used for my base pattern. I used Jalie 3022 which is a yoga pants/shorts pattern. The pattern is available in both paper and PDF.
    j_3022 


    Okay, how cute are these shorts?? And really, they'd be cute even without the side detail.
    j_3022_1


    I love the little tie detail on the side!!
    j_3022_4


    j_3022_2

    j_3022_5

    j_3022_6


    And, as promised a little tutorial for you! Toot! Toot!!
    j_3022_3


    Trace off your normal size for all the pieces, one front, two back pieces, two waistband pieces, and a waistband facing. Once you are done, add an EXTRA 1/2” seam allowance to the SIDE SEAMS of the front and back pieces. Be sure to transfer your notch marks to the new side seams. Don’t do anything to any other seams.
    j_3022_8


    j_3022_7


    Cut out your fabric and sew the front and back together like this. You will be tempted to go ahead and sew your side seams too, DON’T.
    j_3022_9


    Sew your inseam. I always serge this and do an extra zigzag there just to provide some secondary clothing malfunction safety. Eep! While you are at it, hem your shorts. Your side seams are still not sewn.
    j_3022_10
    j_3022_11


    NOW, you can sew your side seams, but DON’T SERGE THEM! REMEMBER you are sewing this at 3/4” seam allowance!!! Your original seam allowance was 1/4” and you added another 1/2” allowance! You want a straight stitch. Yes, I know these are knit. You can either stretch the fabric while you sew (like I did) or use the lightening stitch. You want those seam allowances to lie flat when you are done!
    j_3022_12


    Now, press those seam allowance open and sew them down. This creates a casing for your ties. I go from the inside and make sure my bobbin thread matches the outside. I used gray in the bobbin for my pair.
    j_3022_13


    Here’s your hem.
    j_3022_14


    This is what it looks like from the right side.
    j_3022_15


    Make some knit tubes and thread them through your casings.
    j_3022_16


    You want a little extra tube to stick out the top where you will attach it to the waistband.
    j_3022_17


    Sew the waistband together and attach it like normal to the top of the shorts. When you sew this at the side seams, this will close the casing and secure the ties in the waistband seam.
    j_3022_18


    From the inside. Yes, I use varigated thread in my serger loopers. :)
    j_3022_19


    From the outside.
    j_3022_20


    BOOM!
    j_3022_6

    Mini-Catalog

    $
    0
    0
    We recently shared this mini-catalog on our Facebook page and it was a big hit. I thought it might be a good idea to post it here so everyone can flip through the pages.

    To save the catalog in PDF format that you can view offline, click the OPEN button. You will see an option to save as PDF:

    Also, we linked every photo to it's pattern page on the website to make your shopping faster and easier. We will include a printed copy of this mini-catalog with every shipment too so you can share it with sewing friends, coaches or keep in your sewing room for inspiration :)


    How to Color Block a Leotard

    $
    0
    0
    Last year you bought a gymnastics leotard pattern with classic, plain front for your daughter. Like easy-to-make 3138. However, this season, after browsing on Pinterest for a little too long, she found THE leotard. The style every cool kid at the gym is begging their mom to buy (or make). A beautiful two-tone leo with a bright, oddly-shaped appliqué between the two colours.


    You look online but obviously cannot find a pattern with the exact same cut your daughter has been dreaming about. The solution? Draw on your pattern and cut!

    Yes. You can do it.

    It is actually much easier than it sounds. You will not have to buy another pattern or a RTW leotard!

    Mel Henry from Filles à Maman (who is also a Super Mom to a stylish teen) shows you how to do that. A step by step color-blocking tutorial, with lots of beautiful photos. Take a look, find your craziest fabrics to mix and match and have fun!


    CHARLIE - The Clever Bomber Jacket Pattern

    $
    0
    0

    Jalie needed a new jacket pattern. Something that would work for all our sizes. A bomber jacket was the obvious choice since we see them everywhere, from hip kids stores to classy women's wear collections.

    Boucle knit with black ribbing over a dress made
    with ballet leotard pattern 3349 (we cut just above the leg opening and lengthened!)

    Say hello to Charlie, our bomber jacket pattern designed for girls and women but that makes the cutest jacket for boys too!

    Henri loves his Charlie jacket made of three different sweatshirt fleece!
    Black front, charcoal grey back, heathered grey sleeves with striped ponte collar, cuffs and band.

    To Line or Not to Line? 

    Lining makes drafting so easy. No need to worry about how the pockets look inside, no need to figure out how to get a clean finish where the zipper meets the collar. At the beginning we were leaning towards the lined jacket idea...

    However, for a knit jacket, you need a knit lining, which can be difficult to find with the right stretch and recovery. A lining that stretches too much can be a nightmare. Minus one for lining.
    Jacket made with quilted knit front and back, striped jersey collar, cuffs, hem bands and pockets and stretch pleather sleeves. Worn over our 3245 racerback tank in a Art Gallery printed jersey knit

    Furthermore, there are many knits with a super soft back (like this fleece from l'Oiseau that simply cannot be covered with a lining!). When wearing the jacket over a tank or t-shirt you don't want to touch a cold lining...  When putting on the jacket to get back from the gym, you would not want a silky lining sticking to your arms either.

    So that was it: no lining!

    More work for Jeanne, less fabric to buy for you. The drafting challenge was ON!

    We know some of you will want a lined jacket for a cleaner finish inside. Don't worry, it's easier than you think! Go to the Filles à Maman's blog where Mel not only lined the Charlie, but also made it REVERSIBLE. Her post features the cutest printed sweatshirt fleece from l'Oiseau Fabrics too!


    We wanted to avoid what I like to call "mitt pockets"... you know, when you unzip your jacket but cannot really put your hands in your pockets because they stick out like mittens? Taking the pocket in the seam allowance in the front or at the bottom made corners that were too thick... So Jeanne came up with a fun, "rainbow" pocket.

    Charlie Jacket prototype in our smallest size - We used stretch twill / denim for front, back and pockets, fleece for the sleeves and ponts for the cuffs, collar and hem band.
    The whole pocket is made with one piece of fabric (welt, facing and the pocket back itself)! No tiny piece to fiddle with, no "mitt pockets"! For best results, pick a fabric that you can press too, your welt will look better ;)

    A picture is worth a thousand words

    Look at this perfect pocket welt (a photo Mel took just before topstitching):

    Pocket welt close up - More photos on the Filles à Maman blog

    Fabric and Notions

    Making a jacket requires a few more things than a t-shirt. To make the Charlie Bomber Jacket, you will need:


    Main Fabric
    • Stable knit is super easy to work with and is quite easy to find in fabric stores. Look for scuba, double knit, sweater knit, beefy knits, sweatshirt fleece that do not have toooo much stretch (if you want a jacket with some structure of course).
    • If you use contrast fabric for the back, it will show a bit in the front because of the forward shoulder seam. It becomes a fun element that allows you to finish some fabric remnants that are too short for a front+back!
    • Make sure your sleeve fabric is comfortable, especially for kiddos. Mine prefer sweatshirt fleece to "cold knits" like polyester knits. This jacket is the perfect pattern to up-cycle an old pair of sweatpants (or buy sweatpants or a sweatshirt in plus sizes at a department store and you get super-soft fleece for your jacket sleeves AND matching ribbing!!!) I love the pleather look, but not all pleathers were created equal! Make sure it is nice and soft. You don't want cardboard sleeves!
    • For the front, have fun with a statement fabric! 
    • For kids, we did make it a few times using stretch woven. It works for adults too, but might require alterations if you usually do full-bust adjustment.


    Cuffs, hem band and collar
    • Ribbing is what works best (especially for the collar, ribbing "opens up" and stays closer to the neck).
    • If you cannot find ribbing in local fabric stores and don't want to buy it online,  you can use a knit with some weight to it and good stretch across the grain like ponte or a medium weight jersey knit. 
    Zipper
    Molded plastic zipper with metallic finish
    • In a perfect world, zippers would come in 1/4'' (6mm) increments. They don't. Since we cannot grade our jackets to have 2'' (5 cm) increments in length you will have to cut your zipper (or shorten your pattern a bit, or cheat and leave a space at the top or bottom).
    • If you want your zipper to start and end where it is supposed to, you will need zipper stops (and pliers to remove zipper teeth). 
    • Zipper stops are super cheap so go ahead a buy a pack and you will be equipped to fix/shorten any zippers in your sewing career :) (this includes replacing broken zipper pull on jackets - I'm sharing this because it saved me so much time when Éléonore came home with a broken zip pull and I didn't want to replace the zipper on it!)
    • Metal zipper cannot be shortened. If you like the look of metal and don't want to alter your pattern, look for plastic zippers in metallic color like the metaluxe zipper from YKK


    Iron-On Patches
    • A low-cost solution to add fun and personality to a jacket. Save on the fabric (go with a versatile lower-cost solid knit you will have other uses for) and let your child pick his/her favorite iron-on patches! You can find cool iron-patches in some craft stores but it is online that you will have the best selection (at reasonable prices too!)
    Tons of patches available on eBay!


    Who is Charlie? 


    I've always loved the sky and anything that flies, especially big noisy planes. When Top Gun came out in 1986, I HAD to see it!

    110 minutes of fighter jets, perms and aviator looks... dubbed in French. An instant classic! I was hooked and dreamed to be as cool as Charlie when I grew up. I wanted to be an astrophysicist and civilian Top Gun instructor, nothing less! Today I have the big curly hair and sported the side-part bob a few years during high school, but I didn't turn out to be a pilot or an astrophysicist :)

    However, I have everything I need to pull off her jacket + pencil skirt look! Charlie is the perfect name for this jacket and on top of that it's a unisex name, suiting for this pattern that works for boys too!

    (Hmmm... I wonder if I could use the footed PJ pattern and these perfect iron-on patches to make Frédéric a Maverick jumpsuit to match my Charlie outfit for Halloween...) :)


    Ready to sew?

    • Grab your sewing pattern in paper or PDF format (the pattern is layered so you can print one size at a time and also include a copy shop version)
    • Take a look at our inspiration board to get some ideas for fabric shopping!


    SaveSave

    VANESSA Fluid Pants - Comfy Trousers That are Not Leggings or Yoga Pants

    $
    0
    0

    Fluid Pants? You Mean Joggers, Right?

    Joggers are everywhere! I love the look of the modern joggers... but only on my kids or on other people. Each and every time I try a pair on, they are too tight at the calf so everything looks like leggings with a baggy crotch. Not flattering. At all.

    I did not want to give up on the idea so we started making joggers prototypes. There was nothing that would fit me in ready-to-wear and I assumed I was not the only one in this situation. The new pants would have to be comfortable but flattering. The Justin Bieber drop-crotch-pants look does not work for me.

    The Fabric

    The perfect jogger fabric is not too thick, not too thin, not see through, not a "cellulite-enhancer"... After so many tries with various fibres, I gave up. It's official. The perfect jogger fabric (at least one that would meet all my criteria) is the unicorn of fabrics. It does not exist.

    Still. I was determined to have pants with an elastic waist and that doesn't scream I'm wearing PJ's on the street. We looked in our stash and found some challis. Rayon challis is what I like to call the "naked" fabric. It is opaque but not stiff, it flows, drapes beautifully and is cool to the touch. It was love at first try! The fluid pants pattern was born.  Something as comfortable as joggers, but a bit dressier. In the right fabric and shoes, you could easily wear these on a date or at the office!

    Because our prototype had a little more ease at the calf (my #1 requirement), using a woven fabric did not pose any problem. If you find your perfect jogger knit, it will work too, no worries! You can go a size down if you want the more fitted jogger look in a stretchy fabric. If you have slim calves, go ahead and make the pants even more tapered! It's always easier to take in than to let out!

    Picky Éléonore approved the rayon challis and tencel. She would wear her Vanessa pants with 3245 tank tops. It quickly became her favorite "after swim class" outfit. You know... when you want something long to cover your leg, but nothing clingy. When it's hot outside but don't feel like wearing shorts or a maxi dress...

    Henri being a fan of pull-on pants, we had him try our size M in a camo baby corduroy and medium weight twill.  We even put shirting fabric to the test. It worked! He was happy with how comfortable the pants were and I was happy he was out of sweatpants :) The elasticized cuff was a perfect fit with his high top sneakers too!

    The pattern is designed for women/girls, but they style works for boys too. For men, a longer, slimmer leg would be very easy to do. Simply hide the pattern cover, pretend you found a new pull-on pants pattern for men and you're good to go!

    I also put the pants to the test on the other side of the planet. They are the perfect travel pants and I enjoyed wearing them during the 21-hour flight and when dealing with the A/C-to-tropics temperature changes. The busy print was very forgiving too. Challis does wrinkle... The print somehow camouflages that a bit.

    The Pattern

    Tencel prototype: a bit too long and to wide above the cuff.
    But I love them anyway :)

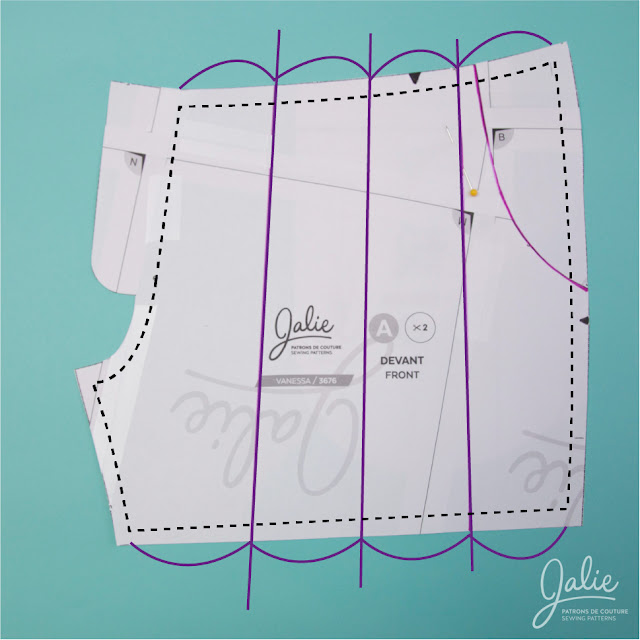
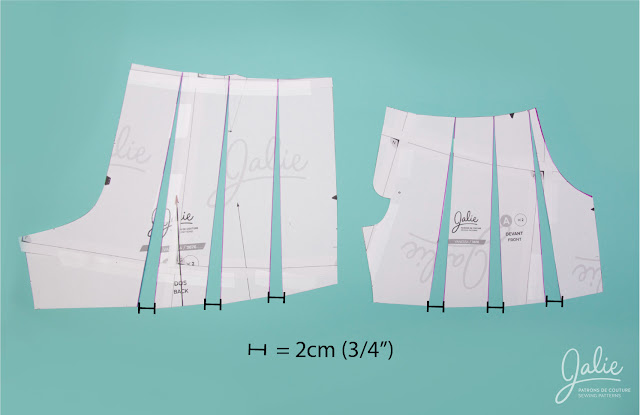
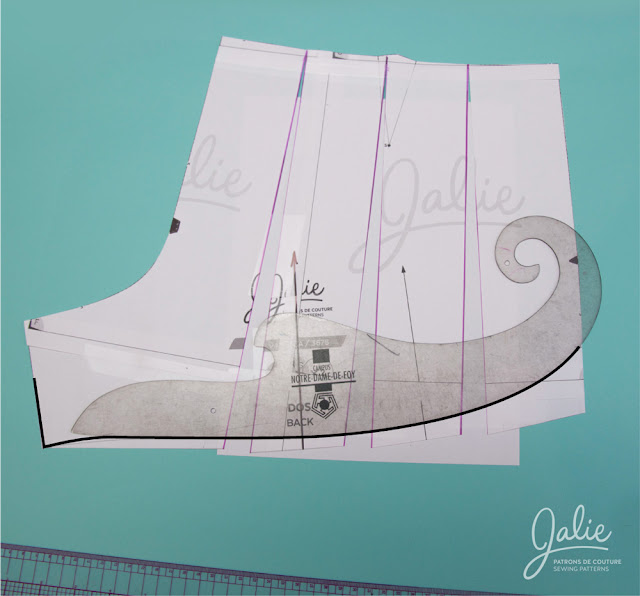
    We tweaked the pattern so there was enough ease for comfort but did not look like a potato sack because of the elastic waist.

    Jeanne and I are pear shaped and usually dislike anything tapered or gathered at the waist. We adjusted the ease and lines until we both felt fabulous in the pants! Darts in the back reduce the amount of gathers.

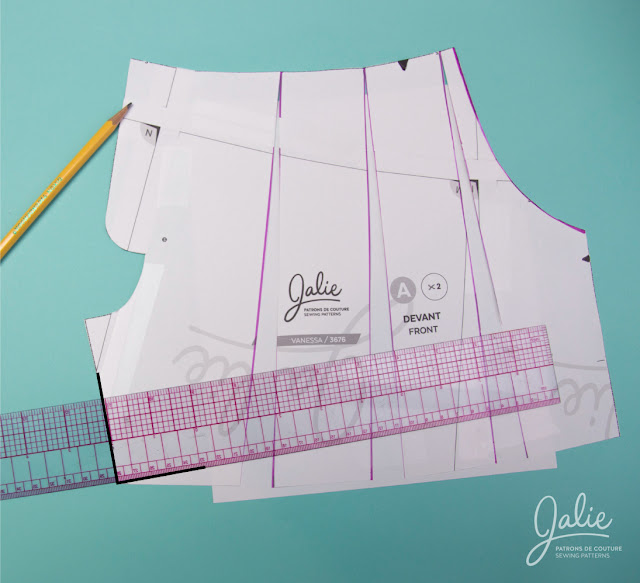
    We decided to add an inset at center front to give the waistband a little je-ne-sais-quoi and also reduce the gathers in the front too. It allows for fun color blocking and it is also very useful for grommets installation. If you want a soft, lightweight fabric for the waistband, you can make your live much easier using a heavier fabric for the inset only (buttonholes on sheer fabric? No thank you!). Also, if you mess up the installation, you do not ruin the entire waistband, only a tiny bit of fabric ;)

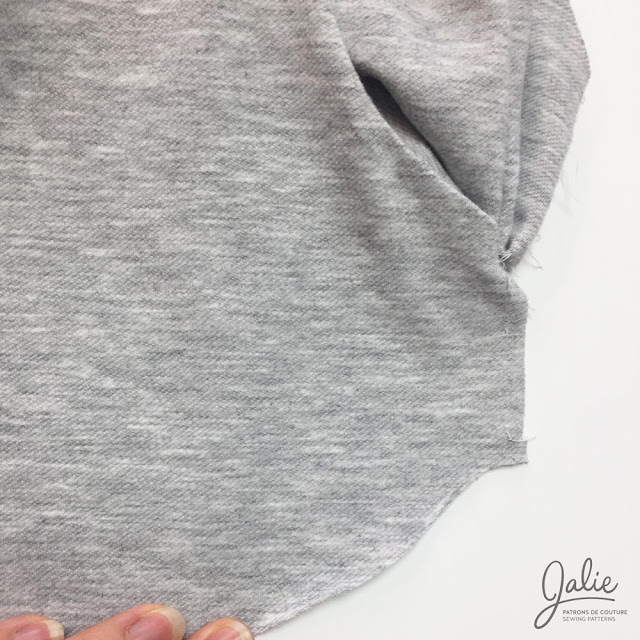
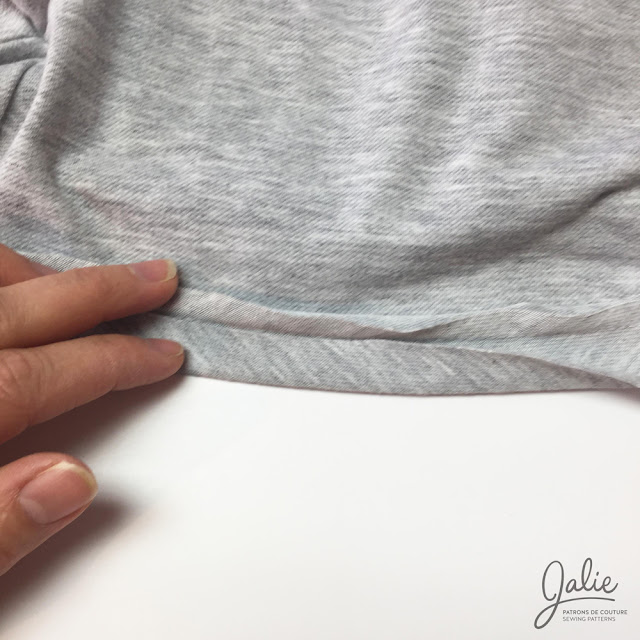
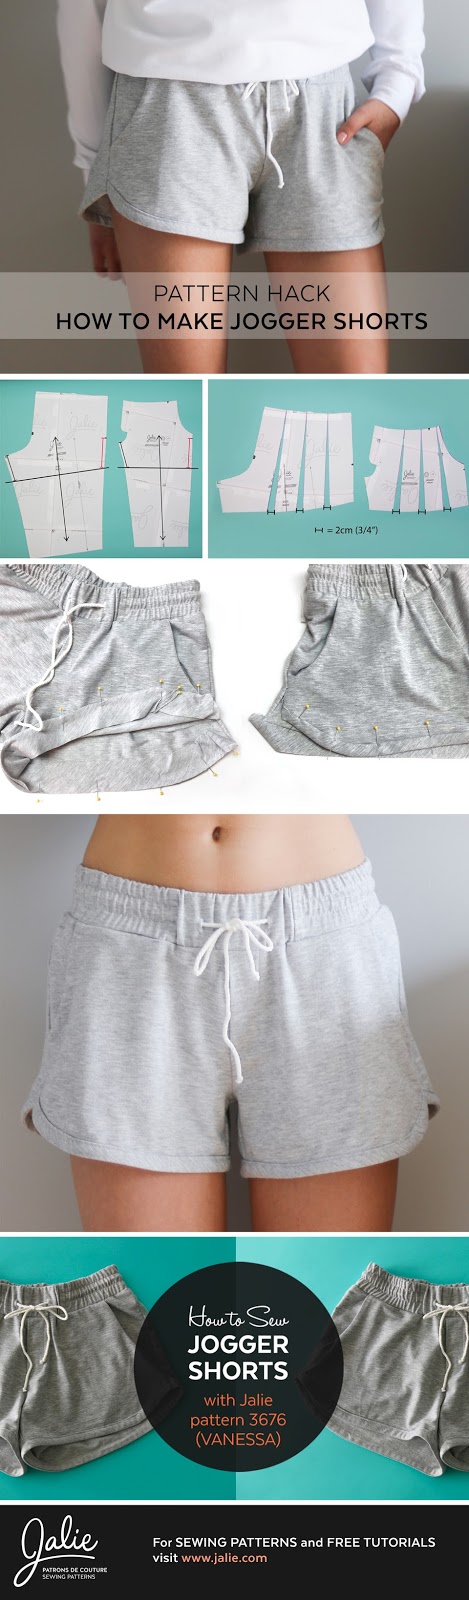
    You can hem the pants (ankle length) or add a cuff (long pants). You might wonder why we did not include a shorts version. Yes, you could cut these pants at any length, but we have a little pattern hack post coming up. I think those of you looking for stylish shorts for the summer will enjoy it. Stay tuned! You can find the Vanessa pattern on our website. It is available in both paper and PDF (tiled and copy shop formats).

    The Story Behind the Name

    Mini Jeanne, 4 years old
    One of Jeanne's lifelong dream was to learn to play piano. Because she grew up in a very humble household with 9 siblings, the idea of buying a piano or taking private lessons was unthinkable.

    For her 60's birthday, she decided to realize that dream. She bought a piano and starting looking for a teacher who would teach her at home.

    She found M Piano online, a small piano school offering that service. She talked to someone over the phone and had a good feeling. When Jeanne opened the door and saw her teacher, it instantly clicked.

    The very bubbly Jeanne had met her match: Vanessa!


    Vanessa convinced Jeanne to perform at the annual concert
    with Henri.  She was the only adult student brave enough to do it! 
    Vanessa has been teaching Jeanne for two years now. Every week, the notes blend with laughter during the whole lesson and Jeanne often has a prototype for Vanessa to try after the hour of piano flies by.

    It's nice to see Vanessa feeling fabulous in her new clothes. At the same time, Jeanne's is proud of her achievements, her heart is filled with music AND we get review / approval of each design in size FF.

    Vanessa is the PERFECT fit model. She knows what she wants, gives us her honest and constructive opinion about each design. The perfect win-win, sewing-music relationship! It was beautiful to see Vanessa bloom during those two years. Having clothes that fit, things designed for her, wearing fabrics / prints / colors that she would not dare to wear before she met Jeanne literally transformed her and boosted her self-confidence.


    Guess which piece of the 
    latest collection is Vanessa's favorite?
    Yep! The Vanessa Fluid Pants... or joggers :)
    To our great surprise, the very reserved and shy Vanessa said yes when we asked her to be our model. She nailed the photo shoots and everybody was super happy to see her in our promo photos that I shared in our Facebook group this spring. Our sizing is super inclusive and our photos now better reflect that reality.

    We hope you like this latest pants pattern as much as we do. Join other Jalie fans on Facebook to discuss fit and fabric choice and don't forget to post photos of your creations on our website!

    We look forward to seeing your versions of the comfiest pants ever :)

    You can find styling and fabric inspiration on our Pinterest board:

    SaveSave
    SaveSave

    The Perfect Gift for New Moms

    $
    0
    0
    There is no better than Mother's Day to introduce our new official collaborator: Mélanie, the mother behind the lovely Filles à Maman patterns (which translates to "mommy's girls"). You might have already read the Reversible Charlie Tutorial and How to color block a leotard on her blog. Here is her first post on the Jalie blog: 

    First off, I would like to share some info about me :) My name is Mélanie but people in the online world know me as Mel Henry. There is one man and three girls (5, 5 and 12) in my life. My family is my everything, but sewing has been a great part of my life, since I am very young. I am super happy and grateful that Jeanne and Émilie, the talented "Ja" and "Lie", gave me the chance to share my creative world, ideas and creations with you. Yay!

    For Mother's Day, we are treating a new mom and her little girl to a cute Jalie gift

    Gift for Mom

     JALIE 3132The starting point for this project was the Jalie 3132 top with nursing option. This pattern is a versatile nursing top that includes different neckline, length and style variations:
    • Cap or 3/4 sleeve
    • Hood or V neck
    • Optional kangaroo pocket
    • T-shirt or tunique length
    What is great about this pattern is that in includes a non-nursing version as well. This means that you can use the pattern for yourself if you are making a nursing top as a gift or you can make your own nursing top and keep the pattern to make yourself t-shirts or tunics years later, when you are no longer nursing. Don't worry if you change size along the way, we got you covered with 17 sizes in the same pattern, from 31'' to 50'' full bust!

    Karine, the new mom we are making this for, is a modern young lady who likes classic, modern and comfortable pieces. We had the perfect off-white jersey with thin stripes in our fabric stash for the top!

    The Joys of Learning Flat Lay Photography
    Picture me holding the tripod with the camera attached to it, standing on a wobbly chair, with my 5 year-olds taking turns at pushing the button on the remote control when I say "GO"! Quite a setup! The lengths we go to so we have beautiful photos for Jalie fans! It's funny how it looks so quiet and simple on the photo. In real life it's a little... hmmm... complicated and hectic :) An epic moment for mommy and her little ones!

    Nursing Top Jalie 3132 with matching bodysuit Jalie 3133

    Gifts for the Baby

    https://jalie.com/jalie3133-baby-bodysuit-sewing-patternOf course, we had to include something for the cute little Romy! She was born three weeks ago, but since new moms are usually well-stashed in newborn size items, we decided to go with the super-useful 6-month size.

    We used pattern 3133. The pattern includes 9 sizes, which cover weighs from 5 to 30 lbs. It includes various styles and options, and works for both boys and girls:
    • Tank style
    • Short sleeve (regular or puff)
    • Long sleeve (regular or puff)
    • Round or boat neck
    • Appliqués (frill or tie)
    We had some of the striped jersey left so we decided to go with a "matching outfit" idea. I picked a coral rib knit for the bindings that created a fun, lively color element to the bodysuit.

    For a short sleeve bodysuit (view A), I picked a darker floral print cotton spandex with nice stretch and recovery that caught my eye, and used the striped jersey for the the bindings. Modern, comfortable pieces for mademoiselle.

    Jalie 3133 tank bodysuit - (View C)
    Baby Onesie Pattern Jalie 3133 - Tank Style (C) Short-Sleeved Crew Neck (A)

    I would have loved to have these two patterns when I gave birth to my daughters! At 5' 10'', everything that was available in stores back then was too short and I was never happy with the fabrics or the styles. With the 3132 pattern, my closet would have been packed with stylish nursing tops with a perfect fit!

    Same thing for bodysuits. They require so little fabric and sew up so quickly that I would have made tons with fabric scraps.

    Émilie told me that these two patterns were drafted when Éléonore was born. She also disliked the styles off the rack with the too-many-layers or the maze-like designs.

    Éléonore was tiny and most available bodysuits in stores were ill-fitting. They were also often pastel coloured, which washed her out. Jeanne made this pattern for her so she could have custom-made onesies in fabrics that made her dark eyes pop.

    With this pattern you can make great baby shower gifts for years to come!
    Jalie 3133 Bodysuits

    Now, it's time for my gift to you. When picking gifts, I often go for things that I would love to receive myself and, what I would love for Mother's Day, is some sewing time. Here are printable coupons you can use for well-deserved Jalie time. Your loved ones will be grateful for this last-minute gift idea :)


    Happy sewing,

    Mel xoxo 


    Vanessa Jogger Shorts // Pattern Hack (Jalie 3676)

    $
    0
    0

    You own (or are eying) the Vanessa Fluid Pants pattern and think "pants can wait, it will be summer soon (at least in Canada)"? We've got news for you! After reading this hack you will be able to wear this pattern year round as you will have anything you need to make great pants AND stylish, comfortable shorts!


    First off, sizing. I go back to the Jalie Measurement Chart each time I make a garment, even if I made something the week before. Our measurements change all the time and my kids sizes change even more quickly.

    Juju's measurements (as of today) are 28" waist, 37 1/2'' hips. Her waist corresponds to size S and  hips are between sizes S and T. The hips measurements is the most important when picking a size for pants.

    I would normally go with size T, but I will use S for this project because:

    • Today's hack will add ease 
    • I will use a knit that stretches across the grain


    Pattern Preparation

    1. Print / Trace the pattern (I am using the PDF pattern for this hack - the pattern is also available in paper (printed) format.

      If you are using the PDF format, remember that you can print one size at a time! Take a look at our tutorial How to print and assemble a PDF if you are not familiar with downloadable patterns and want to learn more about them.

    2. Cut the pattern pieces making sure all marking and notches are visible. They are very important and will make assembly much easier.

      In the following picture, I cut the notches flush with the cut line and trace the triangles inside. I usually clip the fabric instead of cutting the outward triangles that you see on the original pattern. However, I strongly recommend you keep the triangles outside, as you see them on the pattern, especially if you are working with a fabric that frays. This way you will make sure you can all see them.

    3. Measure approximately 4'' (10 cm) inseam (black line) on the front and back pieces.
    4. Measure approximately 5'' (12,5 cm) below the side seam notch (red line) on front and back pieces. 
    5. Trace from inseam to side seam to create a "temporary hem line". 


    Pattern Alteration

    Back Piece

    1. Cut or retrace your new short pieces.
    2. Draw the seam allowances (1 cm / 3/8'') from edge to visualize the actual seam lines.
    3. Divide in 4 sections, with lines parallel to center back
                  

    Front Piece

    1. Place the pocket bottom (D) piece under the front piece, lining up notches, to see the complete front waist and divide into fourths as shown.

    Let's Have Fun! 


    1. Cut along the lines, leaving the top attached. Fan out to add about 2 cm (3/4'') between each section. If you want more ease, open up a little more. You can go up to 5 cm (2'') for a "culotte" look.


    2. Place a sheet of paper under your pattern and tape the sections in place.
    3. Trace a new hem line, square or curved, as you feel it. Follow your inspiration!
      You can see here that the dart is cut. I moved the point towards to the left to align it with the  "opening"

    4. On your front piece, start a line, square with your inseam.


    5. Use the front piece as a template for the back hem curve . When putting the pieces one on top of the other, always align the notches to keep everything straight and in this case, make sure you have identical side seams lengths.


    6. Cut your front hem along the line.


    7. Now it is important to check the pocket placement because you don't want pockets sticking out at the bottom! You simply have to lay the pocket and pocket facing pieces on top of the front piece and trim them if you need to. We decided to remove about 1'' (2,5 cm) since our pockets will be made of knit and therefore stretch downwards a little when Juju puts her hand in them.


    8. Trim the pocket (D) and pocket facing (C)


    Time to Sew

    1. Cut 1 1/2'' (4 cm) wide strips on the bias (45 degree angle with selvage) for the shorts binding. 
    2. Overlap ends as shown and stitch at 45 degrees (diagonal). 
    3. Trim the seam allowance to 1/4'' (6 mm).


    4. Press seam allowances open. 
    5. Assemble the shorts, following the pattern instructions (you can read them on the Jalie website before buying your pattern!), but leave a section of the side seam open.


    6. Pin right side of bias to wrong side of shorts and stitch 1/4'' (6 mm) from edge.


    7. Bring the seam allowance upwards, on right side of shorts. 
    8. Fold bias wrong sides together, by 1/2'' (1,25 cm), its raw edge against the seam.


    9. Fold bias again onto the right side of the shorts.
    10. Pin binding generously.


    11. Topstitch binding 1/8'' (3 mm) from top edge.


    12. Finish the side seam (right sides together).
       
    TERMINÉ!


    Finished shorts - wrong side out


    How to wear them?

    Wear your new shorts with a Pika Tank 3679, a french terry sweatshirt 3355 or a sleeveless 2805!


    Here is a Pinterest inspiration board with fabric, color and outfit ideas for your Vanessa shorts:


    You like this tutorial? 

    Pin the Pinterest-friendly image to one of your Pinterest board!


    EnregistrerEnregistrer
    SaveSave

    MARIE-CLAUDE - Because One Raglan is Not Enough

    $
    0
    0

    As most of you know, our 3245 raglan top is very popular and you probably have it in your pattern stash already. Over the last years, many people have been asking how to raise the neckline over the years. It's not impossible to do... but it's not a fun alteration so we decided to rake care of it :)

    It was 100% clear that we would not to create an "add-on" package or do a copy/paste of the previous pattern. We started from scratch and kept one word in mind: versatility!


    The Pattern

    The new MARIE-CLAUDE (dear francophiles, you can listen to the pronounciation here) includes, a draping turtleneck, a hood (with an optional hole for the ponytail), a regular neck band. You have the choice between a regular cuff or a fun cuff with thumbholes.

    This top is great for lounging, running, as a thermal layer. It is a top that you feel comfortable in, no matter what you are doing :) The curved hem provides a little more coverage without "cutting your silhouette in half".

    It is less fitted than our Valerie Rashguard pattern. It skims the body without clinging. There is some ease in the sleeve, without having fabric bunching under the arm (which is often the case in loser-fitting raglan tops).

    Hacks and Inspiration

    For last year holidays, I lengthened the top and turned it into a lovely polka dot raglan dress. I used a oh-so-soft hacci knit and wore it over tights. Sorry... I forgot to take photos :/ 

    I would love to try turning it into a sleeveless or cold-shoulder top this summer! I can't wait to see what people share in the Gallery!


    Here is a Pinterest Board with ideas for fabric, color and styling:


    Who is Marie-Claude?

    Henri changed school two years ago and this past Christmas, he told be he would love to see his physical education teacher from his old school because he missed her too much.

    I managed to get in touch with her and she surprised him at his tennis class. He was delighted to spend an hour with her to chit chat and I was very grateful that she took the time to come see him. A generous and kind gesture that we will both remember forever!

    Miss Marie-Claude is a wonderful teacher who always goes the extra mile to make her students happy and enjoy sports as much as she does. This pattern is my way to thank her for making a difference in Henri's life :)


    After our long chat filled with fun memories of the two years Henri spent with her, I thought her name would be the perfect pick for a versatile pattern for women who love to move. From running top to thermal underwear for skiing on Quebec hills, this pattern has got you covered!


    A Special Prototype... 


    Last summer, we spent a week at Village Vacances Petit-Saguenay (VIVA) (a wonderful all-inclusive camping in Saguenay - think Club Med along a Fjord... out of this world!), my little gymnast did a cartwheel in the grass and broke her arm.

    Long story short, what should have been the worst summer-vacation-scenario turned out to be the most amazing customer service I ever experienced. The staff when above and beyond to make sure everything would go as smoothly as possible for everyone in the family. The VIVA team blew us away with their humanity.

    A great team of fun people with big hearts! 

    Bidule's Lucky Towel
    The first thing Éléonore asked for when she woke up at the hospital was "mommy, can you pass me the lucky towel my new friend gave me yesterday?". I reached for the beach towel an animator gave her the night before and broke into tears when I saw, written with a Sharpie, "BE BRAVE, I AM THINKING OF YOU,  Bidule ". A totally unexpected, generous and thoughtful gesture that made a big difference for my little one.

    What does this have to do with the raglan pattern!??!

    When Éléonore saw her arm all wrapped up, she started crying. Not because she had a cast that would keep her from biking and swimming all summer, but because they had to cut off her favorite raglan tee.

    I had kept the cut-off sleeve the doctor gave me and I turned it into a pirate hat for "Pin-Pin" to make her smile! Needless to say that we will keep this one-sleeved raglan tee in our memory box for a while :)


    She did not want to drive back to Quebec City. She wanted to go straight back to VIVA for the remaining two days we had originally booked. "Mommy, our group has not found the Marshmallow Tree yet!". We stayed until the end of the week, sa planned.

    She found the tree, everyone was happy :)

    Yes. The place was THAT magical.


    SaveSave
    Viewing all 110 articles
    Browse latest View live